Category Archives: Chocolate

Mint Brownies

December 17, 2010

My mom loves mint brownies. And for a long time I’d promised her I’d make some. So last week when my family (the condensed version) came down to attend my graduation, I baked these. It turns out we all love mint brownies. Even Dustin, who thinks that the brownie shouldn’t be messed with. He gets uneasy whenever he hears I’m putting a new twist on something traditional. But the boy couldn’t stop eating these. (Victory!) Maybe it was the fudgy brownie base, or perhaps the thin layer of mint filling. Or was it the rich chocolate topping? Probably the irresistible combination of all three.

I was a little bit concerned about how much butter went into these brownies. It’s probably why they’re so awesome. Two sticks here, another two there. What’s a little butter over the holidays, right? Just make sure you’ve got someone to share these with. (And the recipe could easily be reduced by half, or less.)

Mint Brownies

INGREDIENTS

Brownie Batter:
1 cup (2 sticks) unsalted butter, melted
1/2 cup unsweetened cocoa powder
2 cups sugar
4 eggs, whisked
1 tsp. pure vanilla extract
1/2 tsp. salt
1 1/2 cups sifted all-purpose flour

Mint Frosting:
1/2 cup (1 stick) unsalted butter, softened
2 Tbsp. milk
2 cups powdered sugar
1 tsp. peppermint extract
green food coloring (optional)

Chocolate Topping:
1/2 cup (1 stick) unsalted butter
1 1/2 cups semi-sweet chocolate chips

DIRECTIONS

1. Preheat oven to 350 F. Lightly grease a 9×13 baking pan with cooking spray.

2. To make the brownie batter, in a large bowl, whisk to combine melted butter and cocoa powder. Add the sugar, eggs, vanilla, and salt and mix well. Stir in the flour, mixing until just combined. Pour into the prepared baking dish. Bake in preheated oven for about 20 minutes, until set in the center. Cool slightly before placing in the freezer for 20 minutes.

3. To prepare the mint frosting, combine all ingredients in a medium bowl. Mix with electric beaters on medium speed until fluffy. Spread over brownies and return pan to freezer for 20 more minutes.

4. To prepare the chocolate topping, melt butter and chocolate together in a glass bowl (on the stove or in the microwave). Drizzle over brownies and spread into an even layer with a spatula. Place in the freezer or refrigerator until set.

Fills a 9×13 pan.

(Adapted from Make it Do)

White Chocolate, Cranberry, and Macadamia Nut Cookies

January 6, 2010

Today is A Hint of Honey’s first Birthday! We made through a full year! I meant to celebrate today with cake, but the cake I baked didn’t turn out as grand as I’d hoped. I made a towering-tall red velvet cake. It was pretty with fluffy white frosting and a deep scarlet middle. It tasted much like I imagined red velvet cake would (it was my first try), but I just wasn’t thrilled with the result. It seemed a little dry and the frosting wasn’t the perfect match. Maybe it was the recipe, probably it was me. Anyhow, today we’ll be without a birthday cake. So instead, I have a different treat to share with you: white chocolate, cranberry, and macadamia nut cookies. Still worth celebrating! I feel obliged to make some soft of birthday speech. A toast to a full year of memorable meals, delectable desserts, mounds of dishes, and millions of messes. To food-spattered cookbooks (and computers and cameras), frustrating photo shoots, and friends and family who shared it all with me. To Dustin, for his patience and encouragement. To my readers, for making this so much fun! Happy 1!

White Chocolate, Cranberry, and Macadamia Nut Cookies

INGREDIENTS

3 cups all-purpose flour
1 tsp. baking soda
3/4 tsp. salt
1 cup (2 sticks) unsalted butter, room temperature
1 cup (packed) brown sugar
1/2 cup sugar
2 large eggs
1 Tbsp. vanilla extract
1 1/2 cups dried cranberries
1 1/2 cups white chocolate chips, coarsely chopped
1 cup salted macadamia nuts, coarsely chopped

DIRECTIONS

1. Preheat oven to 350 F. Lightly grease or line two large baking sheets.

2. Using an electric mixer, beat butter in a large bowl until fluffy. Add sugars and beat until blended. Beat in the eggs, one at a time, and then the vanilla.

3. In a medium bowl, sift together the flour, baking soda, and salt. Add to the wet ingredients and beat until just blended. Stir in the chocolate, cranberries, and macadamia nuts with a spatula.

4. Drop by tablespoonfuls onto the prepared baking sheets. Baked in preheated oven for 10-12 minutes until lightly golden. Cool on a wire rack. Can be stored in an airtight container at room temperature or frozen for several weeks.

Makes 48 cookies.

(Adapted from Bon Appetit)

Disappearing Marshmallow Brownies

October 6, 2009

This is one of those recipes I grew up on. I had forgotten how much I loved these magical brownies. The combination of butterscotch, marshmallow, chocolate, and walnuts is delightful! The marshmallows really do “disappear” into thin air, leaving remnant puffy little craters. These brownies are meant to be gooey in the middle. They’ll leave you with fudgy fingers and a sweet sticky smile!

Disappearing Marshmallow Brownies

INGREDIENTS

1 cup butterscotch chips
1/2 cup butter
2/3 cup brown sugar
1 tsp. vanilla
1/2 tsp. salt
2 eggs, lightly whisked
1 1/2 cups all-purpose flour
2 tsp. baking powder
2 cups mini marshmallows
2 cups semisweet chocolate chips
1/2 cup walnuts, chopped

DIRECTIONS

1. Preheat oven to 350 F.

2. Melt butter and butterscotch chips in a large saucepan over medium heat, stirring constantly. Remove from heat and cool slightly.

3.. Stir in brown sugar, egg, and vanilla. Mix well. Add flour, salt, and baking powder. Stir until well incorporated.

4.. Fold in the marshmallows, chocolate chips, and nuts until just combined (at this point the batter should still be warm enough to melt some of the chocolate chips but not so hot as to melt all of the marshmallows). Pour into a greased 9×13 baking dish.

5. Bake in preheated oven for 25-30 minutes. DO NOT OVERBAKE. The center will still jiggle but will firm up when cool. Remove from the oven and cool completely before cutting into squares.

Makes a 9×13 pan of brownies.

(My mom’s recipe.)

Gorilla Poops, A.K.A. No Bake Cookies

August 14, 2009

Whoever dreamed up such an appetizing name for these “dessert droppings”, I’ll never know. That’s what my mom called them and so that’s what they are. Delicious as far as dung goes. We always made them with coconut, but I recently realized that the rest of the world was using peanut butter. So this go round I made them both ways, coconut for the sake of tradition, and peanut butter for Dustin (like I’ve mentioned 800 times, he detests coconut, and it’s tragic).

They really are a snap to make. No preheating the oven, setting timers, shuffling cookie sheets. Just drop them by the blob on some wax paper and you’re done. The hard part is waiting to eat them until they’ve cooled. I’ve singed my tongue countless times due to lack of patience. And it’s ironic because afterward you can’t taste much of anything! (Luckily, the fridge/freezer will speed up the cooling process.)

INGREDIENTS
2 cups sugar
5 Tbsp. unsweetened cocoa powder
1/2 cup milk
1/2 cup butter
1 tsp. vanilla extract
pinch of salt
1/2 cup coconut OR peanut butter
3 cups old-fashioned oats

DIRECTIONS
1. In a saucepan bring sugar, cocoa, milk, and butter to a rapid boil for 1 minute. Remove from the heat and add vanilla, salt, coconut or peanut butter, and oats. Mix well.

2. Drop by spoonfuls onto wax paper and let cool.

Makes 2-3 dozen, depending on size.

(Recipe from my mom.)

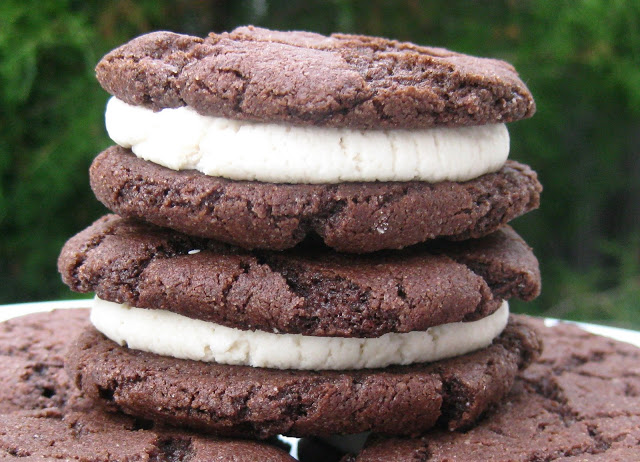
Oreo Sandwich Cookies

July 5, 2009


It has taken me five days to get around to finishing this post. These last two weeks of school (before a glorious summer break) have been the busiest yet. Why is it that teachers like to throw everything at you at once? I have a final tomorrow morning that I should be studying for right now. That or practicing giving a physical examination that I have to record to DVD next week. But instead I’ve got my laptop propped on the end of an examination table in our clinical lab, next to the otoscope and blood pressure cuff, avoiding productivity for just a few more minutes.

Food is my creative escape from this sterile world of hospital gowns and surgical gloves. I want to be a nurse. I signed up for this. But some days I want to be a the girl who doesn’t think about food as a measure of input and output. I’ll never again be able to eat a cinnamon bun without thinking about its spiking affect on my blood glucose. This heightened level of awareness is keeping me healthy, but it can be irritating.

Since adopting a natural foods diet, there are several treats we miss. I miss my daily Fiber1 Bar (they are way too tasty to actually be good for you). Dustin longs for his favorite packaged cookies: Keebler Fudge Sticks, Nutter Butters, and Oreos. When I came across this recipe I was super excited! Homemade Oreos! I was not expecting to be wowed, but Dustin and I both agreed (and he is the expert) that these are far superior the to Nabisco brand! The outer cookie is soft and chewy (and stays so stored at room temperature for a few days) and perfect with the fluffy frosting filling. Pour a glass of milk, pile up a plate of cookies, dip, and devour.

INGREDIENTS
For the chocolate cookies:
1 1/4 cups all-purpose flour
1/2 cup unsweetened cocoa
1 tsp. baking soda
1/4 tsp. baking powder
1/4 tsp. salt
1 cup sugar
1/2 cup plus 2 tablespoons (1 1/4 sticks) unsalted butter, room temperature
1 large egg

For the filling:
1/4 cup (1/2 stick) unsalted butter, room temperature
1/4 cup non-hydrogenated shortening (suggested: Spectrum organic shortening made with palm oil)
2 cups confectioners’ sugar, sifted
2 tsp. vanilla extract

NOTE: While I try not to use shortening, it is essential in this case to maintain the consistency of the filling. If you were to use butter or oil it wouldn’t keep its shape at room temperature (and would alter the taste.)

DIRECTIONS
1. Preheat oven to 375 F.

2. In a food processor or electric mixer (this could be done by hand as well), thoroughly mix the flour, cocoa, baking soda, baking powder, salt, and sugar. With the motor running on low add the butter and then the egg. Continue mixing until the dough comes together in a big ball.

3. Spoon rounded teaspoonfuls onto parchment lined baking sheets (giving them room to spread). Slightly flatten them with the tips of your fingers. Bake in the preheated oven for 9 minutes. Remove from the oven to cool on a wire rack.

4. To make the filling, cream butter and shortening at low speed, gradually beating in the sugar and vanilla. Turn mixer to high and beat several minutes until light and fluffy.

5. To assemble the cookies, spoon frosting into a piping bag (or a Ziploc with the corner cut off works just as well). Pipe dots of filling onto the center of half of the cookies. Place a second cookie (that is the same size) on top and press down gently so the filling spreads to the sides. Continue assembling all of the cookies and enjoy!

Makes about 2 dozen sandwich cookies.

(Adapted from Smitten Kitchen)