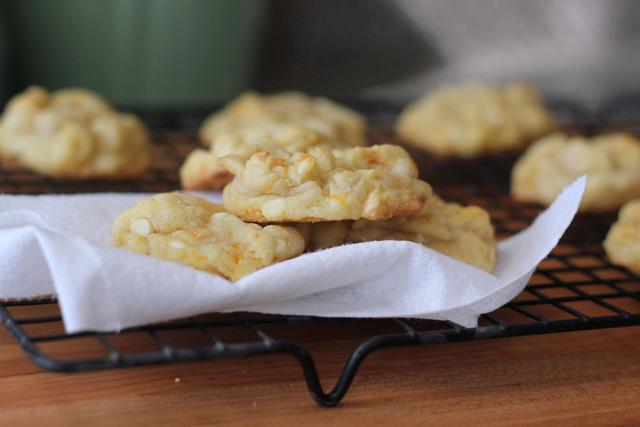
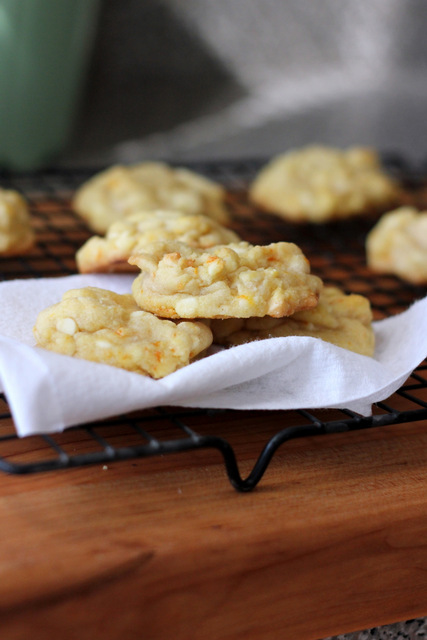
I’ve shared these cookies with a few friends now and it’s unanimous: they’re awesome. They really do capture that orange-vanilla “creamsicle” flavor. Just as I was writing this I began wondering why I haven’t made a creamsicle flavored ice cream and then I found this recipe which I will for sure be trying shortly. Once it stops snowing.
Orange Creamsicle Cookies
INGREDIENTS
2 1/2 cups all-purpose flour
3/4 tsp. baking soda
1/2 tsp. salt
1 cup (2 sticks) butter, softened
1/2 cup sugar
1/2 cup brown sugar
1 large egg
1 tsp. pure vanilla extract
2 Tbsp. orange zest (approx. zest of 2 large oranges)
2 cups white chocolate chips
DIRECTIONS
1. Preheat oven to 375 F.
2. In a small bowl, combine flour, baking soda, and salt. In a large bowl, cream butter and sugars until light and fluffy. Beat in egg and vanilla until smooth. Gradually add the flour mixture until well combined. Stir in the orange zest and white chocolate chips.
3. Drop rounded spoonfuls onto cookie sheets (do not flatten cookies) and bake in preheated oven for 6-10 minutes (mine took 7 minutes) until golden brown around the edges. Remove from the cookie sheets to a wire rack to cool.
This was my Valentine’s treat to myself. And Dustin and Clara. But I never know for sure if Dustin will like a dessert I make, unless it’s chocolate chip cookies or a brownie without nuts or frosting. He’s picky about his cake, can’t handle anything too rich or chocolatey (there is no such thing), and claims to dislike any dessert tainted with fruit, raisins, or coconut. Except that he usually eats them anyway. I don’t know what to believe so I continue baking what I please and just deal with the occasional complaints. Clara will eat anything sweet. Despite years of suggesting he learn to cook, bake, make anything, Dustin is still lost in the kitchen. So if I want a homemade holiday treat (or any meal, for that matter), I have to make it myself. I’ll be baking my own birthday cake next week. I’ve done so almost every year since we’ve been married- except for last year when we picked up german chocolate cupcakes from a local bakery (which are my favorite, Dustin can’t stand the frosting).
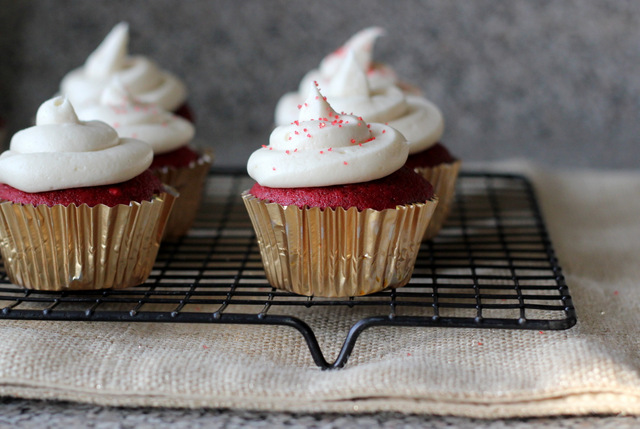
These red velvet cupcakes were approved by every member of the family. It was my first red velvet cake (I’ve made a whoopie pie version before) and needn’t look further. The cupcakes were soft and fluffy and not at all dry. And I could have eaten a whole bowl of the cream cheese frosting. It would be a great compliment to so many cakes- carrot, spice, hummingbird, chocolate. But let’s stop talking about cake. I’m suddenly very hungry.
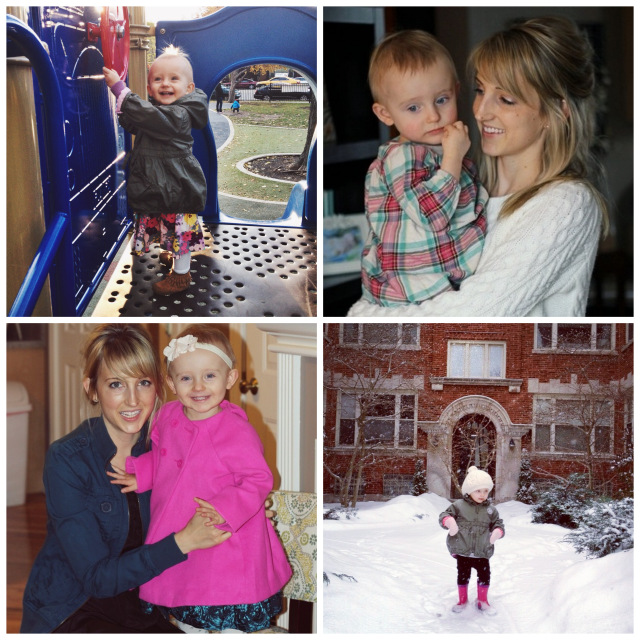
I realized I haven’t posted any photos of Clara (or myself) on here in a very long time. She’s no longer a baby and perhaps some of you would like to see us once and a while. Here a few shots from my private Instagram feed. Clara is 2 months shy of 2 and talks like she’s grown up already.
Red Velvet Cupcakes with Cream Cheese Frosting
INGREDIENTS
Red Velvet Cupcakes:
4 Tbsp. unsalted butter, at room temperature
3/4 cup sugar
1 egg
2 1/2 Tbsp. unsweetened cocoa powder
2 Tbsp. red food coloring
1/2 tsp. pure vanilla extract
1/2 cup buttermilk
1 cup + 2 Tbsp. all-purpose flour
1/2 tsp. salt
1/2 tsp. baking soda
1 1/2 tsp. distilled white vinegar
Cream Cheese Frosting:
4 oz. butter, at room temperature
4 oz. cream cheese, at room temperature
2 1/2 cups powdered sugar
2 tsp. pure vanilla extract
scant 1/4 tsp. ground cinnamon (optional)
DIRECTIONS
1. Preheat oven to 350 F. Line a 12-cup muffin/cupcake pan with liners.
2. In a large bowl with an electric mixer, cream the butter and sugar until light and fluffy, about 3 minutes. Turn the mixer to high and add the egg. Beat until well incorporated, scraping down the sides of the bowl if necessary.
3. In a separate small bowl, mix together the cocoa powder, vanilla extract, and red food coloring to make a thick paste. Add to the batter and mix on medium speed until well combined, stopping the mixer to scrape down the sides of the bowl if necessary.
4. Reduce the mixer speed to low and add half of the buttermilk. Add half of the flour and mix until combined. Scrape the bowl if necessary and add the remaining buttermilk and flour. Beat on high until smooth. Reduce the mixer speed to low and add the salt, baking soda, and vinegar. Turn to high and beat for another couple minutes until completely smooth.
5. Divide the batter evenly between the cupcake liners and bake for 15-20 minutes, until a toothpick inserted into the center of a muffin comes out clean. Cool for several minutes in the pan before removing the cupcakes to a wire rack to cool completely before frosting.
6. To make the frosting, beat or whisk butter and cream cheese in a large bowl with an electric mixer on medium-high speed for 5 minutes. Reduce the speed to low and slowly add the powdered sugar until well incorporated. Add the vanilla and cinnamon (if using) and mix to combine. Increase the speed to medium-high and whip for a few more minutes until the frosting is light and fluffy, scraping down the sides of the bowl if necessary.
Makes 12 cupcakes and more than enough frosting (recipe and frosting can be doubled to make an 8 or 9-inch layer cake).
Over the next few days A Hint of Honey will experience some down time as we work behind the scenes to get the newly designed site up and running! If during that time you’re in desperate need of a recipe, don’t hesitate to contact me. You can reach me via email (ahintofhoney at gmail) or Facebook or Twitter and I’ll do my best to get that recipe to you! I hope you’re as excited as I am! It will be worth the wait…
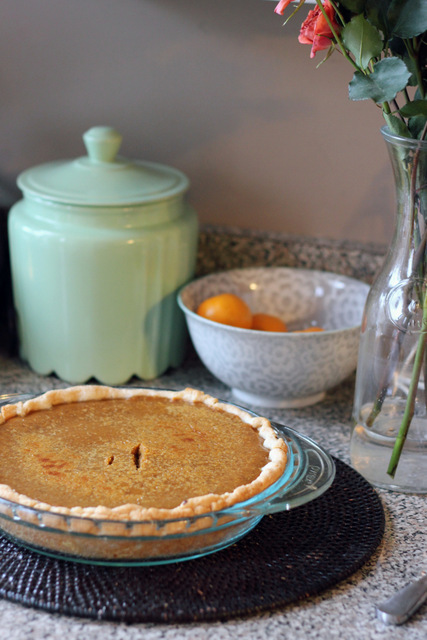
Now pie. I’ve always wanted to make a pumpkin pie with pumpkin that didn’t come from a can. Because then it would truly be a from-scratch homemade pumpkin pie. And yes it’s more work, but it had to be done. At least once.
And now that I’ve done it, I’m already considering doing it again. Because it wasn’t so hard and it was really wonderful. Although if you’re not as determined as me, this recipe would still be delicious with canned pumpkin. And even if you skip the cardamom and lemon zest (which brighten and boost the flavor), it’ll taste great.
Fresh Pumpkin Pie
INGREDIENTS
1 recipe all-butter pie crust (I added 1 1/2 tsp. sugar for a sweeter crust)
2 cups pumpkin puree (from a medium sized fresh roasted sugar pumpkin or canned)
12 oz. can evaporated milk (not nonfat) or 1 /2 cups heavy cream
1/2 cup packed dark brown sugar
1/3 cup white sugar
1/2 tsp. salt
2 whole eggs + 1 egg yolk
2 tsp. ground cinnamon
1 tsp. ground ginger
1/4 tsp. ground nutmeg
1/4 tsp. ground cloves
1/4 tsp. ground cardamom
1/2 tsp. lemon zest
DIRECTIONS
1. Prepare pie crust according to recipe directions, omitting the step where you pre-bake the crust. (NOTE: The dough needs to be made ahead of time and allowed to chill for several hours in the refrigerator before rolling out.)
2. To make pumpkin puree, preheat oven to 350 F. Line a large baking sheet with aluminum foil. Cut the sugar pumpkin in half and scrape out the seeds. Place cut-side-down on the prepared baking sheet and roast in the preheated oven for 40-60 minutes (this will depend on the size of your pumpkin) until fork tender. Set aside to cool before scraping out the pulp. Place the pumpkin pulp in a large clean dish towel and wring the towel to squeeze the extra liquid out of the pumpkin. If you want the puree to be extra smooth, puree the pumpkin with a food processor or blender.
3. Preheat oven to 425 F.
4. In a large bowl, mix together sugar, salt, spices, and lemon zest. Beat the eggs and add to the bowl. Stir in the pumpkin puree and milk (or cream). Whisk until well incorporated.
5. Pour into pie shell and bake in preheated 425 F oven for 15 minutes. After 15 minutes reduce the oven temperature to 350 F and bake for another 40-50 minutes, until a knife inserted into the center comes out clean. (If the crust is browning too fast you can cover the edges with strips of aluminum foil partway through baking.)
6. Remove from the oven to cool on a wire rack for several hours before serving. The pumpkin will be puffed up when you take it out of the oven and deflate slightly as it cools. Serve with whipped cream.
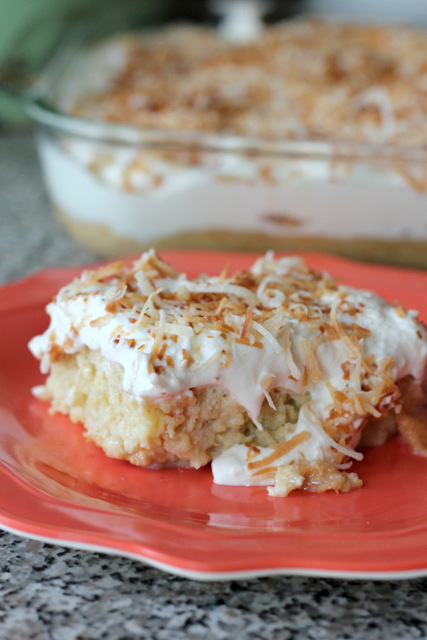
This one I never considered making before I made it. And then immediately regretted the 20+ years I’ve lived without it. I know that sounds dramatic. After all, it is just a dessert. But it’s a shame to be missing out on something this wonderful. I suspect there are less-than-spectacular tres leches cakes out there. But this was the first I’ve tasted and I (we) loved it. I think you’ll be wowed as well.
I came across this coconut tres leches cake searching for a dessert to pair with tacos. I went all out a couple Sundays ago and slow-cooked a pork shoulder and fixed an array of toppings, and felt the need to serve a Mexican-themed final course. This recipe was highly touted on CHOW and I barely messed with it except for the addition of some cinnamon (don’t skip it!) and using vanilla extract instead of Bourbon. The coconut was the highlight for me. Coconut milk is one of the “tres leches” (three milks) and the whipped cream smothered cake is topped with toasted coconut flakes. Despite the detailed instructions, it is quite simple to make. And perfect for a party since it must be prepared ahead of time and allowed to refrigerate.
Coconut Tres Leches Cake
INGREDIENTS
butter, for coating the baking dish
1 cup all-purpose flour
1/4 tsp. cinnamon + extra for dusting
6 large eggs
1 cup sugar
1 14-oz. can sweetened condensed milk
2/3 cup evaporated milk (not nonfat)
1/2 cup unsweetened canned coconut milk (not light)
1 1/2 tsp. pure vanilla extract, divided
1 cup sweetened flaked coconut
1 1/2 cups heavy whipping cream
1 Tbsp. powdered sugar
DIRECTIONS
1. Preheat oven to 325 F and arrange a rack in the middle. Coat a 9×13-inch glass baking dish with butter; set aside.
2. Combine the flour and cinnamon in a small bowl and whisk to aerate and break up any lumps; set aside.
3. Separate the eggs, placing the yolks in the bowl of a stand mixer. Reserve the whites in a separate, very clean, medium bowl. Add the sugar to the yolks and, using the paddle attachment, beat on high speed until pale yellow, about 5 minutes. Transfer the mixture to a large bowl; set aside. Thoroughly clean and dry the stand mixer bowl. Place the egg whites in the clean bowl and, using the whisk attachment, whip on high speed until medium peaks form, about 1 1/2 minutes.
4. Using a rubber spatula, stir about a third of the egg whites into the yolk mixture to lighten it. Then gently fold in the remaining whites. Sprinkle the flour over the egg mixture and gently fold it in, just until there are no more white flour streaks. (Do not overmix.)
5. Pour the batter into the prepared baking dish and bake until the cake is puffed and golden and the edges pull away from the sides of the pan, about 20 minutes.
6. Meanwhile, place the three milks and 1 tsp. of the vanilla extract in a large bowl and whisk until combined; set aside.
7. Remove the cake from the oven and place on a wire cooling rack. Using a toothpick or wooden skewer, poke holes all over the cake and allow to cool for 15 minutes. Pour the milk mixture evenly over the cake and continue cooling, about 45 minutes more. Tightly cover with plastic wrap and refrigerate at least 4 hours or overnight.
8. When the cake is ready to serve, spread the coconut in an even layer in a large frying pan. Toast over medium heat, stirring often, until lightly browned and fragrant, about 5 minutes. (If the coconut begins to burn, reduce the heat.) Immediately remove from the pan to a small bowl.
9. Place the heavy cream and powdered sugar in large bowl and whisk until medium peaks form, adding the remaining 1/2 tsp. vanilla extract halfway through whipping. Slice the cake and serve topped with a mound of whipped cream, a sprinkle of toasted coconut, and a dusting of cinnamon. (Cake will keep for several days tightly covered in the refrigerator.)
I’ve been dedicating a lot of time here recently (mostly behind the scenes: moving to wordpress, partnering with advertisers, now working on a redesign… so exciting!!) and it has prompted me to think about my purpose in this space. What am I doing here? Not on earth in general- we’ll save that for another day. But why I bother with this blog. Why I put so much of myself into something that maybe just a few (wonderful) people read. Well, this is what I came up with:
I love it. I love food (obviously). I tolerate taking pictures of food (one of my goals is to improve this aspect of things). I love cooking. And I want to inspire you to love it too. That’s it. My big purpose. I hope I can reach at least a few of you out there and inspire you to create in the kitchen. To feed yourselves and your families healthy, whole foods and to enjoy it!
The second purpose is to journal my successes and failures. I post the recipes that are worth repeating, along with what I learned in the process of getting there. This is my love affair with food, chronicled as a reference for us to share.
And last, the most selfish reason of all- I want to write. To write about food and whatever else I please. To write about my little unimportant life, in a way that’s meaningful to me. To write about eating too much and not sleeping nearly enough. About being a wife, a daughter, a mama. Just to say something.
So thank you for listening.
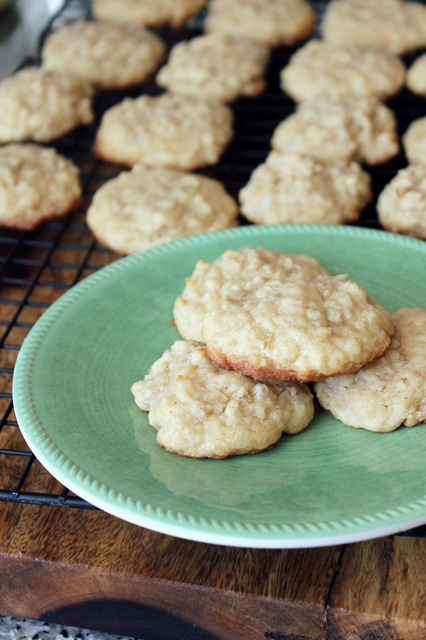
Now cookies. Because we all deserve a treat. I loved my friend’s description of these, “the perfect balance of chewy, and coconut, and sweet”. They’re simple- nothing exotic or unusual. Just a vanilla cookie batter with coconut and oats. Soft and sweet and chewy.
Chewy Coconut Oatmeal Cookies
INGREDIENTS
1 cup (2 sticks) butter, softened to room temperature
1 cup granulated sugar
1 cup brown sugar
2 eggs
2 tsp. pure vanilla extract
1 tsp. baking soda
1 tsp. baking powder
1/2 tsp. salt
2 1/2 cups all-purpose flour
1 cup shredded sweetened coconut
1 cup quick oats
DIRECTIONS
1. Preheat oven to 350 F. Lightly grease (or line with parchment paper) a large baking sheet.
2. Cream butter and sugars with an electric mixer on medium until light and fluffy. Add the eggs and vanilla extract and mix well. Add the baking soda, baking powder, salt, flour, coconut, and oats and mix until well combined.
3. Drop by tablespoonfuls onto the prepared sheet. Bake in preheated oven for 8-10 minutes until just golden brown on the edges. Remove cookies to cool on a wire rack.

/ 4 COMMENTS / Share