Category Archives: Dessert

Triple Chocolate Trifle with Raspberries

August 3, 2012

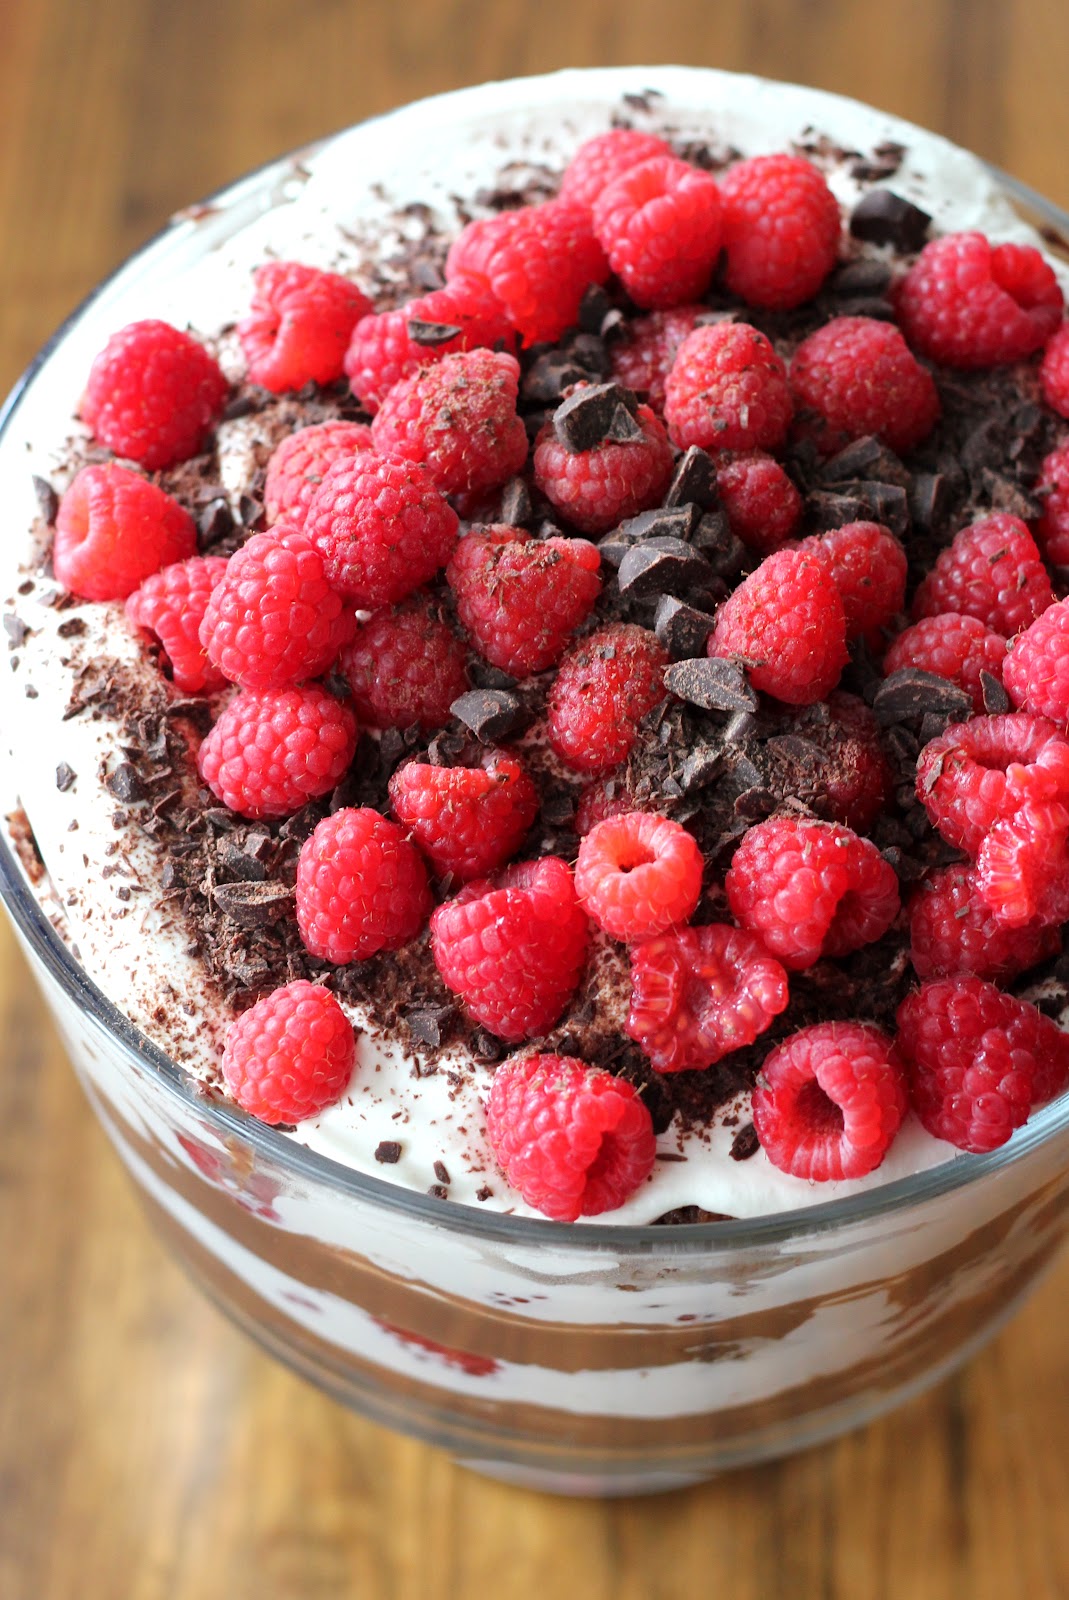
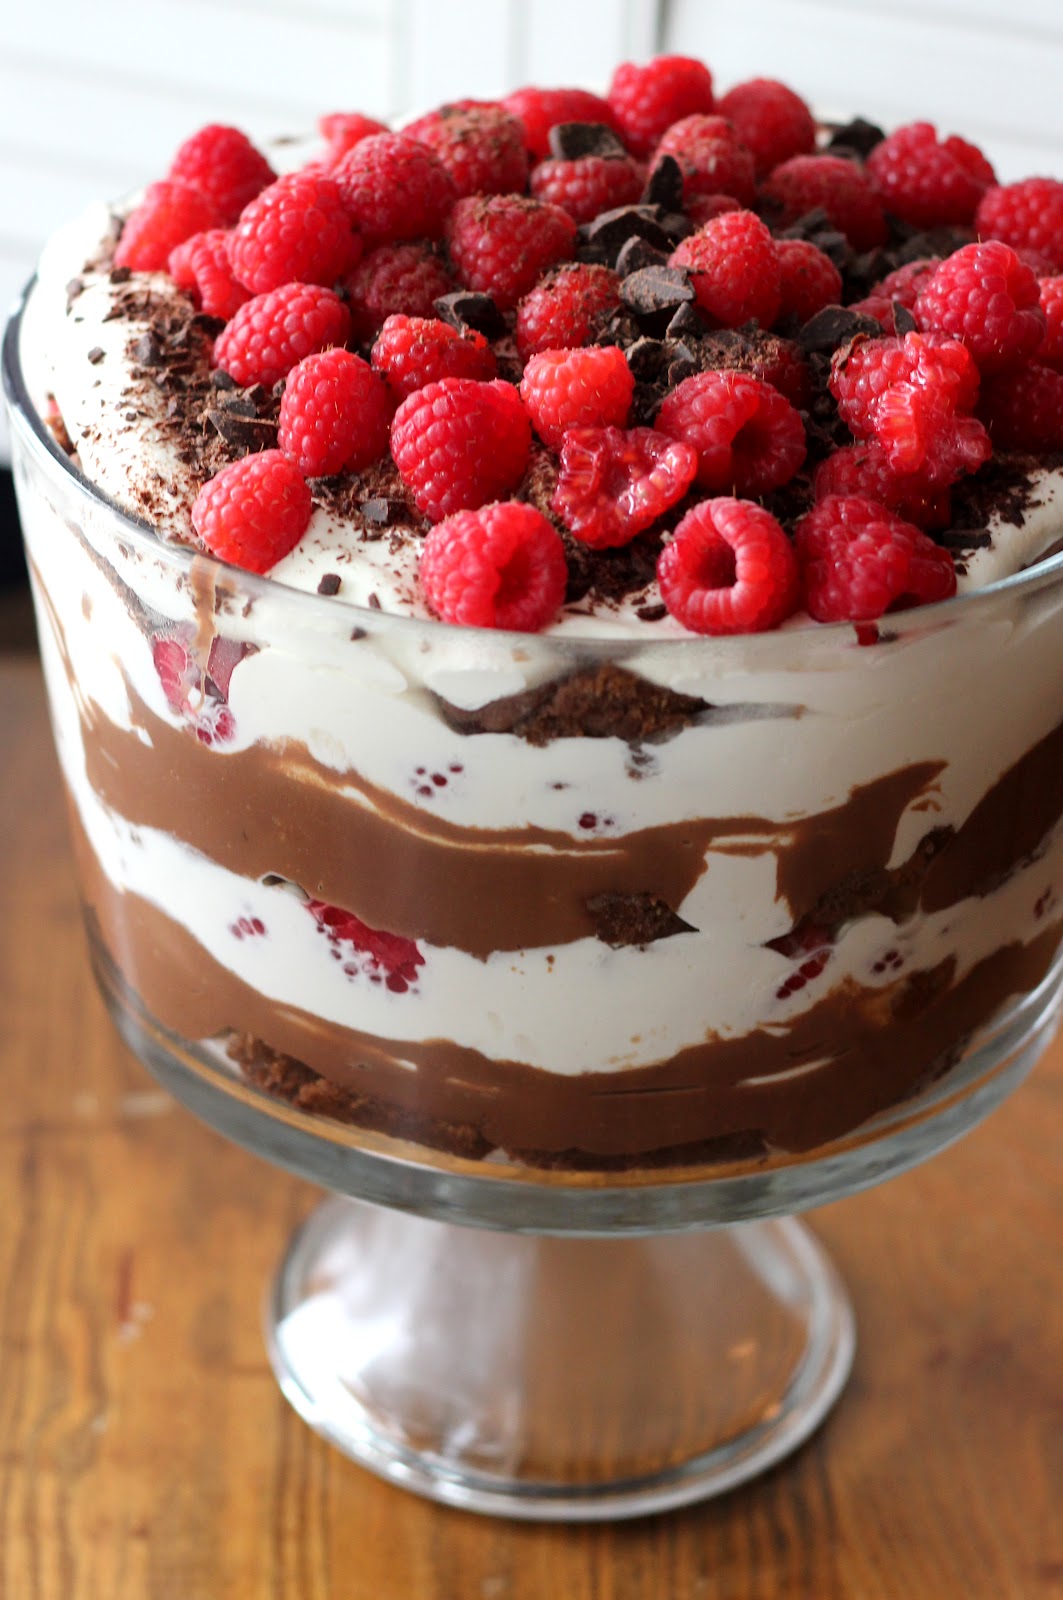
My husband loves chocolate desserts. And I love anything with fruit. Add a little (or whole lot) of fresh whipped cream, even better. So when I stumbled upon this recipe I knew we had a winner. Decadent chocolate brownies layered with creamy chocolate custard, summer raspberries, lightly whipped cream, and bittersweet chocolate shavings. It was as awesome as it sounds. The original recipe called for cocoa in the whipped cream as well. For aesthetic reasons more than taste, I left it out. Technically its addition would make this a quadruple chocolate trifle and I think that might just be overdoing it. I also forgot to add the chocolate shavings between the layers, but didn’t miss them. I think a hearty sprinkling on top is just the right amount.

Triple Chocolate Trifle with Raspberries

INGREDIENTS

Brownies:
1 cup + 2 Tbsp. unsalted butter
3 oz. unsweetened chocolate, finely chopped (I used 3 oz. milk chocolate and reduced the sugar)
1/2 cup cocoa powder
2 1/2 cups sugar (I used 2 cups, see above)
3 eggs, beaten
1 Tbsp. pure vanilla extract
1 1/2 cups all-purpose flour
1/2 tsp. kosher salt

Chocolate Custard:
1/2 cup sugar
3 Tbsp. cocoa powder
2 Tbsp. cornstarch
pinch salt
1 3/4 cups whole milk
1/2 cup heavy cream
2 large egg yolks
10 oz. (2 cups) bittersweet chocolate (I used 60% dark), finely chopped
2 Tbsp. unsalted butter
1 tsp. pure vanilla extract

Whipped Cream:
2 cups heavy whipping cream
1/4 cup powdered sugar
5 Tbsp. cocoa powder (optional- I omitted)

1-2 pints fresh raspberries
bittersweet chocolate (I used 60% dark), shaved or roughly chopped for layers and/or topping

DIRECTIONS

1. To make brownies, preheat oven to 350 F. Grease a 9-by-13-inch baking pan.

2. In a large saucepan, melt butter. Remove pan from heat and stir in chopped chocolate until fully melted. Stir in cocoa and sugar until combined. Slowly add eggs, whisking chocolate mixture constantly, then whisk in vanilla. Fold in flour and salt.

3. Pour batter into prepared pan. Bake until just firm, about 20-25 minutes (do not overbake). Transfer pan to a rack to cool.

4. In a large bowl, mix together granulated sugar, 3 tablespoons cocoa powder, cornstarch and salt. Whisk in 3/4 cup milk. In a large saucepan, bring remaining 1 cup milk and 1/2 cup cream to a boil over medium heat. Whisk hot milk mixture slowly into cocoa mixture. Return to saucepan. Cook over medium heat, whisking gently, until slightly thickened, about 2 minutes. (A simmering bubble or two is O.K., but do not let it boil.)

5. In a medium heat-resistant bowl, whisk yolks. Whisking them constantly, very slowly dribble about half the cocoa-milk mixture into yolks until fully combined. Pour yolk mixture into saucepan with remaining cocoa-milk mixture, whisking constantly. Cook, whisking occasionally, over medium-low heat, until thickened, about 5 minutes. (Do not let mixture come to a simmer. If pan begins to steam thickly, remove from heat for a few moments and stir well before continuing.) Let cool slightly.

6. Melt 5 ounces chopped chocolate with butter. Stir until smooth. Stir in vanilla. Cool 5 minutes, then fold into thickened egg mixture. Place plastic wrap directly against pudding (to prevent a skin from forming), and chill until set, about 3 hours. (Pudding and brownies can be made up to 5 days ahead, and refrigerated.)

7. Just before assembling, in an electric mixer, beat remaining 2 cups cream with remaining 5 tablespoons cocoa powder and 1/4 cup confectioners’ sugar until it forms soft peaks. Scrape down sides and fold in any excess cocoa or sugar.

8. Cut brownies into 1-inch squares. Fit a layer of brownie squares in bottom of a 4-quart trifle, glass, or other bowl. Top with half the pudding, a third of the whipped cream, a third of the remaining chopped chocolate and a third of the raspberries. Repeat layering until all ingredients have been used. Serve immediately, or cover with plastic wrap and chill for up to 24 hours before serving.

Serves 8-10.

(Adapted from The New York Times)

Browned Butter Blondies

April 23, 2012

I’m sorry about all the sweets. I have the best of intentions to make some healthy savory dishes to share with you this week. (My last before baby girl is scheduled to arrive May 1st!) I’ve made plans to spend my dwindling moments of pregnancy shopping, napping, reading, movie-watching, cooking, and sneaking in a few more dates with just the two of us. All the things I’ll miss once parenthood sets in. Although I won’t complain if having a baby means more evenings in like last night- curled up on the futon with Netflix reruns and bowls of warm blondies and ice cream.

These were made on a last-minute whim and they exceeded expectations. Browning butter adds something marvelous to an otherwise ordinary recipe. I wanted to add some walnuts as well. Dustin wouldn’t let me. (But you should. I think it would be awesome.) The key to perfect blondies is leaving them every-so-slightly gooey in the center. And serving them right out of the oven, topped with melting ice cream.

Browned Butter Blondies

INGREDIENTS

6 Tbsp. unsalted butter
1 1/2 cups brown sugar
2 eggs
1 1/8 cups flour
1 tsp. baking powder
1/2 tsp. salt
1 tsp. pure vanilla extract
1/2 cup chocolate chips (I used mini semi-sweets)

DIRECTIONS

1. To brown butter, melt butter in a saucepan over medium heat. Cook, stirring frequently, until foam subsides and small brown flecks start to appear in the bottom of the pan. Once it has reached a nice brown color and nutty aroma, remove from the heat.

2. Preheat oven to 350 F. Lightly grease an 8×8 pan.

3. In a medium bowl, whisk to combine browned butter, sugar, and eggs until well mixed. Stir in the dry ingredients. Pour into the prepared baking dish and sprinkle with chocolate chips.

4. Bake in preheated oven for about 20 minutes, until the edges and top are just set and turning golden brown (don’t over bake- you want them slightly gooey in the center). Serve warm with a scoop of ice cream.

Makes an 8×8 pan.

(Adapted from The Little Red House)

Lemon Curd Trifle with Fresh Strawberries

April 19, 2012

In the midst of baby’s impending arrival and the drama of trying-to-find-an-apartment-in-Chicago-from-far-away, I’m having a hard time focusing on writing about this recipe. But I wanted to share it with you anyway. Just a few words should suffice. I’ll let the picture do the speaking. But I will issue a warning: This wasn’t quick or easy to make. It took what seemed like forever whipping custard over a double broiler. Then baking a pound cake. And whipping two separate batches of cream. And after hours of separate stages of chilling, finally assembling everything. I’m not trying to dissuade you from making this trifle. Quite the opposite- it was incredible. And worth every second spent! But just be prepared to dedicate the better part of a morning to its achievement. By the end I had created a masterpiece. A dessert that somehow managed to be sweet and tart and dense yet light and absolutely stunning all in one bite.

Lemon Curd Trifle with Fresh Strawberries

INGREDIENTS

Lemon Curd:
6 large egg yolks
1 cup sugar
4 lemons, zested and juiced (to equal ~1/2 cup lemon juice)
1/2 cup (1 stick) unsalted butter, cut into chunks
2 cups whipping cream
1 tsp. pure vanilla extract
2 Tbsp. powdered sugar

Sour Cream Lemon Pound Cake:
3 cups cake flour
1/2 tsp. baking soda
1/2 tsp. salt
1 cup (2 sticks) unsalted butter, room temperature
2 1/2 cups sugar
6 eggs, room temperature
2 lemons, zested and juiced (~1/4 cup lemon juice)
1 cup sour cream

Strawberry Filling:
3 pints fresh strawberries, sliced
1-2 Tbsp. sugar (depending on how sweet your berries are)
1/2 lemon, freshly squeezed

Topping:
1/2 cup heavy whipping cream
1/2 tsp. pure vanilla extract
1 Tbsp. powdered sugar
extra fresh strawberries, for topping

DIRECTIONS

1. To prepare the custard, bring a pot of water to a simmer over medium-low heat. Combine the egg yolks, sugar, lemon zest and lemon juice in a metal or glass heat-resistant bowl and whisk until smooth. Set the bowl over the simmering water, without letting the bottom touch, and continue to whisk. Keep whisking (often vigorously) until the custard has doubled in volume and is very thick and yellow. (It took me about 25 minutes to reach this state.) Do not let boil. Remove the bowl from the heat and whisk in the butter, a couple chunks at a time, until melted. Refrigerate until cold and firm (at least several hours or overnight).

2. To prepare the pound cake, preheat the oven to 325 F. Grease and flour a 16-cup tube or bundt pan. Sift flour, baking soda, and salt into a medium bowl. Using an electric mixer, beat butter in a large bowl at medium speed until fluffy. Gradually add sugar and beat 5 minutes. Add the eggs, 1 at a time, beating until just combined after each addition. Beat in the lemon juice and zest. Using a rubber spatula, mix in the dry ingredients. Mix in the sour cream. Transfer to the prepared pan. Bake in preheated oven for about 1 hour, until the top is golden brown and a toothpick inserted into the center comes out clean. Let cake cool in pan 15 minutes until turning out onto a wire rack to cool completely.

3. To finish the lemon curd, with an electric mixer whip 2 cups cold heavy cream to soft peaks. Add the vanilla extract and powdered sugar and continue whipping to stiff peaks. Fold into the lemon curd to lighten it into a mousse.

4. To prepare the strawberry filling, toss strawberries in 1-2 Tbsp. sugar and lemon juice and set aside.

5. To assemble the trifle, line the bottom of a trifle dish with slices of the lemon pound cake. Spoon a layer of lemon curd over the cake, and then a layer of strawberries. Repeat layers until the ingredients are used up. Refrigerate until cold.

6. Just before serving, whip 1/2 cup heavy cream until soft peaks form. Add the vanilla extract and powdered sugar and continue whipping to stiff peaks. Spread over the top of the trifle and top with extra fresh strawberries.

Makes 1 large trifle with a little pound cake left over for snacking.

(Trifle adapted from Food Network, Pound Cake adapted from Epicurious)

Browned Butter Blueberry Muffins

April 9, 2012


Oh, my my my. These are good. But my conscience won’t let me recommend them to you without a disclaimer: they are nothing but dessert! So sweet and sinful (and butter-full) that I can’t justify them as anything else. But go ahead, devour them anyway. You shouldn’t be having browned butter blueberry muffins for breakfast every day. But once can’t hurt, right?!

I had never browned butter before. And it scared me a little. I kept a close watch on the saucepan, and, after what seemed like too long, voila!, the butter turned brown! A glorious golden brown with an astonishing aroma. It gives these cupcakes muffins a distinguished taste. I’m not sure how well frozen berries would hold up in this recipe. I do have one trick to share: before adding your berries to the batter, dust them lightly with flour. This prevents them from sinking to the bottom. You will have picture perfect muffins with evenly distributed blueberries!

Browned Butter Blueberry Muffins

INGREDIENTS

7 Tbsp. unsalted butter
1/3 cup whole milk or buttermilk (or low-fat milk works, too)
1 large egg
1 large egg yolk
1 tsp. pure vanilla extract
1 1/2 cups all-purpose flour
3/4 cup sugar
1 1/2 tsp. baking powder
3/4 tsp. salt
2 cups fresh blueberries (frozen in a pinch)

Crumb topping (makes more than you’ll need):
3 Tbsp. cold unsalted butter, but into tiny cubes
1/2 cup all-purpose flour
3 1/2 Tbsp. sugar

DIRECTIONS

1. Preheat oven to 375 degrees F. Line muffin pan with paper or foil liners.

2. Melt butter in a small saucepan over medium heat. Keep an eye on the butter. Melt and cook down the butter until little brown bits appear in the pan. The crackling will subside and butter will begin to brown fairly quickly after that. Keep a close eye. Remove from heat.

3. Whisk milk, egg, yolk and vanilla until combined. Add the brown butter and stir to combine.

4. Whisk together flour, sugar, baking powder and salt in a medium bowl Add milk and butter mixture all at one and stir gently to combine. Gently but thoroughly fold in the blueberries.

5. Divide the batter among muffin cups and spread evenly.

6. To make the topping combine all of the ingredients in a bowl and rub together with your fingertips until crumbly. Sprinkle evenly over the batter in the cups.

7. Bake until golden and crisp and a wooden pick inserted into the center of a muffin comes out clean, about 18-20 minutes. Cool in pan on a rack for 15 minutes then remove from the pan. Serve warm or at room temperature.

Makes 1 dozen muffins.

(Adapted from Joy the Baker)

Lemon Sticky Rolls

April 4, 2012

Despite my difficulty getting around lately, I’ve been determined to do two main things: buy stuff for the baby (accomplished thanks to Amazon and a surprising number of stores that provide free wheelchairs/motorized carts- which is only mildly embarrassing) and make a few treats. By treats I mean anything homemade. Because we don’t get much of that around here lately. Over the weekend I managed to serve brunch, highlighted by these fresh-from-my-own-oven sticky rolls. It doesn’t get more homey. I used my mom’s foolproof sweet roll dough recipe (featured in our favorite cinnamon rolls), just dressed a bit differently. Lemon and nutmeg dusted throughout the rolls, lemon and nutmeg and ginger in the filling, and even more lemon and cream cheese in the glaze. The lemon is bright and sweet, not overpowering. And the spices provide just a hint of flavor in the background.

I’m also excited to announce that since Tuesday, I’ve been officially removed from bedrest! I’ve reached the 35-week mark and after reassuring ultrasound results (baby is looking big and healthy), my doctor told me I’m allowed to do whatever activity I can manage comfortably. For an unknown reason (the baby is still dropped just as low and my signs of labor have actually progressed further), I’m feeling and moving better by the day. Less pain + less laying around = happier me. But I’m definitely still taking it easy- the intense discomfort could quickly return or I could be delivering a baby any day!

Lemon Sticky Rolls

INGREDIENTS

Dough:
6-8 cup unbleached all-purpose flour
2 Tbsp. instant yeast
2 tsp. salt
1/2 cup sugar
zest of 2 lemons (reserve the juice for using in the glaze below*)
3/4 tsp. ground nutmeg
1/2 cup butter, melted
2 eggs, whisked
2 1/4 cups warm milk

Filling:
1 1/2 cups sugar
heaping 1/4 tsp. ground nutmeg
3/4 tsp. ground ginger
zest and juice of 2 lemons
6 Tbsp. butter, melted

Lemon Cream Cheese Glaze:
8 oz. cream cheese, softened
*juice of 2 lemons
2 cups powdered sugar
extra lemon zest for sprinkling on top

DIRECTIONS

1. In a large bowl combine 3 cups flour, yeast, salt, sugar, lemon zest, and nutmeg. Whisk to combine. Pour in wet ingredients (butter, eggs, and milk). Stir until it is a thick paste. Add the remaining flour, 1/2 cup at a time, until it comes together into a ball.

2. Lightly flour a flat surface, and knead the dough, adding more flour to prevent sticking, 8-10 minutes, until smooth. Spray the inside of a bowl with cooking spray, place the dough inside, cover, and let rise in a warm place until doubled, about 1 hour.

3. To make the filling, in a small bowl combine the sugar, nutmeg, ginger, and lemon zest. Slowly add the lemon juice, mixing with your fingers or a fork, until the mixture resembles wet sand (you will probably not need to use all of the juice).

4. Punch down the dough and divide in half. Roll out each half into a large rectangle. Brush melted butter over the surface of the dough. Spread half of the prepared filling over each rectangle of dough. Roll up lengthwise. Cut each log into 12 evenly sized pinwheels. Place into lightly greased 9×13 baking pans. Cover each pan and let rise until doubled in size, about 1 hour.

5. Preheat oven to 350 F. Bake rolls in preheated oven for 15-18 minutes, until golden on top. (DO NOT over-bake. Soft and doughy is better than browned.) Remove from the oven and place on a cooling rack.

6. While the rolls are baking, prepare the glaze. Beat the cream cheese with an electric mixer unti light and fluffy. Beat in the lemon juice and powdered sugar until light and smooth.

7. Spread the glaze over the hot rolls, dividing it among the two pans. Sprinkle with extra lemon zest. Serve warm.

Fills 2 9×13 pans (about 24 rolls).

(Dough from here, Lemon Sticky Rolls adapted from The Kitchn)