Korean Ground Beef Bibimbap Bowls

August 6, 2020

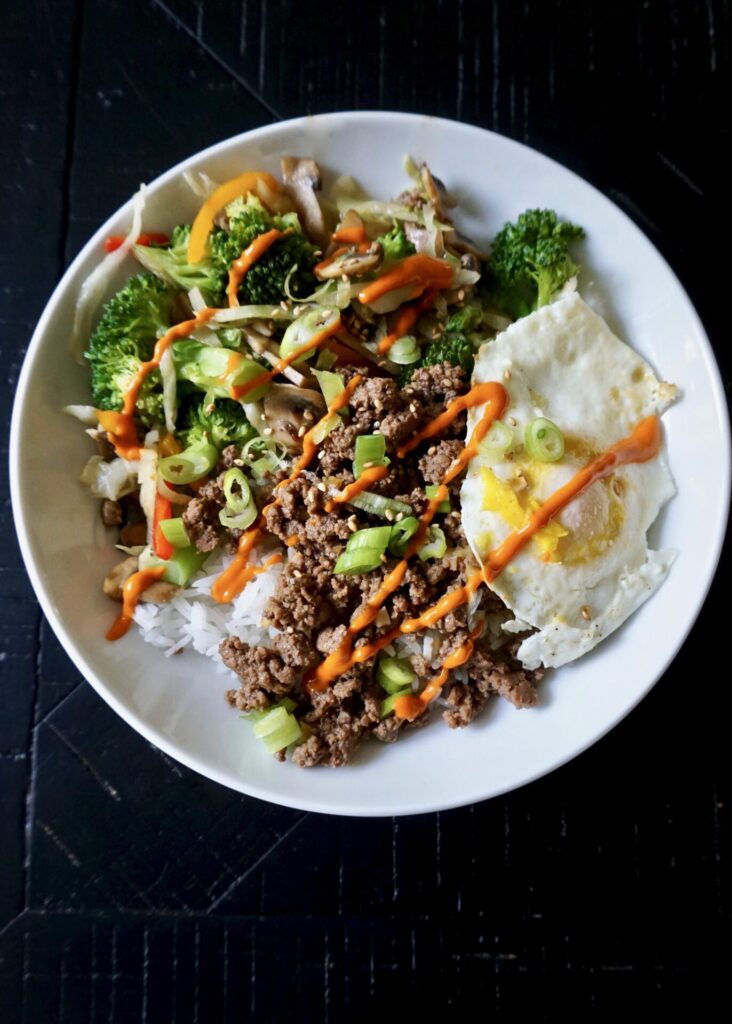
I told you about my newfound love of Korean cuisine when I shared these Korean Beef Tacos. Today I have a more traditional Korean recipe for you… bibimbap bowls! Korean beef (also known as bulgogi) is usually made with ribeye steak, but for the sake of cost and ease we’re using ground meat. The sweet-spicy sauce is the same so you still get that amazing flavor. The beef is served over steamed jasmine rice with lots of veggies, a fried egg (or two, if you’re my kids and that’s your favorite part) and Gochujang sauce if you can find it (sriracha will work in a pinch but doesn’t have quite the same flavor). And if you love it, add some kimchi!

Korean Ground Beef Bibimbap Bowls

INGREDIENTS

Sauce:
1/4 cup low-sodium soy sauce
4 cloves garlic, minced
1 Tbsp. sesame oil
2 Tbsp. brown sugar
1 Tbsp. rice vinegar
1 Tbsp. fresh grated ginger
1 tsp. chili garlic sauce (I used 1/2 tsp. sambal oelek)

Korean Beef Bowls:
1 – 1/12 lbs. ground beef
3 green onions sliced, green and white parts separated
4 eggs
4 tsp. butter
steamed jasmine rice
stir-fried or steamed veggies (mushroom, bell pepper, broccoli, zucchini, cabbage, carrot, onion, etc.)
Gochujang sauce
sesame seeds, for garnish

DIRECTIONS

  1. Whisk together the sauce ingredients, set aside
  2. Place a large pan over medium high heat on the stove. Add the ground beef and brown, breaking the meat up as it cooks until done, approximately 4-6 minutes.
    Pour the sauce over the meat and bring to a simmer. Stir in the white parts of the green onions, cook for 3-4 minutes.
  3. Meanwhile fry the eggs: Heat a frying pan over medium heat. When the pan is hot add the butter. Once butter is melted, crack the eggs into the pan, being careful not to break the yolk. Reduce heat to low. Fry until whites are set and yolks are cooked to desired doneness, 4-5 minutes.
  4. To assemble the bowl: Add rice to a bowl, top with korean ground beef, vegetables, then a fried egg. Drizzle with sauce and garnish with remainder of green onions and sesame seeds.

Serves 4.

(Adapted from Fox and Briar)

Caprese Salad

August 4, 2020

Caprese screams summer to me. This pretty Italian salad is simply tomatoes, mozzarella, and sweet basil, drizzled in olive oil (and often balsamic as I’ve done here). Because it’s so minimal, high quality ingredients really matter- juicy ripe tomatoes, the freshest basil, high quality vinegar and extra virgin olive oil- even good sea salt and fresh cracked pepper make a difference in a meh vs. outstanding Caprese salad!

I haven’t provided amounts because you can use whatever sizes of tomatoes and mozzarella you want (larger ones sliced on a platter or smaller balls tossed in a bowl). You can also use whole cherry tomatoes and mozzarella balls and skewer them on toothpicks for mini caprese kabobs! The dressing and seasonings are adjusted to taste. You can use a little basil or a lot. Go easy on the balsamic vinegar and I highly recommend the glaze. It’s essentially balsamic syrup and adds an amazing punch of sweetness. Serve with crusty bread for soaking up the juice/dressing.

Caprese Salad

INGREDIENTS

fresh mozzarella, sliced or small mozzarella balls (I used pearls)
tomatoes, sliced, or cherry or grape tomatoes, halved
fresh basil, chopped
sea salt and freshly ground black pepper
balsamic vinegar
extra virgin olive oil
balsamic glaze (optional, but recommended)

DIRECTIONS

  1. If you’re using sliced tomatoes and mozzarella, layer them on a serving platter. If you’re using cherry/grape tomatoes and mozarella balls, combine them in a serving bowl. Top with some fresh basil. Season with sea salt and freshly ground black pepper. Drizzle with a bit of balsamic vinegar (go light on the vinegar) and extra virgin olive oil. Toss and adjust seasonings to taste. Drizzle with a bit of balsamic glaze (optional, but so delicious!) and serve.

Sun-dried Tomato Pesto Grilled Cheese

August 3, 2020

I like to dream that someday I’m opening a little cafe featuring all my favorite sandwiches, salads, and baked goods. I’d also love to have a wood-fired oven, because PIZZA! My kids just need to grow up a bit so I have more time. And I need to perfect homemade focaccia. Then I’ll be ready…! This sun-dried tomato pesto grilled cheese would definitely make the menu. We pickup up a similar sandwich from a local restaurant a few weeks ago and had to recreate it at home.

This sun-dried tomato pesto is everything. I was licking it right out of the bowl and can’t wait to make it again and pour it over pasta. It uses a whole jar of olive-oil packed sun-dried tomatoes, garlic, lots of fresh basil (which I’ve successfully planted outside and kept alive for months now- it’s a miracle!), pine nuts, and Parmesan. I spread the pesto over sourdough bread and added a pile of provolone, sharp cheddar, and havarti (I like using a combination of cheeses for maximum flavor). Grill until crisp on the outside and the cheese is oozing out the middle.

Sun-dried Tomato Pesto Grilled Cheese

INGREDIENTS

Sun-Dried Tomato Pesto:
1 (8.5-oz.) jar sun-dried tomatoes packed in olive oil
2 cloves garlic
1/2 tsp. kosher salt
pinch crushed red pepper flakes (1/4 tsp. if you like a bit of heat)
1/2 tsp. sugar
1 cup packed fresh basil leaves
1/4 cup + 2 Tbsp. pine nuts
1/3 cup freshly grated Parmigiano-Reggiano
2 Tbsp. water

sliced Italian bread (I used sourdough)
softened butter
provolone, Sharp cheddar, and Havarti cheese (or a combination of any good melting cheese such as mozzarella, fontina, etc.), sliced or grated

DIRECTIONS

  1. To make the pesto: In the bowl of a food processor fitted with the steel blade, combine the sun-dried tomatoes with their oil, garlic, salt, red pepper flakes, sugar, basil, pine nuts, Parmigiano-Reggiano and 2 Tbsp. of water. Pulse, scraping down the sides as necessary, until the mixture is finely puréed.
  2. To make the grilled cheese: Spread one side of each slice of bread with butter, then flip over and spread the pesto evenly over the other side of each slice. Heat a large nonstick or cast iron pan over medium heat. Place 4 slices of bread, butter-side-down, in the pan. Divide the cheese evenly over the bread, then top the sandwiches with the remaining bread. Cook until the first side is golden brown, a few minutes. Carefully flip the sandwiches and cook until the cheese is fully melted and the bread is golden brown, a few minutes more. Let cool slightly, then slice the sandwiches in half and serve.

Note: You’ll have plenty of leftover sun-dried tomato pesto. It keeps well in the refrigerator for up to 4 days and can be frozen for up to 2 months. You can also try tossing the pesto with pasta; just keep in mind that the pesto is thick so you’ll need to thin it with some of the pasta cooking water and a little olive oil when tossing it with the pasta.

Adapted from Once Upon a Chef

Easy 5 Layer Ice Cream Cake

July 31, 2020

I’ve probably mentioned before that Dustin (my husband) has slightly kiddish taste when it comes to dessert. He’ll try any treat I make (unless he spies a raisin), and sometimes often thinks it’s delicious. But he’ll still complain (or at least hint at the fact) that he’d rather it was a chocolate chip cookie or brownie. Frosting better be buttercream. And when it comes to cake, ice cream cake is the superior choice in his opinion.

I make a lot of fruit desserts- especially in the summer- because that’s what I love most. But when Dustin’s birthday rolled around earlier this month I had to make something to please just him, and this ice cream cake was perfect! And it’s super easy. No fancy molding of ice cream into cake layers required. It consists of a crushed oreo + butter bottom crust, two layers of ice cream (flavors your choice!), a thick spread of fudge (I went the homemade route with this recipe… yum!), and a whipped cream + sprinkle topping. It does require dirtying quite a few bowls and some time in the freezer between each step but once the cake is assembled it can be stashed away and ready to serve when it’s party time! My husband and kids were super impressed and I have a feeling they’ll be requesting this one for many birthdays to come!

Easy 5 Layer Ice Cream Cake

INGREDIENTS

36 Oreos (1 standard package)
1/2 cup unsalted butter, melted
1 quart* chocolate ice cream, softened (I used chocolate ice cream on half and vanilla ice cream on the other half)
1 quart* your choice flavor ice cream, softened (I used cookie dough ice cream)
1 1/2 cups hot fudge (store-bought or homemade)

Whipped Cream:
1 cup heavy cream
2 Tbsp. powdered sugar
1/2 tsp. pure vanilla extract
sprinkles

DIRECTIONS

  1. Make the crust: In a food processor or blender, pulse the whole Oreos into a fine crumb. Stir the cookie crumbs and melted butter together, then press into a 9×13 pan. (No need to grease the pan prior.) Make sure it is very tightly packed– I use the back of a spatula to firmly press it in. Freeze for 15 minutes.
  2. During that time, place the softened chocolate (and/or vanilla) ice cream in a bowl and give it a good stir to rid any frozen lumps. You want a nice smooth, soft ice cream. Spread it on top of the frozen crust. Freeze for 15-30 minutes. (Closer to 30 minutes is ideal.)
  3. During that time, place the 2nd ice cream flavor into a bowl and stir it until it is smooth and very soft. Carefully spread on top of the chocolate ice cream. Freeze for 15-30 minutes. (Closer to 30 minutes is ideal.)
  4. Make sure the hot fudge is spreadable consistency. You may have to slightly heat it. Spread it on top of the ice cream as best you can. Because it is not as cold as the ice cream layer, the two will slightly mesh together as you spread. That’s ok. Freeze for 15-30 minutes. (Closer to 30 minutes is ideal.)
  5. Make the whipped cream: Using a hand mixer or a stand mixer fitted with a whisk attachment, beat the heavy cream, confectioners’ sugar, and vanilla on medium-high speed until stiff peaks form, about 4-5 minutes. Spread on top of hot fudge layer, then top with sprinkles. Cover with aluminum foil and freeze for at least 12 hours before serving (and up to a few days!).
  6. Use a very sharp knife to cut, making sure you are cutting into the crust. Keep leftovers in the freezer.

*Ice Cream: 1 quart of ice cream is 2/3 of a standard 1.5 quart container. So you’ll use a little more than half of the container for each ice cream layer.

Makes a 9×13 ice cream cake.

Adapted from Sally’s Baking Addiction

Classic French Toast

July 29, 2020

I’ve tried my share of french toast recipes and this one makes THE BEST classic french toast! (I also love buttermilk french toast… you have to give it a try sometime as well.) What makes this recipe different from others I’ve found is the addition of flour and sugar to the egg batter, which helps form a sweet crust when it cooks on a buttered skillet. And the vanilla and cinnamon add even more flavor.

Use the best thick-sliced bread you can find. If you live in the Seattle area my favorite bread for french toast is the Swiss Peasant loaf made by Wild Wheat Bakery in Kent. It’s sold at Whole Foods, Central Market, and some other local grocery stores here. It also makes an awesome grilled cheese.

I usually top my french toast with Vanilla Greek yogurt and a pile of fruit/berries. Or try butter and maple syrup, powdered sugar, jam, lemon curd, or go savory with bacon and a fried egg.

Classic French Toast

INGREDIENTS

4 large eggs
2/3 cup milk
1/4 cup all-purpose flour
1/4 cup sugar (can be reduced or omitted)
1/4 tsp. salt
1/2 tsp. ground cinnamon (optional)
1 tsp. pure vanilla extract
8 thick slices french bread

DIRECTIONS

  1. Preheat griddle to 350 degrees F or or heat a skillet over medium heat. Grease well with butter.
  2. Add all ingredients, except the bread, to a blender (I used an immersion blender) or to a shallow dish and whisk well to combine. If whisking by hand, it’s okay if the flour doesn’t mix in completely smooth. (I recommend using a blender or food processor because it’ll be pretty clumpy if you whisk by hand.)
  3. Dip bread slices into the egg mixture, dredging them well on both sides, and place on hot, greased griddle or skillet.
  4. Cook for a few minutes, until the bottom of the breads starts to get golden brown. Flip and cook on the other side the same.
  5. Remove to a plate. Serve warm, with syrup and a sprinkle of powdered sugar. (Or berries and vanilla yogurt, butter and jam, etc!

Makes about 8 large slices.

Adapted from Tastes Better from Scratch