Red Chile Sauce Chicken Enchiladas

July 15, 2020

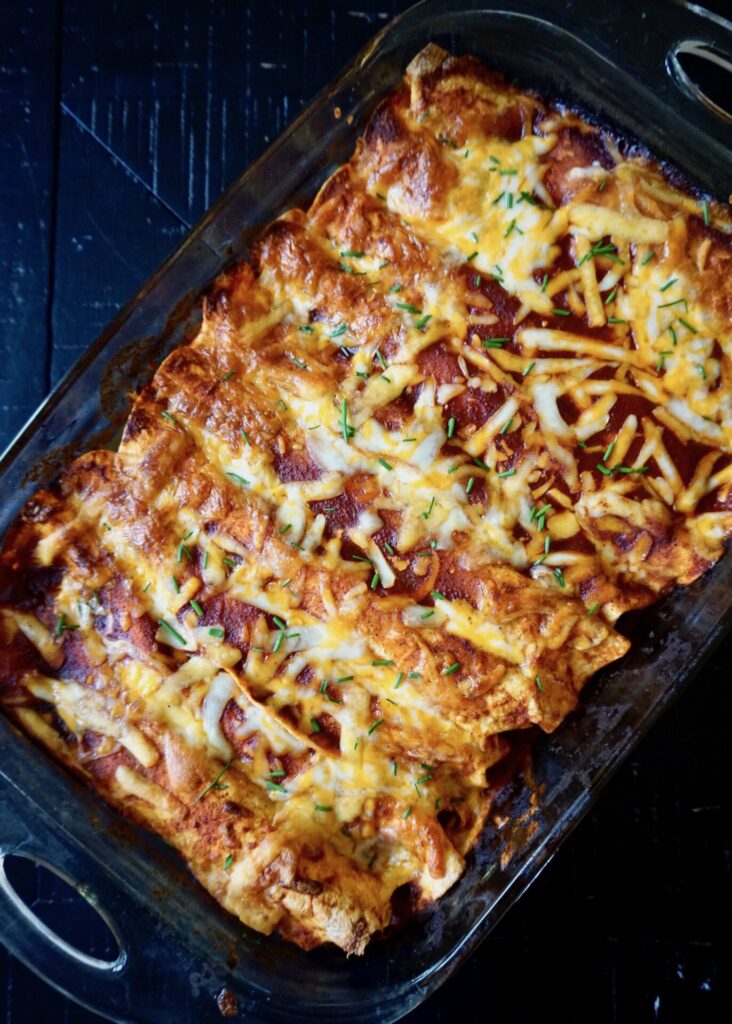
Enchiladas are one of my favorite things to make at home. They usually turn out just as good- often better!- than restaurant versions, they’re convenient (perfect to prep ahead of time and throw in the oven when dinnertime rolls around, also perfect for delivering dinner to a friend), and my whole family devours them without complaint. I also love loading them up with all the toppings: shredded lettuce, pico de gallo, sour cream, and avocado. That’s comfort food for me.

This red chile sauce enchilada is more involved than my easy salsa verde enchilada recipe, but the homemade red chile sauce is worth the extra work! You can cook the chicken by simmering it right in the sauce or use pre-cooked chicken (such as rotisserie) and just add it after the sauce has reduced. Use corn or flour tortillas and your favorite blend of Mexican cheese (I always include some Pepper Jack). You could make these enchiladas vegetarian by replacing the chicken with your choice of beans/vegetables. And note that they’re not super spicy. If you want more heat, add more jalapeno (and/or leave in the seeds) or up the chipotle in adobo if that’s what you’re using.

Red Chile Sauce Chicken Enchiladas

INGREDIENTS

1 medium onion, diced (or 2-3 green onions)
1 jalapeño, seeded and finely chopped (I used 1/2 Tbsp. Chipotle in adobo instead)
1 tsp. olive or vegetable oil
3 medium cloves garlic, finely minced
2 Tbsp. chili powder
1 Tbsp. granulated or brown sugar
2 tsp. ground cumin
2 (8-oz.) cans tomato sauce
1 cup water
1 1/2- 2 lbs. boneless, skinless chicken breasts (about 3 large chicken breasts)
1 cup (4 oz.) shredded sharp cheddar cheese
1 cup (4 oz.) shredded Monterey/Colby/Pepper Jack cheese
handful minced fresh cilantro (I used 1/4 cup)
~12 (6-inch) soft corn or flour tortillas (I slightly larger flour tortillas)

for serving:
sour cream
shredded lettuce
diced tomato/salsa/pico de gallo
sliced avocado or guacamole
fresh cilantro or chives, for garnish

DIRECITONS

  1. In a large saucepan, combine the onion, jalapeno/chipotle, 1/2 tsp. salt, and oil. Cover and cook over medium-low heat, stirring often, until the onions and peppers have softened, 8-10 minutes. Stir in the garlic, chili powder, cumin, and sugar, and cook until fragrant, 30 seconds or so. Stir in the tomato sauce and water. Bring to a simmer.
  2. Nestle the chicken into the sauce. Reduce heat to low, cover, and cook until chicken is cooked through, about 10-15 minutes, depending on the size and thickness of the chicken breasts you are using. Transfer the chicken to a plate, and set aside to cool slightly. Continue to simmer the sauce over medium heat until slightly thickened, about 5 minutes.
  3. Strain the sauce through a fine mesh strainer into a medium bowl, pressing the onion mixture with a spoon or spatula to extract as much liquid as possible. Season the sauce with additional salt and pepper to taste, if needed.
  4. Transfer the leftover onion mixture from the strainer to a large bowl and set aside. Shred the chicken into bite-sized pieces and add to the onion mixture in the large bowl. Stir in 1/4 cup of the reserved enchilada sauce, 1/2 cup cheddar cheese, 1/2 cup Jack cheese and the cilantro. Toss to combine.
  5. Stack the tortillas on a plate and cover with plastic wrap or damp paper towels. Microwave on high until warm and pliable, 40-60 seconds. Spread the tortillas on a clean work surface, and spoon 1/3 cup of the chicken mixture evenly down the center of each. Tightly roll each tortilla and lay seam-side down in a greased 9×13 inch baking dish.
  6. Preheat the oven to 400 F. Pour the enchilada sauce evenly over the top of the enchiladas. Top with the remaining cheese. Cover the dish with foil and bake 20-25 minutes or until heated through.
  7. Remove the foil and bake another 5 minutes, until the cheese browns. Remove from the oven and let stand 10 minutes before serving.
  8. Serve with sour cream, lettuce, guacamole, salsa, additional cilantro, etc. if desired.

Makes a 9×13 pan of enchiladas.

Adapted from Mel’s Kitchen Cafe

Crispy Pan-Fried Tilapia

July 13, 2020

I’m not above buying frozen fish sticks for an easy quick dinner. But I had some frozen tilapia on hand and figured this recipe was worth a go. As written it was very simple: dredge the fish fillets in some flour, egg, and panko to coat. Then fry them in some oil on a hot skillet. Serve with lemon and tartar (this homemade recipe is THE BEST). I decided to kick up the flavor a notch by adding Cajun seasoning. I didn’t have that on hand so I found a recipe and mixed it myself. (It makes more than you’ll need but will store in an airtight container for a least a year.) The fish was tender and flakey, crisp on the outside from the lightly fried panko crust, and so delicious with that tartar sauce.

You could definitely opt to bake the tilapia fillets instead. They just won’t be quite as rich or crispy. Preheat an oven to 400 F, place the prepared fillets on a baking sheet lined with foil, coat them in nonstick cooking spray, and bake until they’re golden and the centers flake easily.

Crispy Pan-Fried Tilapia

INGREDIENTS

Tilapia:
2 lbs. tilapia fillets
1 cup all-purpose flour
3 eggs, beaten
2 cups panko bread crumbs
Cajun seasoning, to taste (I used 2 tsp. of the recipe below and it had a kick but wasn’t too spicy for my kids)
salt and freshly ground black pepper, to taste
olive or vegetable oil (I used grape-seed oil), for frying

lemon wedges, for serving
tartar sauce, for serving

Cajun Seasoning:
1 Tbsp. paprika (I prefer smoked paprika)
2 tsp. fine kosher salt
2 tsp. garlic powder
1 tsp. ground black pepper
1 tsp. ground white pepper
1 tsp. onion powder
1 tsp. dried oregano
1 tsp. cayenne pepper
1/2 tsp. dried thyme

DIRECTIONS

To make the Tilapia:

  1. Cut the tilapia into “fingers” by first cutting the fillets in half. Leave the thin sides long, then cut the thicker sides in half on a diagonal so they appear longer. (I just cut my fillets in half.)
  2. Set up three large shallow bowls in an assembly line. Put the flour in the first bowl; the beaten eggs in the second; and the panko (and the Cajun seasoning, if using) in the third.
  3. Line a baking sheet with aluminum foil. Dredge the fish fingers in the flour mixture, shaking excess into the bowl so just a light coating remains; dip in the eggs and turn to coat evenly; then dredge in the panko, turning several times to coat evenly. (This can be a messy job…it’s best to use one hand for the flour and eggs and the other for the panko.) Set the breaded tilapia fingers on the prepared baking sheet and season with salt and pepper. Cover and refrigerate until ready to cook (this can be done several hours ahead of time).
  4. Line a plate with 3 paper towels and set by the stove. Coat a large non-stick sauté pan generously with olive oil and place over medium heat. When the pan is hot, place the first batch of tilapia fingers in the pan (do not crowd) and cook until the first side is golden brown, 2-3 minutes. Flip and continue cooking until done, about 2 minutes more. Transfer the fish fingers to the plate with paper towels and let sit for a minute to drain any excess oil. Remove any brown bits out of the pan, add more oil if necessary and continue to cook the fish in batches until done. Season the cooked tilapia fingers with more salt if desired. Serve with lemon wedges and tartar sauce.

To make the Cajun Seasoning:

  1. Mix all ingredients together in a bowl or spice jar until evenly combined. Use immediately, or store in a sealed container for up to 1 year.

Serves 4-6.

Tilapia adapted from Once Upon a Chef and Cajun seasoning from Gimme Some Oven

Arugula, Apple, and Manchego Salad

July 10, 2020

If you’re not familiar with Manchego, let me introduce you to my favorite cheese! Machego is a Spanish sheep’s milk cheese that is semi-firm and buttery while slightly sweet and nutty. It melts well (think grilled cheese) and is delicious with fruit and nuts, meats (in Spain they often serve it with Serrano ham), or bread/crackers on a cheese board or in a salad. Trader Joe’s and Costco carry versions, but you should be able to find it at most local supermarkets. If you’re looking for more ways to use it I have a handful of other recipes with Manchego here.

This arugula salad was meant as a side dish, but I ended up devouring most of it before dinner made it to the table (and spoiling my appetite hah)! Arugula, crisp apple, toasted sliced almonds, and Manchego are tossed with a light cider-maple vinaigrette. It’s simple and so delicious.

Arugula, Apple, and Manchego Salad

INGREDIENTS

Salad:
5 ounces arugula/baby arugula
1 crisp apple (such as Honey-crisp)
3.5 oz. Manchego, thinly sliced or grated
1/2 cup sliced almonds, lightly toasted

Vinaigrette:
1 Tbsp. cider vinegar
3 Tbsp. vegetable oil (I used grape-seed oil)
1 Tbsp. maple syrup
1/2 tsp. Dijon mustard
1/2 Tbsp. finely chopped shallot
~1/8 tsp. salt
~1/8 tsp. freshly ground black pepper

DIRECTIONS

  1. Make the vinaigrette by whisking all of the ingredients together in a small bowl. Set aside.
  2. Place the arugula in a serving bowl. Whisk the vinaigrette again until well combined, then add to the salad, little by little, until the greens are well dressed. Right before serving, cut the apple into thin slices and toss into the salad along with the Manchego and almonds. Taste and adjust seasoning, then serve immediately.

Serves 2-4 (but can be easily doubled, tripled, etc!).

Adapted from Once Upon a Chef

Smothered Chicken Burritos with Green Chile Sauce

July 8, 2020

I’m proud of myself for posting so regularly lately. I’m determined to make my way through my digital stack of must-share recipes! I did miss a post on Monday because we were road-tripping back from visiting family. Our drive home was especially eventful because we decided to adopt my sister’s cat and she joined us on our 14 hour drive and hotel stay. Let’s just say we didn’t get any sleep that night but she was great in the car and now we have the sweetest cat ever as our first family pet! (And my girls are just in heaven.) But back to food…

This smothered chicken burrito recipe has been wildly popular on Pinterest and among my friends/family. And I’m not surprised… the creamy green chile sauce is addictive! The filling is adaptable (you can add rice or beans or veggies to your chicken, you could even make them vegetarian or switch up the meat). I think you could smother just about anything in that sauce and it’d taste good! Hahah I’m picturing some interesting concoctions now. Just add this recipe to your next meal plan (do you meal plan? I admit, I rarely do!)… you wont regret it!

Smothered Chicken Burritos with Green Chile Sauce

INGREDIENTS

Sauce:
1 Tbsp. butter
1 Tbsp. olive oil
2 Tbsp. flour
2 cups low-sodium chicken broth
1/2 tsp. ground cumin
pinch Mexican oregano
1 small clove garlic, minced
1/2 cup sour cream
1/2 cup Cheddar/Colby/Pepper Jack cheese 
1 4-oz. can mild green chiles
salt and freshly ground black pepper, to taste

Filling:
2-3 cups cooked shredded chicken (I like to use rotisserie)
2 green onions, sliced
1- 1 1/2 cups red salsa (enough to coat the chicken, as mild or spicy as you want)
1 1/2 cups Cheddar/Colby/Pepper Jack cheese 
1 cup pinto beans (or black beans or rice or a vegetable like spinach/corn)
3/4 tsp. ground cumin
1/2 tsp. Mexican oregano
salt and freshly ground black pepper, to taste

6-8 large (8-10 inch) flour tortillas
extra Cheddar/Colby/Pepper Jack cheese for topping

for serving:
shredded lettuce
diced tomatoes/pico de gallo/salsa
chopped cilantro
avocado or guacamole

DIRECTIONS

  1. Preheat oven to 400 F. Line a baking sheet with foil.
  2. In a large bowl, mix filling ingredients: chicken, salsa, cumin, oregano, cheese and onions. Place a heaping 1/2 cup or so of the chicken mixture in the center of each tortilla.
  3. Fold the sides of the tortilla in and roll up like a burrito. Place seam-side down on baking sheet. Brush lightly with olive oil or spray with non stick cooking spray.
  4. Bake at 400 F for about 20-25 minutes or until golden brown and crispy.
  5. Meanwhile, prepare sauce by melting butter in a medium saucepan over medium heat. Once melted and bubbling, whisk in flour and cook, stirring constantly for about 3 minutes. Add minced garlic and stir for 30 seconds. Gradually whisk in chicken broth. Add cumin, oregano, and a dash of salt and pepper and cook, stirring, until thickened, about 2-3 minutes. Remove from heat and stir in green chilies, cheese and sour cream. Tastes and add more seasonings if needed.
  6. Remove burritos from oven and turn the oven to HIGH broil. Ladle a spoonful of sauce over each burrito and top with a handful of shredded cheddar cheese. Broil for 2-3 minutes, or until cheese has melted. 

Adapted from Carlsbad Cravings and Tastes Better from Scratch

Cherry Pie Cookie Bars

July 3, 2020

Early every summer the roadside cherry stands show up in Washington and we stop and buy local cherries by the bagful. I don’t like pitting them (but this little tool helps a lot) or cleaning up the mess after my kids cover themselves in cherry juice, but we LOVE fresh cherries. I’ve been making this dessert the last couple summers and it’s time I shared it here. These cherry pie bars have a base/crumble similar to a sugar cookie, a juicy cherry-almond filling, and a sticky sweet lemon glaze. It just crossed my mind how sprinkling sliced almonds on top would make them extra beautiful/delicious!

The hardest part of this recipe is making sure the bars get cooked through. Because the cherries release a lot of moisture, I pre-bake the crust a bit before adding the filling. I also added more cornstarch to help it thicken. Even if it takes longer than the suggested baking time, don’t take the bars out of the oven if the center is still doughy. I’ve made that mistake before and had to toss the center of the dish. The bars will set up more as they cool. They’re the best served with a scoop of vanilla bean ice cream.

Cherry Pie Cookie Bars

INGREDIENTS

Cherry Pie Filling:
5 cups fresh Bing/sweet cherries, pitted and halved (about 1 1/2 to 2 lbs., you can use frozen cherries, but make sure they are thawed and the juices drained off)
1/3 cup sugar
2 Tbsp. cornstarch
1/4 tsp. almond extract

Cookie Dough:
1 cup (2 sticks) butter, softened
1 cup sugar
2 Tbsp. milk
1 tsp. baking powder
1/2 tsp. baking soda
1/4 tsp. salt
1 large egg
1 large egg yolk
2 1/4 cups all-purpose flour

Lemon Glaze:
1 cup powdered sugar
1 tsp. lemon zest
~1 Tbsp. milk + extra to thin glaze

DIRECTIONS

  1. Preheat the oven to 350 degrees F. For easier cleanup, line a 9X13-inch baking pan with parchment paper or aluminum foil. Lightly grease the parchment/foil with nonstick cooking spray and set aside.
  2. In a medium bowl, stir together the cherries, sugar, cornstarch, and almond extract. Let sit while making the crust.
  3. For the cookie dough, with an electric mixer (handheld or stand mixer), cream together the butter, sugar, milk, baking powder, baking soda, and salt until light and fluffy, 2-3 minutes. Add the egg and egg yolk. Mix until well-combined. Add the flour and mix until just combined and no dry streaks remain.
  4. Take 2/3 of the dough (more or less) and press into the bottom of the pan. It helps to drop pieces relatively evenly across the bottom before spreading into an even layer. You can use your hands or a knife to spread the dough as it’s a bit sticky.
  5. Par-bake the bottom crust in the preheated oven for 15 minutes, it should puff and start to set but not be cooked through or brown. Remove from the oven,
  6. Give the cherry filling a good stir and pour over the top of the bottom crust. Pinch off quarter-size pieces of the remaining dough and drop on top. It won’t cover the cherry filling all the way but will puff and spread while baking.
  7. Bake for 30-40 minutes until the cherry filling is bubbling and the edges of the dough are golden. (Test to center with a knife to make sure that it’s not still doughy. If the bars are browning too fast before the center sets you can lightly tent them with foil while they finish baking.) When the bars are done, remove them from the oven and set them aside to cool.
  8. For the glaze, whisk together the powdered sugar, lemon zest and milk until thick and pourable (add milk a little at a time if needed to thin the consistency).
  9. Drizzle the glaze over the top of the bars. Serve the bars at room temperature or slightly warm with vanilla ice cream.

Makes a 9×13 pan of bars.

Adapted from Mel’s Kitchen Cafe