Mini Cheesecakes

June 12, 2020

A couple years ago my friend Anna (who is an incredibly talented at cakes!) started a baking club for her girls and some friends. They would play and learn to bake something new and always come home with a yummy treat. It became the highlight of Clara’s month! When Anna moved away I promised my girls we could start a baking club of our own and so we did- twice now in our two different homes. It’s always a huge mess but so much fun and I love seeing how excited they get about creating something delicious!

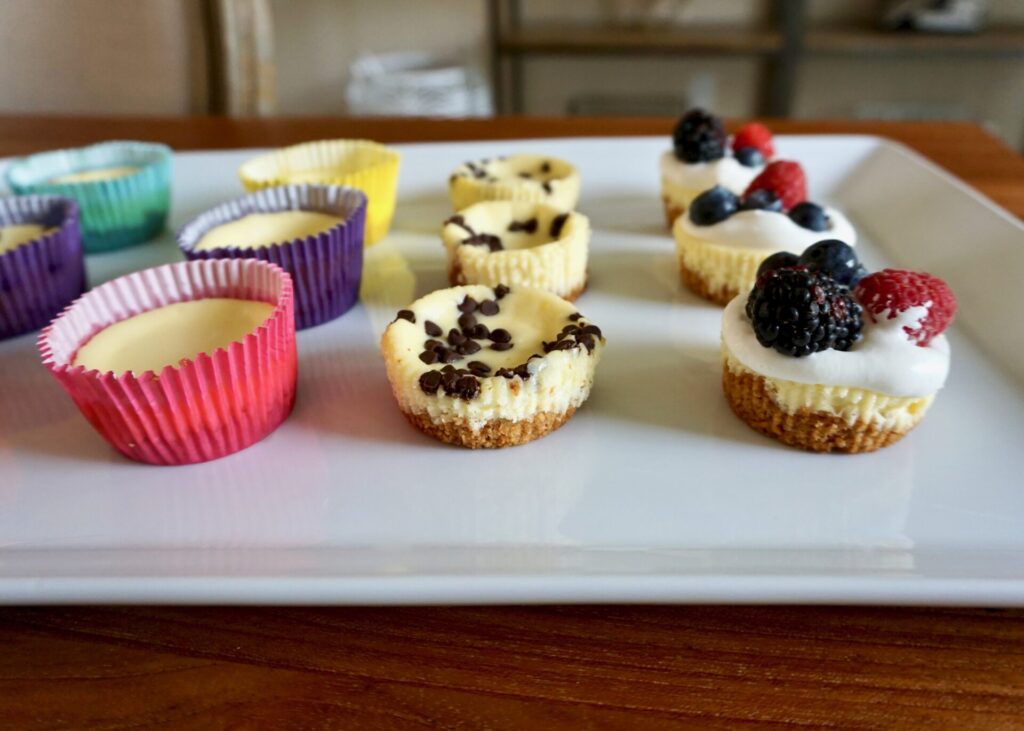
We made these mini cheesecakes for baking club earlier this year (before we all went into isolation). They were simple enough to bake with 5 kids and because they’re so tiny, they’re quick to set up. And they were a huge hit! I didn’t photograph them then, so we made them again last weekend and we still think they’re the best. I stretched the recipe to make 12, but if you want them a little larger just fill 9 muffin cups. We sprinkled some with mini chocolate chips before they went into the oven and the rest we left plain and served with homemade whipped cream and fresh berries.

Mini Cheesecakes

INGREDIENTS

Graham Cracker Crust:
2/3 cup graham cracker crumbs (about 4-5 full sheet graham crackers)
2 Tbsp. unsalted butter, melted
1 Tbsp. sugar

Cheesecake:
one 8-ounce block full-fat cream cheese, softened to room temperature
1/4 cup sugar
1/4 cup full-fat sour cream, at room temperature
1/2 tsp. pure vanilla extract
1 tsp. fresh lemon juice (optional, but recommended)
1 large egg, at room temperature

topping suggestions: mini chocolate chips, salted caramel, lemon curd, strawberry topping, chocolate ganache, fresh fruit or maraschino cherries, homemade whipped cream, or raspberry sauce

DIRECTIONS

  1. Preheat oven to 350 F. Line a 12-count muffin pan with 9-12 liners. This recipe yields only 9-12 mini cheesecakes, (depending how full you fill them). You could skip the liners and spray the pan with non-stick spray or grease with butter, but the mini cheesecakes are pretty stubborn to release from the pan. I recommend using liners to make things easier.
  2. Make the crust: Combine all of the crust ingredients in a medium bowl. Mixture will be sandy. Firmly press a heaping Tablespoon of crust mixture into each liner. (I use closer to 1 and 1/2 Tablespoons of crust per mini cheesecake.) Pre-bake for 5 minutes.
  3. Make the filling: Using a handheld or stand mixer fitted with a paddle or whisk attachment, beat the cream cheese and granulated sugar together on medium-high speed in a large bowl until the mixture is smooth and creamy, about 1 minute. Add the sour cream, vanilla extract, and lemon juice then beat until fully combined. On medium speed, add the egg and beat just until combined. Batter will be thick. Divide the batter between all the liners. (If you want to add mini chocolate chips, sprinkle some on top before you bake the cheesecakes.)
  4. Bake until the edges are set and the centers only slightly jiggle, about 18-20 minutes.
  5. Set the pan on a wire rack and allow cheesecakes to cool at room temperature for 30 minutes, then transfer to the refrigerator and chill for at least 2 hours and up to 1 day. If chilling for longer than 2 hours, loosely cover the cheesecakes. The cheesecakes will slightly sink in the middle as they chill. It gives you room for toppings!
  6. Once chilled, add toppings and serve. Cover and store leftover cheesecakes in the refrigerator for up to 5 days.

Makes 9-12 mini cheesecakes.

(Adapted from Sally’s Baking Addiction)

Halal Cart-Style Chicken and Rice with White Sauce

June 10, 2020

In April I was supposed to visit New York City with my littlest sister and we had plans to see lots of sights/shows and eat all the food. Thanks to coronavirus that trip didn’t happen… hopefully next year! Our list of must-eats included the famous Halal Guys street cart. (Which I’ve never had but my sister promised is worth a stop.) After our trip was cancelled I came across this recipe and had to try making it myself! Since I’ve yet to eat the original, I can’t speak to the authenticity of the recipe but it sure is delicious. My husband declared it one of his favorite meals. My kids (who love most mediterranean/middle eastern food) also approved. It takes some time because of all the different components- the chicken, the rice, the sauce- but it’s worth the effort!

I used chicken breast instead of thigh. If you don’t overcook the meat, it’ll still be tender and juicy. Besides using a lower-sodium chicken broth I made the rice as directed. The sauce I altered slightly: after reading a lot of reviews of this recipe I decided to up the yogurt and use less mayo, which meant I needed less vinegar. I also added a bit of fresh garlic. Definitely use iceberg lettuce- I think it’s the first time I’ve bought iceberg in like 10 years but it’s perfect here. Serve with warm fluffy pita and some harissa hot sauce (or sambal oelek is similar enough).

Halal Cart-Style Chicken and Rice with White Sauce

INGREDIENTS

Chicken:
2 Tbsp. fresh lemon juice
1 Tbsp. chopped fresh oregano (or 1 tsp. dried)
1/2 tsp. ground coriander seed
3 cloves garlic, roughly chopped
1/4 cup olive oil
Kosher salt and freshly ground black pepper, to taste
2 pounds boneless, skinless chicken thighs, trimmed of excess fat (I used chicken breast and cut them into thin strips for more even cooking)
1 Tbsp. vegetable or canola oil

Rice:
2 Tbsp. unsalted butter
1/2 tsp. turmeric
1/4 tsp. ground cumin
1 1/2 cups long-grain or Basmati rice
2 1/2 cups chicken broth (I used low-sodium)
Kosher salt and freshly ground black pepper, to taste

White Sauce:
1/2 cup mayonnaise
1/2 cup plain Greek yogurt (use full fat for the best flavor)
1 tsp. sugar
2-3 tsp. white vinegar (if you use more mayo than yogurt, you can reduce the vinegar further)
1 tsp. lemon juice
~1/2 tsp. freshly minced garlic (optional, but recommended)
2-3 Tbsp. chopped fresh parsley
Kosher salt and freshly ground black pepper, to taste

to serve:
1 head iceberg lettuce, shredded
1 large tomato, cut into wedges
Fluffy pocketless pita bread, brushed in butter, lightly toasted, and cut into 1 × 3-inch strips
Harissa-style hot sauce, for serving (I used sambal oelek, but I just found a harissa hot sauce at Trader Joes and will use that next time!)

DIRECTIONS

  1. For the chicken: Combine the lemon juice, oregano, coriander, garlic, and olive oil in a blender. Blend until smooth. Season the marinade to taste with kosher salt and black pepper. Place the chicken in a 1-gallon zipper-lock bag and add half of the marinade (reserve the remaining marinade in the refrigerator). Turn the chicken to coat, seal the bag, and marinate the chicken in the refrigerator for at least 1 hour and up to 4 hours, turning occasionally to redistribute the marinade (see Note).
  2. Remove the chicken from the bag and pat it dry with paper towels. Season with kosher salt and pepper, going heavy on the pepper. Heat the oil in a 12-inch heavy-bottomed cast iron or stainless-steel skillet over medium-high heat until it is lightly smoking. Add the chicken pieces and cook without disturbing until they are lightly browned on the first side, about 4 minutes. Using tongs, flip the chicken. Reduce the heat to medium and cook until the chicken is cooked through and the center of each thigh registers 165°F. on an instant-read thermometer, about 6 minutes longer. Transfer the chicken to a cutting board and allow to cool for 5 minutes.
  3. Using a chef’s knife, roughly chop the chicken into 1/2- to 1/4-inch chunks. Transfer to a medium bowl, add the remaining marinade, cover loosely with plastic, and refrigerate while you cook the rice and prepare the sauce.
  4. For the rice: Melt the butter over medium heat in a large Dutch oven. Add the turmeric and cumin and cook until fragrant but not browned, about 1 minute. Add the rice and stir to coat. Cook, stirring frequently, until the rice is lightly toasted, about 4 minutes. Add the chicken broth. Season to taste with salt and pepper. Raise the heat to high and bring to a boil. Cover, reduce to a simmer, and cook for 15 minutes without disturbing. Remove from the heat and allow to rest until the water is completely absorbed and the rice is tender, about 15 minutes.
  5. For the sauce: In a small bowl, combine the mayonnaise, yogurt, sugar, vinegar, lemon juice, parsley, and ~1 teaspoon black pepper (adjust to taste). Whisk to combine. Season to taste with salt (I used about 1/4 tsp. kosher salt).
  6. To serve: Return the entire contents of the chicken bowl (chicken, marinade, and all juices) to the skillet. Cook over medium-high heat, stirring occasionally, until heated through. To serve, divide the rice, lettuce, tomato, and toasted pita bread evenly among four to six plates. Pile the chicken on top of the rice. Top with the white sauce and hot sauce. Serve immediately, passing extra sauce at the table.

Note: Do not marinate the chicken longer than 4 hours or it’ll get a mushy texture. If you must delay cooking the chicken for any reason, remove it from the marinade, pat it dry with paper towels, and refrigerate until ready to cook.

Serves 4-6.

Adapted from Serious Eats

Fish Tacos

June 8, 2020

We love fish tacos but we don’t live in San Diego and can’t have them nearly as often as we wish. (Though there are some great fresh fish options here in the Pacific Northwest… the tacos are just not quite as authentic.) But we love this recipe and think it’s the best way to enjoy them at home! Tilapia is my first choice of flakey white fish for tacos. Cod can be a little tough and halibut, though wonderful, is super expensive. Whatever fish you choose gets marinaded for a short time (while you prep your sauce/toppings) before going on the grill (or under the broiler if it’s not ideal grilling conditions or you don’t have one). Warm tortillas, a creamy garlic/lime/hot sauce, and all the toppings- don’t skip the Cotija and avocado they’re awesome here!- finish the tacos off. Hint: you can make the fish and sauce as mild or spicy as you want by adjusting the cayenne and hot sauce. We kept it medium for the little mouths but feel free to kick it up!

Fish Tacos

INGREDIENTS

Fish:
1 – 1 1/2 lbs. lean white fish fillets (I used tilapia, can use halibut, mahi mahi, snapper, cod)
salt and freshly ground black pepper
2 Tbsp. canola or vegetable oil
1 small lime , juiced
1 clove garlic , minced
1 1/2 tsp. chili powder
1 tsp. ground cumin
1/2 tsp. paprika
1/8 tsp. cayenne (optional, or use more to make it spicy)
8- 12 corn or flour tortillas (this recipe has a method for making crispy tortilla shells in the oven that would be amazing here!)

Sauce:
1/2 cup sour cream
1/3 cup mayonnaise (I used half mayo and half plain low-fat Greek yogurt)
1/2 lime , juiced
1/2 tsp. garlic powder
1/2 tsp. cumin
¼ tsp. salt
1 tsp. sriracha hot sauce, or to taste (I used 1/2 tsp. of a chipotle hot sauce for a mild kick)

Toppings:
pico de gallo or diced tomato
Cotija cheese, crumbled
shredded cabbage
fresh cilantro
sliced avocado
lime wedges
diced white or red onion
hot sauce

DIRECTIONS

  1. Season the fish with a little salt and pepper on both sides.
  2. In a mixing bowl whisk together the oil, lime juice, garlic, chili powder, cumin, paprika, cayenne.
  3. Add fish to a large ziplock bag and pour the marinade over fish. Seal bag and allow fish to marinade for 20-30 minutes.
  4. Preheat grill to medium-high heat. Brush grill grates with oil and grill fish filets for about 3-4 minutes on each side (cook time will vary depending on thickness of fish), flipping only once. OR Preheat oven broiler to high. Place fish on a lightly greased foil-lined baking sheet and broil for 5-7 minutes until fish flakes easily with a fork (if you have extra thick fillets it could take longer).
  5. Add the tortillas to the grill and warm for about 15 seconds on each side (or warm in the oven or microwave).
  6. Transfer fish to a plate and allow to rest for a few minutes before gently breaking into pieces.
  7. Serve on warm tortillas, topped with cabbage, pico de gallo, sauce and other desired toppings.

Adapted from Tastes Better from Scratch

Blueberry Dutch Baby (Puff Pancake)

June 5, 2020

We’ve been making this sweet blueberry Dutch baby on repeat the last few months. Since it’s not blueberry season in Washington yet (it’s coming… and it’s my favorite time of the year here!), I’ve also used frozen blueberries- the tiny wild ones are the best. We usually top our puff pancakes with Ellenos Greek Yogurt. Ellenos is another one of my favorite things about living near Seattle- it’s the most amazing Greek yogurt you’ll ever taste! It’s comes in so many flavors, but vanilla, lemon, Marionberry, and honey are all great choices here. They’ve started selling select flavors at some stores nationwide- hooray!- and when you’re visiting Pike Place Market you must stop and experience it yourself (the crumbles can’t be missed)!

This blueberry dutch baby can also be served with maple syrup, powdered sugar, a squeeze of lemon, fruit, jam, whipped cream, or even ice cream! It’s best made in a cast iron skillet but if you don’t have one, use a 9×13 baking dish (preheat in the oven to melt the butter as directed, being careful to not touch the hot pan as you’re pouring the batter in). The pancake will deflate once it’s removed from the oven but keep its crisp edges and ruffled center.

Blueberry Dutch Baby (Puff Pancake)

INGREDIENTS

3/4 cup whole milk
3 large eggs
2 Tbsp. maple syrup (or light brown sugar)
1 tsp. pure vanilla extract
3/4 cup all-purpose flour
1/4 tsp. salt
3 Tbsp. unsalted butter, sliced
3/4 cup blueberries (I’ve used both fresh blueberries and wild frozen blueberries)
powdered sugar, for dusting (optional)

DIRECTIONS

  1. In a bowl whisk together the whole milk, eggs, maple syrup, and vanilla extract. Add the flour and salt and whisk in until there is no dry flour. Set aside.
  2. Heat the oven to 425 F. Place a 12 inch cast iron skillet in the oven as it heats.
    Add the butter and blueberries to the skillet and put it back in the oven for 1-2 minutes, or until the butter is fully melted. Swirl the skillet to make sure the whole bottom is coated with butter.
  3. Pour the batter into the skillet and give it a stir to distribute the berries.
  4. Bake the Dutch baby for about 15 minutes, until it has puffed, the edges are golden, and the center is set.
  5. Remove from the oven and dust with powdered sugar (optional). Other toppings can include blueberry (or other) jam, whipped cream, lemon juice, Greek yogurt, maple syrup, even ice cream!

Makes 1 large (12 inch round) puff pancake.

Adapted from Just a Little Bit of Bacon

Turkey Havarti Panini with Stoneground Mustard Aioli

June 3, 2020

This is another cafe-inspired sandwich that I’ve mastered at home. There was a great lunch spot near our last house with the friendliest couple that cooked and ran the business together. I became a regular for a bit when I was pregnant with Damen and couldn’t stomach much of anything, especially anything I made for myself. (It’s a miserable 9 months when I’m pregnant and explains my repeated absences over the last 9 years.) Anyway, I craved this cute cafe’s sandwiches, particularly this one with turkey and havarti. So I’d call my order in and when I’d come in to pick up my lunch they’d ask how I was feeling and comment on how my belly was growing. A few times I took my kids to dine in and they’d bring them cups of blueberries and not mind when my children made extra messes. The kind of place I want to run if I have a restaurant someday…

This sandwich made me fall in love with stoneground mustard AND Havarti. I wasn’t very familiar with either until I had this combination and realized how delicious they both are, and even better together! Stoneground mustard gets mixed with mayonnaise and some fresh lemon to make a simple aioli. (I realize aioli usually has garlic in it, but theirs didn’t- I can’t eat garlic when I’m pregnant so I definitely asked!- so I don’t include it either.) The mustard flavor in this aioli isn’t overwhelming… it’s subtle enough that my kids will eat it. Havarti is creamy and melts just right for a panini and is one of my favorite cheeses now! Sliced tomato and arugula are optional but I love it with both. Use a crusty loaf of sourdough for the best flavor, a little butter or oil for an extra crisp outside and you’ll have a perfect panini.

Turkey Havarti Panini with Stoneground Mustard Aioli

INGREDIENTS

crusty white or wheat bread (preferably sourdough)
oven roasted turkey, thinly sliced
Havarti cheese, grated or sliced
tomato, sliced (optional)
arugula (optional)

Stoneground Mustard Aioli:
1/4 cup mayo
1 Tbsp. stoneground mustard
1/2 tsp. lemon juice
1-2 tsp. chopped chives (optional, but recommended)
pinch freshly ground black pepper

DIRECTIONS

  1. Preheat a panini press or pan on the stove to medium heat.
  2. To make the aioli, stir to combine the mayo, mustard, lemon juice, chives, and a pinch of pepper in a small bowl.
  3. To assemble the sandwiches, spread aioli on one side of a slice of bread. Layer with Havarti, turkey, tomato, and arugula. Top with the second slice of bread (you can add more aioli if you want).
  4. Brush the preheated panini press or pan with some butter or olive oil. Grill the sandwich, flipping halfway through if necessary, until the cheese has melted and the outside is crisp and golden.

Makes enough aioli for about 4 sandwiches.