Angel Biscuits

June 1, 2020

I’m realizing I should have taken a picture of one of these biscuits cracked open, slathered in butter and dripping honey. That’s the best way to enjoy them! They’re plenty buttery and rich on their own, of course, but you’ve got to have one with honey or some really good jam. Then they’re unforgettable! I’d choose that over most desserts any day.

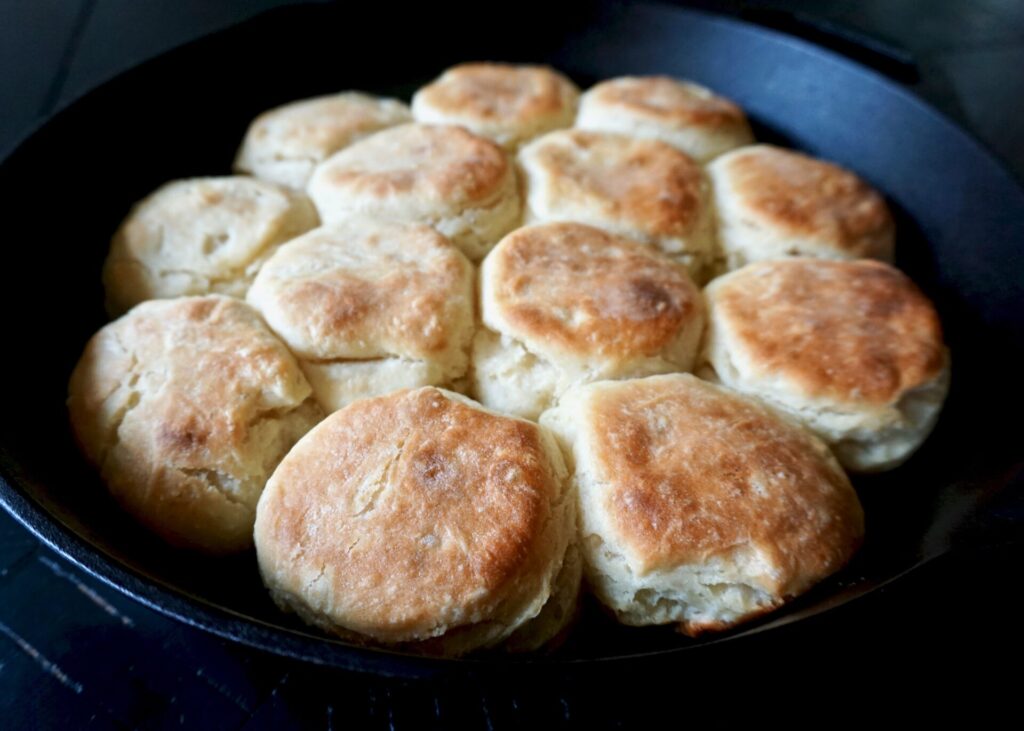
Angel biscuits are a hybrid of biscuits and dinner rolls because they use yeast (but still a lot of butter). You have a longer rise but get a lighter, fluffier, taller biscuit with the texture somewhere in-between. It’s a good thing. I promise. I like baking them in a cast iron skillet for an extra crisp bottom.

Angel Biscuits

INGREDIENTS

2 1/2 cups all-purpose flour
2 tsp. baking powder
1/2 tsp. baking soda
1/2 tsp. kosher salt
2 1/2 Tbsp. sugar
2 Tbsp. warm (90-110 F) water
1 package (2 1/4 tsp.) active dry yeast
1/2 cup (1 stick) butter, cold, cut into small squares + 2 Tbsp. extra melted butter for the pan and brushing on top
1 cup buttermilk

DIRECTIONS

  1. Preheat the oven to 425 degrees F.
  2. In a large bowl, whisk together the flour, baking powder, baking soda, salt and 1 1/2 Tbsp. of the sugar.
  3. In a small bowl, combine the warm water with the yeast and the remaining 1 tablespoons sugar; stir until the yeast is dissolved. Let stand until bubbles appear, 2 to 3 minutes.
  4. Using your hands, mix the 1/2 cup cold butter into the flour, breaking the butter into small pebbles, until the mixture resembles coarse meal. Make a well in the center and add the buttermilk and the yeast mixture. Gently fold the flour into the wet ingredients. Keep mixing until a ball starts to form, then gently knead, 12 to 15 times, to create a smooth dough. Cover with a cloth or plastic wrap and let rise in a warm place for approximately 1 hour.
  5. Transfer the dough to a lightly floured work surface and press out to 1- to 1 1/2-inches thick. Fold the dough in half, press again to 1- to 1 1/2-inches thick, and then fold again. Cut the dough using a 2- to 3-inch round biscuit cutter, depending personal preference. Brush the bottom of a cast-iron skillet with some of the melted butter. Place the biscuits in the skillet; brush the tops with melted butter.
  6. Bake until golden brown, 15-20 minutes, depending on size. Brush again with melted butter and serve immediately. 

Makes about 12 small or 6 large biscuits.

Adapted from Food Network

Salsa Verde Chicken Nachos

May 29, 2020

Whenever tortilla chips are in sight I always end up eating way too many -especially if guacamole is involved- and filling up before I get to the rest of my meal. Who says guac/salsa and chips can’t be a meal, anyway? Well, nachos is the solution. It makes tortilla chips the main event and you can add as many toppings (lots of protein, even veggies) to make it more healthful/filling!

These salsa verde chicken nachos are our latest favorite creation. It’s a simple concoction: toss chicken in salsa verde and pile it on a bed or crispy chips with lots of cheese, beans, and corn. When it comes out of the oven all toasted and melty, add the peppers and onion, cilantro, tomatoes/salsa, avocado, and sour cream. It’s a feast.

Salsa Verde Chicken Nachos

INGREDIENTS

tortilla chips (our favorite are Late July Thin and Crispy)
cheese, grated (Colby/Monterey/Pepper Jack, Cheddar, Mexican blend, etc.)
cooked chicken, shredded
salsa verde (our favorite is Trader Joe’s)
black or pinto beans
corn (fresh or frozen)
red/orange/yellow bell pepper, diced
green onion or chives, chopped
cilantro, chopped
tomato, diced
pico de gallo or salsa
sour cream
guacamole or avocado, pitted and sliced
pickled or fresh jalapeno, sliced

DIRECTIONS

  1. Preheat oven to 400 F. Line a large baking sheet with aluminum foil and coat with cooking spray. Toss chicken in salsa verde to coat. Spread a layer of tortilla chips on the pan, top with a generous amount of shredded cheese, chicken, beans, and corn (and any other toppings you want baked in the oven). Sprinkle a bit more cheese on top.
  2. Bake in preheated oven for 15-20 minutes until the cheese has fully melted and the chips are beginning to brown.
  3. Remove from the oven and top with additional toppings: red pepper, onion/chive, cilantro, tomato, pico/salsa, sour cream, guacamole/avocado, jalapeno, etc. and serve immediately.

Creamy Tuscan Tortellini Soup

May 27, 2020

We loved the last one so much I made another tortellini soup! This one has a creamy tomato base, Italian sausage (or you can use shredded chicken), white beans, carrots, spinach, and of course, lots of Parmesan cheese on top. Adding tortellini seems to be the only way I can get one of my kid to eat soup. You could substitute any pasta but the cheese-filled tortellini gives it an extra boost of flavor. Other suggestions: up the veggies by adding mushrooms or zucchini, etc. Skip the meat and use veggie broth to make it vegetarian. Ravioli instead of tortellini would be awesome. Stir in cream instead of the milk/flour combo. That would be decadent. Use fresh herbs instead of dried. This is such a great base recipes the options are really endless…!

Creamy Tuscan Tortellini Soup

INGREDIENTS

1 Tbsp. olive oil
1/2 cup finely diced onion
1 cup diced carrots (about 3 medium carrots, peeled)
3 cloves garlic, finely minced
4 cups chicken broth (I use low-sodium)
28-oz. can crushed tomatoes
1 tsp. dried basil
1/2 tsp. dried oregano
1/4 tsp. dried thyme
1 tsp. kosher salt
1/8 tsp. black pepper
10 oz. cheese tortellini
1 1/2 cups milk (I use whole milk)
3 Tbsp. all-purpose flour
1 (15-oz.) can Great Northern or Cannellini beans, drained and rinsed
8 oz. Italian chicken sausage- mild or spicy (OR pork/turkey sausage OR 2 cups cooked, shredded chicken)
2-3 cups lightly packed, coarsely chopped fresh spinach (I used 1 cup frozen chopped spinach, measured before it was thawed)
freshly grated Parmesan cheese, for serving

DIRECTIONS

  1. In a large pot, heat the oil over medium heat and add the onions and carrots. Cover the pot and cook/sweat the mixture, stirring occasionally, until the vegetables are tender, 3-4 minutes. Add the garlic and cook, stirring constantly, for about 30 seconds. If you’re using sausage, you want to add it now and cook it until browned. (If you’re using chicken breast you’ll add it later.)
  2. Add the broth, crushed tomatoes, basil, oregano, thyme, salt and pepper. Bring the mixture to a simmer and add the tortellini. Cook for 2-3 minutes until the tortellini are mostly tender (they’ll continue to cook for a few minutes in the next step).
  3. Whisk or blend the flour and milk together until smooth and add it to the soup, stirring constantly. Add the beans, chicken (if using shredded chicken) and spinach. Bring the soup to a low simmer and cook for 3-4 minutes, stirring occasionally, until slightly thickened and all the ingredients are heated through and the tortellini are tender. Season to taste with salt and freshly ground black pepper.
  4. Serve with freshly grated Parmesan cheese on top, if desired.

Adapted from Mel’s Kitchen Cafe

Grilled Chicken, Peach, and Mozzarella Salad

May 25, 2020

Since it’s Memorial Day, which means the unofficial start of summer, I’m sharing something extra fresh and summery, perfect for grilling season! I actually posted this recipe on Instagram sometime last year but had never shared it on the site. It comes from our former next-door neighbors and friends the Mattsons. We rented a home north of Seattle for the first 3 years we lived here and they were the best part of that home/neighborhood. We’ve both since moved and we miss them so much! This salad was one of the delicious meals they made when we had cookouts in their backyard.

I usually just grill chicken with some salt and pepper but you could make extra dressing and marinate the chicken in that before grilling for even more flavor. The corn can go on the grill at the same time. Grilled corn is one of the best summer treats! (I remove the husks, rub them in some olive oil, sprinkle with salt and pepper, and grill, turning occasionally until the outside gets nice charred marks and the corn is tender-crisp.) Toss with fresh greens, ripe peaches (which you can also grill, but they get a little mushy that way), tiny mozzarella balls, pistachios, avocado, and a sweet and tangy orange balsamic dressing.

Grilled Chicken, Peach, and Mozzarella Salad

INGREDIENTS

chicken breast, seasoned with salt and pepper and grilled
fresh peaches, pitted and sliced
mini fresh mozzarella balls (often called pearls)
unsalted pistachios, toasted
avocado, pitted and diced
fresh sweet corn, grilled and cut off the cob
mixed greens (I used red leaf lettuce, romaine/green leaf/butter lettuce would all be good)

Orange Balsamic Vinaigrette:

1/2 navel or cara cara orange, juiced
1 tsp. orange zest
1 Tbsp. balsamic vinegar
1 Tbsp. pure Maple syrup (can use honey)
1 tsp. Dijon mustard
1/4 cup extra virgin olive oil
salt and pepper, to taste

DIRECTIONS

1. To make the dressing, whisk together all ingredients until emulsified. Season to taste with salt and pepper.

2. Place salad ingredients in a large bowl, season with salt and pepper, drizzle with dressing, toss and serve.

Recipe from the Mattson Family

Oreo Layer Cake

May 22, 2020

oreo cake

On May 1st Clara turned 8! This year was definitely different having a birthday alone at home but we made the most of it. I might have driven an hour to pickup her favorite Mediterranean take-out near our old house… we’re crazy about food like that! She received lots of gifts and love from family afar and a surprise drive-by visit from friends. And she requested an Oreo Cake so that’s what we made!

oreo layer cake

I’ve never been much of an Oreo fan so I was skeptical that I would like any Oreo cake I baked her. But WOW was I wrong. This cake was amazing and slightly converted me to Oreos (at least in cake/buttercream form)! The original recipe comes from Preppy Kitchen and I didn’t deviate much from it. His site has lots of pictures of the cake baking and even a video on the decorating process. Definitely check it out if you have questions or need more tips.

My cake didn’t turn out as picture perfect but I learned a few things along the way: Don’t crushed your Oreos too fine for the frosting (or cake batter) or they’ll turn it basically black. Not the prettiest color but it tasted amazing nonetheless. Also, pouring perfect chocolate ganache is harder than it looks. This was my first attempt EVER and in hindsight I should have let it cool a bit longer first. I didn’t use any ganache between the layers as I was worried about sliding and the ganache just on top was plenty rich. (I especially enjoyed licking it right out of the pot. So good.) And I skipped the white buttercream dollops on top. You could use this reserved buttercream to decorate in any way you wish. I went with white sprinkles because I was trying to please kids and didn’t feel like bothering with frosting tips.

Oreo Layer Cake

INGREDIENTS

Oreo Cake:
2 cups all-purpose flour
1 cup granulated sugar
1/4 tsp. baking soda
1 tsp. baking powder
1/4 tsp. kosher salt
3/4 cup unsalted butter, room temperature
3 egg whites
1 tsp. vanilla extract
1/2 cup sour cream, room temperature
1/2 cup whole milk, room temperature
1 cup chopped Oreos

Oreo Buttercream:
1 1/2 cups butter, room temperature
5 cups confectioners’ sugar
1 1/3 cups crushed Oreos (don’t crush them too finely or your frosting will turn out super dark like mine)
1/4 cup heavy cream
pinch salt kosher

Chocolate Ganache:
1 cup semisweet chocolate chips
1/2 cup heavy cream, heated

DIRECTIONS

For the Cake:

  1. Butter and flour three six inch pans. I use cake strips on my pans for more even baking as well. (I did it without cake strips and it turned out fine.) Preheat oven to 340F.
  2. In a standing mixture fitted with a paddle attachment, beat butter until light and fluffy.
  3. Sift the dry ingredients together in a large bowl.
  4. Beat the dry ingredients into the butter until well incorporated, scrape the bowl at least once.
  5. Beat the wet ingredients together in a medium bowl.
  6. Add the wet to the butter mixture and mix until just combined. Fold in the crushed Oreos at the very end and mix until just combined.
  7. Divide the mixture evenly into the cake pans
  8. Bake at 340 for about 25-30 minutes or until the centers are springy to the touch.

For the buttercream:

  1. Beat the butter until light and fluffy. Add the confectioners’ sugar and cream and mix.
  2. Reserve about a cup of the buttercream for the white dollops. Which will be piped with an 869 tip. (I didn’t end up doing white dollops, and just used white sprinkles on top.)
  3. Mix in the crushed Oreos into the large batch of buttercream.

For the ganache:

  1. Melt chocolate and cream together on low heat. Whisk together and set aside. You might need to add more or less cream to achieve the desired consistency. (Then set aside to cool to the ride consistency for pouring.)

To assemble the cake:

  1. Oreo buttercream goes between each layer as well as a swirl of chocolate. Don’t go overboard with the ganache as it will overpower the other flavors. (I didn’t add the chocolate ganache between the layers)
  2. Coat outside with buttercream and smooth.
  3. Add a skirt of crushed Oreos at the bottom of the cake. (We decorated with whole Oreos instead.)
  4. Pour the ganache on top and allow to drip. Smooth top with an offset spatula.
  5. Pipe white buttercream dollops on top with an 869 tip. (Once again, we didn’t do this and added white sprinkles instead.)

Adapted from Preppy Kitchen