Three Cheese Chicken and Spinach Pizza with Garlic White Sauce

May 18, 2020

garlic chicken spinach pizza

Dustin finally gets to go back to work tomorrow (Which is such a relief! Though we’ll miss having him home 24/7…) so my posting probably won’t be as frequent. This time stuck at home together has been a mixture of fun and stress and sometimes just strange. But I’ve been cooking so much more and taking pictures and writing again and that feels good!

three cheese pizza spinach white sauce

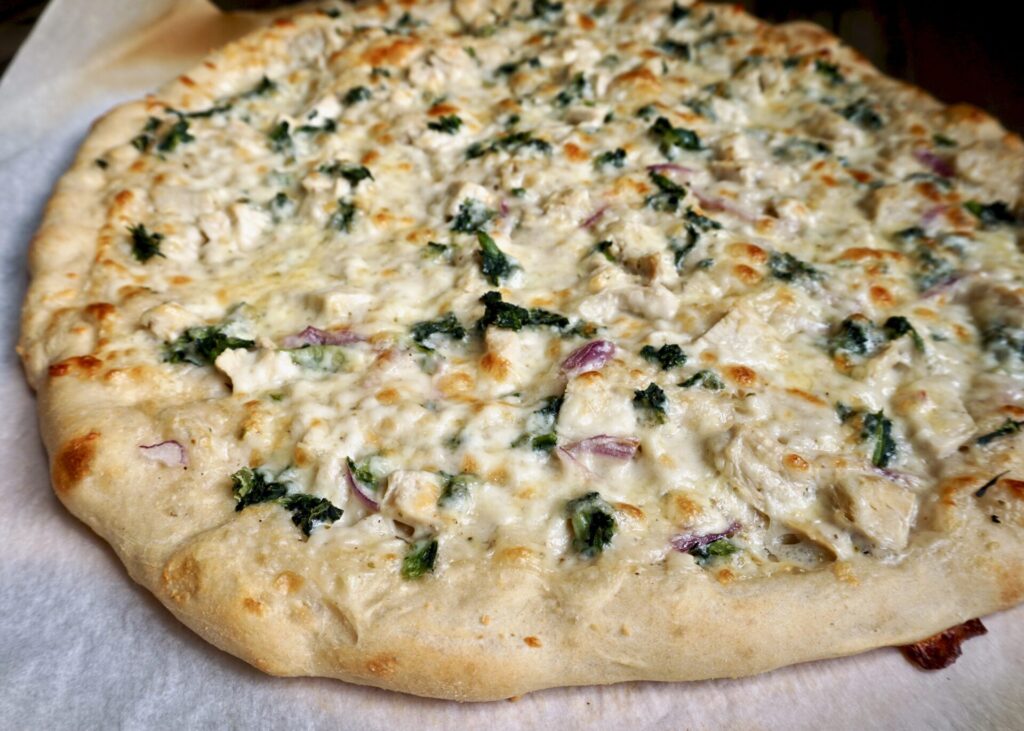
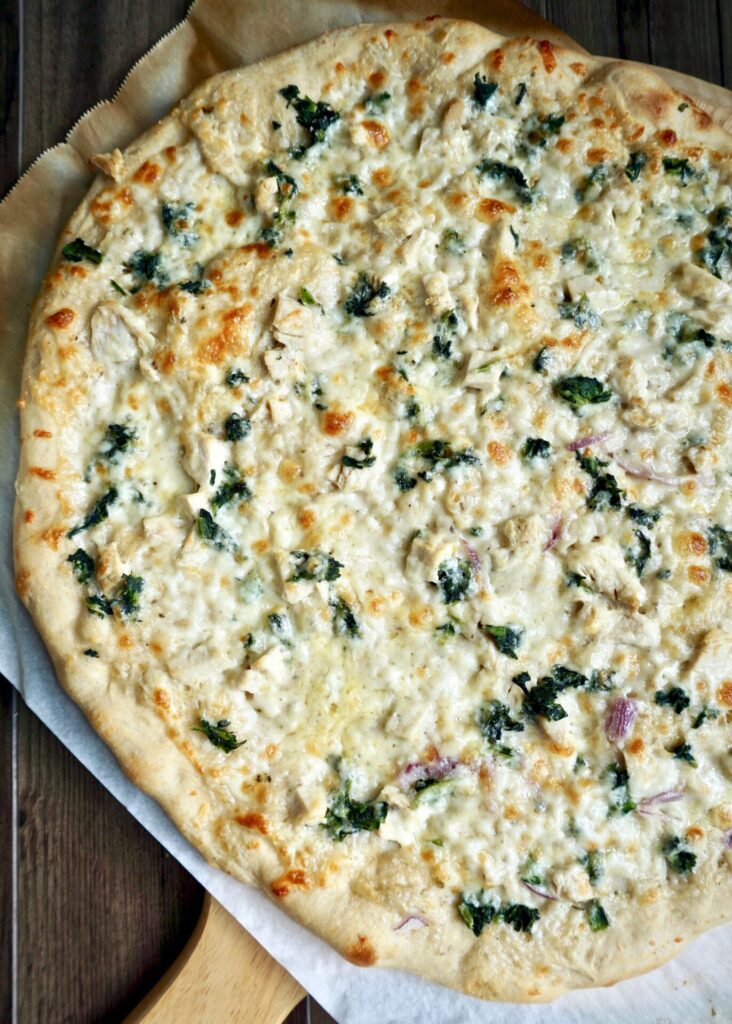
We have pizza almost weekly and I don’t always make my homemade dough. Sometimes I use pita or naan or another flatbread for the crust because it’s quick and convenient and still tastes good. But every so often making your own dough is totally worth it! I came across this pizza topped with a garlic white sauce, three cheeses (including some pepper jack which is my 8-year-old daughter’s cheese obsession right now), and chicken and knew I had to make it right away! It was worthy of a homemade crust. The garlic white sauce is dreamy. I had to stop myself from licking it all up before it made it onto the pizza. Luckily the sauce makes enough for 2 pizzas, so double the dough or freeze half for later. I made two pizzas and didn’t regret having some leftover the next day!

My addition to the original recipe was some spinach. I keep frozen chopped spinach on hand because it’s so easy to use- just measure some out and pop it in the microwave to thaw. The red onion is optional- I included it on my part of the pizza, left it off for the kids. Chives and extra crushed red pepper are optional too, but always recommended! (The pepper jack doesn’t make this pizza very spicy so if you want more heat go for the pepper flakes.) We all loved this one- definitely going to be a repeat pizza over here!

Three Cheese Chicken and Spinach Pizza with Garlic White Sauce

INGREDIENTS

Pizza:
~1/2 cup garlic white sauce
2 Tbsp. freshly grated Parmesan cheese (or Pecorino Romano)
1 medium chicken breast (about 1 1/2 cups), cooked and shredded
1/2- 3/4 cup frozen chopped spinach, thawed and moisture squeezed out (measured before thawing)
red onion, sliced (optional)
1 1/4 cups mozzarella cheese, shredded
3/4 cup pepper Jack cheese, shredded
salt and freshly ground black pepper
pinch crushed red pepper flakes (optional)
chives for garnish (optional)

Garlic White Sauce:*
2 Tbsp. butter
4 cloves garlic, minced
2 Tbsp. all-purpose flour
1/4 tsp. freshly ground black pepper
1/4 tsp. salt
1/4 tsp. dried oregano
1 cup milk
1/2 cup freshly grated Parmesan cheese (or Pecorino Romano)

*This makes enough sauce for 2 pizzas!

DIRECTIONS

  1. Prepare pizza dough according to recipe directions.
  2. To make the garlic white sauce, melt butter in a small saucepan over medium heat. Add garlic, cooking for 30 seconds before whisking in flour, pepper, salt and oregano. Whisk to combine well. Slowly add milk, whisking until well combined. Continue whisking occasionally until desired thickness is reached. Remove from heat, stir in cheese until smooth. Use immediately or cover and chill until ready to use.
  3. Preheat oven and pizza stone to 450 F.
  4. Spread 1/2 cup (or approx. half of the) garlic white sauce over the prepared crust. Sprinkle with Parmesan cheese. Top off with shredded chicken and optional red onions. Sprinkle with mozzarella and pepper Jack cheese. Dust with black pepper (and a pinch of salt if you used unseasoned chicken and spinach).
  5. Bake in preheated oven on pizza stone for 10-12 minutes or until the crust is puffed and the cheese and crust are golden. Top with fresh chives (optional). Slice and serve with crushed red pepper flakes for more heat (optional).

Adapted from Baked by Rachel

Roasted Beet, Pistachio, and Goat Cheese Salad

May 16, 2020

roasted beet goat cheese salad

My kids might hate zucchini (in healthy forms, anyway) but they have a thing for beets. Our love for beet salad started when we ordered it at an Italian restaurant and realized how amazing roasted beets are paired with goat cheese! Now I make my own version at home- beets tossed with a sweet honey-orange vinaigrette, goat cheese crumbles, and toasted pistachios- and we can’t get enough!

I usually buy the pre-roasted beets (Love Beets or Trader Joe’s brand) because they’re so convenient, but by all means, you can roast your own beets: Place them in some foil, drizzle with olive oil and season with salt and pepper. Wrap the foil up and bake in a 400 F oven for 40-60 minutes until they are easily pierced with a knife. Let them cool before peeling off the skin. Whichever way you go just BE CAREFUL when you handle the beets- they are a mess and can stain clothing!

Roasted Beet, Pistachio, and Goat Cheese Salad

INGREDIENTS

4-6 roasted beets OR 16 oz. packaged roasted beets, diced
1/4 cup freshly squeezed orange juice
2 Tbsp. olive oil
1-2 tsp. honey, to taste
1/2 tsp. stone ground mustard (this is my favorite, you can sub Dijon but it’s stronger so I’d use 1/4 tsp.)
salt and dash of freshly ground black pepper, to taste
~1/3 cup crumbled goat cheese
~1/4 cup toasted pistachios

DIRECTIONS

  1. In a small bowl, whisk to combine the orange juice, olive oil, honey, and mustard. Season to taste with salt and pepper. 
  2. Place the beets in a large bowl and pour the dressing over top. Toss to coat. Add the goat cheese and pistachios and gently stir to combine. 

Serves 4.

Zucchini Cornbread

May 15, 2020

Zucchini isn’t very popular around here. I’m alone in my love for it in our home. My kids definitely complain when it makes an appearance, unless it’s in a baked good (muffins, even cake!). I still make it and serve it every so often and am convinced they’ll eventually come around. I tried to sneak it into grilled cheese sandwiches once and now when I make grilled cheese my 4-year-old checks hers thoroughly for signs of zucchini before proceeding to eat. Haha. They might have questioned what little green specks were doing in their cornbread when I first made this one, but one bite and they no longer cared. This zucchini cornbread is delish!

This cornbread is super moist and just the right amount of sweet. It doesn’t need any toppings but adding a little butter and honey never hurts! It can be made with half white whole wheat flour for a heartier version. I’ve also made it with half cornmeal, half flour for a stronger cornmeal flavor.

Zucchini Cornbread

INGREDIENTS

1/2 cup yellow cornmeal
1 1/2 cups all-purpose flour*
1/3 cup sugar
2 tsp. baking powder
1/4 tsp. baking soda
3/4 tsp. salt
1 cup buttermilk or milk
2 eggs, lightly beaten
4 Tbsp. butter or coconut oil, melted
2 cups unpeeled shredded, drained zucchini (can also use yellow squash)

DIRECTIONS

  1. Preheat the oven to 350 F. Lightly grease a 9-inch square baking pan with cooking spray. Set aside.
  2. In a large bowl, stir together the cornmeal, flour, sugar, baking powder, baking soda, and salt.
  3. Make a well in the dry ingredients and add the buttermilk (or milk), eggs, and melted butter (or coconut oil) and zucchini. Stir just until combined.
  4. Spread the batter in the prepared pan and bake for 30-35 minutes until the top springs back lightly to the touch and/or a toothpick inserted in the center comes out clean.

*You can use half white whole wheat flour and half all-purpose flour, but you may need to add an extra 1-2 Tbsp. buttermilk/milk if the batter seems too thick.

To Make Muffins: Divide batter into 12 lightly greased muffin cups and bake for approx.15-20 min until a toothpick comes out clean.

Adapted from Mel’s Kitchen Cafe

Ham and Cheese Oven-Puffed Pancake

May 13, 2020

I’ve been wanting to make a savory dutch baby/puff- pancake (or whatever you want to call it!) for a while now and settled on this recipe. And lucked out because the first attempt was amazing! It turned out perfectly cooked, puffy, tender, and so flavorful. I only made one (alongside a blueberry version which I’ll share soon) and we were fighting over it! I stuck with a simple ham and cheese combo but you can try adding veggies- sautéed mushrooms and/or spinach and bell pepper would be great options. Bacon could replace the ham. Feel free to switch up the cheese- just use something strong so the flavor isn’t lost.

Ham and Cheese Oven-Puffed Pancake

INGREDIENTS

3 large eggs
1 tsp. Dijon mustard
heaping 1/2 tsp. kosher salt
1/4 tsp. freshly ground black pepper
1 cup all-purpose flour
1 1/4 cups whole milk
2/3 cup grated Sharp cheddar cheese (or Gruyere)
1 Tbsp. finely chopped fresh chives
3 Tbsp. unsalted butter
4 oz. thinly sliced ham or Canadian bacon, finely diced

DIRECTIONS

  1. Preheat the oven to 425°F and set an oven rack in the middle position.
  2. In a large bowl, whisk the eggs with the mustard, salt, and pepper. Whisk in the flour. Gradually add the milk, whisking until the batter is smooth. Stir in the cheese and chives.
  3. Melt the butter in a 10/12-inch cast iron or nonstick ovenproof pan over medium heat (or in the preheating oven). Remove from the heat (or from the oven- careful it will be hot!) and swirl the butter around. Sprinkle the ham evenly around the pan. Pour the batter over the ham, then use a fork to be sure the ham is evenly distributed. Carefully transfer the pan to the preheated oven and bake for about 25 minutes (I used a 12 inch cast iron pan and mine only took 15 minutes). It will appear puffed straight out of the oven, but will quickly collapse. Cut the pancake into thin wedges and serve. (Remember that the pan is hot; I usually place a dishtowel or oven mitt over the handle as a reminder.)
  4. The pancake is best served fresh out of the oven. However, leftover slices can be reheated in the microwave.

Makes 1 large puff pancake, 10-12 inches round.

Adapted from Once Upon a Chef

Easy Salsa Verde Enchiladas

May 12, 2020

I had some issues last week uploading photos to my site. But I found a solution and I’m back with the promised enchilada recipe today! (I was also having fun with my sister visiting and enjoying some summer-like weather. We were picking up takeout at our favorite places- including Pike Place market that has some amazing pickup options- and hiking/playing at the state parks that just reopened.) But back to the enchiladas…

This is my easy salsa verde enchilada. It uses a jar of salsa verde (we always buy it from Trader Joe’s because it’s the best!) mixed with sour cream for the sauce. I’ve made the filling many ways- with shredded chicken or a combo of chicken and spinach, sometimes corn too, chicken and beans, or just veggies such as mushroom, spinach and corn. I season it with some cumin, garlic, paprika, and oregano- you could throw in a 1/2 tsp. or so of chili powder if you want or up the cayenne for more heat. And of course there’s lots of cheese. The hardest part is filling and rolling up all those tortillas. The sauce and more cheese go on top and it bakes until golden and bubbling. Then I sprinkle on some onion and cilantro and serve it with all the toppings… black olives for the olive lovers around here, shredded lettuce, tomatoes/salsa/pico, avocado, extra sour cream. It’s easy and adaptable and one of my favorite Mexican comfort foods.

p.s. This makes a great dish to take friends/family who need a meal. You can bake it for them and take it hot or give it to them unbaked and provide instructions for baking it later. I suspect it can be frozen and baked right out of the freezer (you’ll need to extend the baking time depending on how cold it is). Provide the toppings on the side and you’re all set! We usually eat these enchiladas with refried beans and tortilla chips (because I want to keep it easy). If you have some extra time, this Mexican rice and black bean dish is sooo good!

Easy Salsa Verde Enchiladas

INGREDIENTS

16 oz. salsa verde (we love Trader Joe’s brand)
1/2 cup sour cream
~4 cups cooked chicken, diced or shredded
1/2 tsp. ground cumin
1/4 tsp. garlic powder
1/4 tsp. dried Mexican oregano
1/2 tsp. paprika
1/8 tsp. cayenne
salt and freshly ground black pepper, to taste
8-12 tortillas (I use flour, if you use small corn tortillas you will need more)
~2 cups grated cheese (Colby/pepper jack, cheddar, Mexican blend, etc.)

optional toppings:
black olives
shredded lettuce
diced tomato, salsa, or pico de gallo
avocado or guacamole
sour cream
chopped cilantro
sliced green onion or chives

DIRECTIONS

  1. In a medium bowl, whisk to combine the salsa verde and sour cream.
  2. In a second bowl, combine the chicken with the spices and season to taste with salt and pepper. (If you’re using a rotisserie chicken the meat won’t need much seasoning but plain chicken breast will need more.) Add 1 cup of the cheese and 1/4 cup of the salsa/sour cream mixture to the chicken and toss to combine.
  3. Coat a 9×13 baking dish with nonstick cooking spray (or butter/oil). Place some filling in each tortilla and roll up tightly. Place filled tortillas in the prepared baking dish.
  4. Pour the remaining salsa verde-sour cream mixture over top of the tortillas in the dish. Sprinkle with the remaining 1 cup of cheese (or more if you like it extra cheesy)!
  5. Bake in preheated 375 F oven for 20-25 min until the top has browned and the filling is bubbling. When it comes out of the oven I sprinkle mine with onion and cilantro. Serve with toppings of choice.

Makes a 9×13 pan of enchiladas.