Beef Taco Salad

April 30, 2020

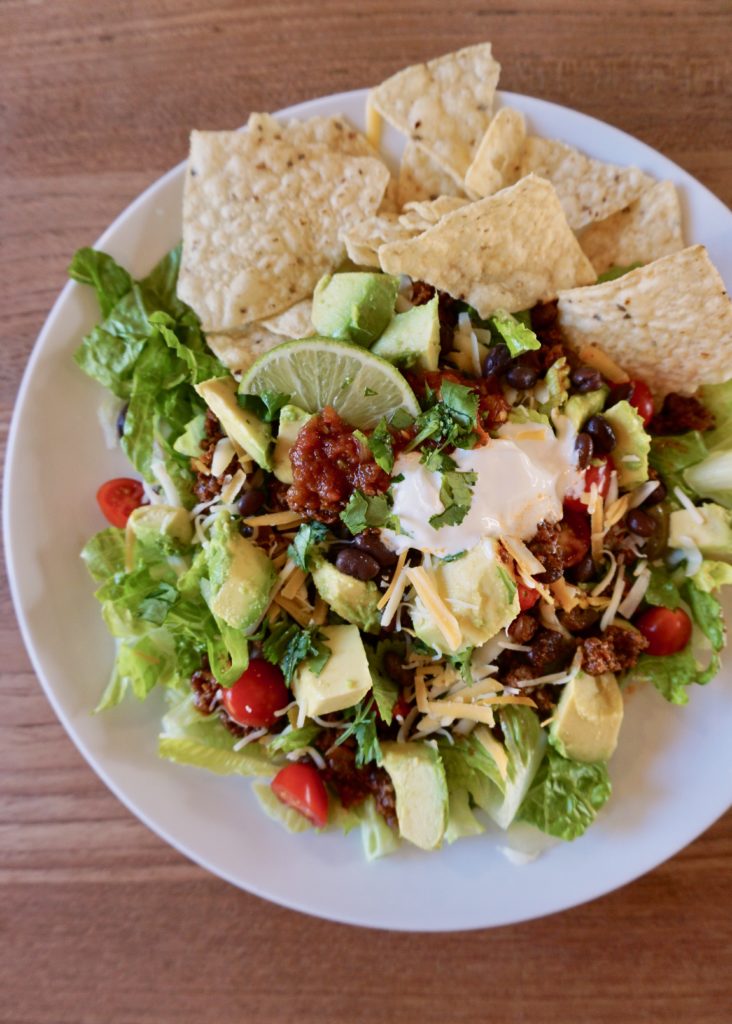
I can’t think of much to write today so I’m going to state the obvious: we love Mexican food. We have tacos/quesadillas/burritos/enchiladas/etc. several times a week and are always wanting more! This is my go-to recipe for taco salad- no packet of seasoning needed. The beef (or ground turkey or chicken if you prefer) is saucy and spiced just right. Throw it on a salad with all of your favorite taco ingredients (avocado and crushed tortillas chips are my must-haves) and dig in! If you want to make a homemade tortilla bowl to serve your salads in follow this link to the original post. Happy eating!

Beef Taco Salad

INGREDIENTS

Beef Taco Meat:
1 Tbsp. vegetable oil (or olive oil)
1 small or 1/2 large onion, finely chopped
2 Tbsp. chili powder (this would also be really good with ancho chili powder)
3 garlic cloves, minced
1 lb. ground beef (I usually use 85-90% lean)
1 8-oz. can tomato sauce
1/4 cup low-sodium chicken broth (or just use water and add an extra pinch of salt)
2 tsp. cider vinegar
1 tsp. packed light brown sugar
cayenne pepper, to taste (optional- I like to add some if I’m using a mild chili powder)
salt and freshly ground black pepper, to taste

Salad:
romaine lettuce, shredded
canned black or pinto beans, drained and rinsed
tomatoes, diced
green onions, thinly sliced
fresh cilantro, chopped
lime, sliced
Mexican cheese, shredded
avocado, pitted and sliced
sour cream or Mexican crema
salsa or pico de gallo
tortilla chips or tortilla (optional)

DIRECTIONS

  1. Heat oil in a nonstick skillet set over medium-high heat. Add onion and cook until softened, about 5 minutes. Stir in chili powder and garlic and cook until fragrant, about 30 seconds. Add ground beef and cook, breaking up meat with a wooden spoon, until almost cooked through but still slightly pink, about 2 minutes. Stir in tomato sauce, broth, vinegar, and sugar and simmer until slightly thickened, about 5 minutes; mixture will be saucy. Remove from heat and season with salt and pepper  to taste and cayenne, if using.
  2. Combine salad ingredients in serving bowls, topping with the taco meat. Serve with tortilla chips and/or a warm tortilla, if using. 

Serves 4. 

Adapted from Love and Olive Oil, originally from America’s Test Kitchen

No-Knead Buttermilk Dinner Rolls

April 29, 2020

I decided last minute that I wanted to rolls to serve with our Easter dinner. And since I had a pile of potatoes to julienne and pork and carrots to roast I wanted something easy. After a quick search I found this recipe and went for it. I didn’t expect too much because I’ve never made rolls with a no-knead method before (I figured no-knead doughs needed a long rise to develop properly). But the fact that I’m sharing this recipe today means I was pleasantly surprised… these rolls were soft and fluffy, especially delicious with a pat of butter and drizzle of honey, and my little family fought over them!

The original recipe below notes that it’s best to use buttermilk (not a substitute). I’ve learned to just keep buttermilk on hand because it’s inexpensive and I use it often in baking and breakfast foods (pancakes, waffles, even french toast). If I’ve had a jug of buttermilk open a few days and haven’t used it up I put the rest in the freezer and thaw it out as needed. Budget Bytes recommends freezing it in ice cube trays, but I usually just measure it by cup-fulls and freeze in ziplock freezer bags.

No Knead Buttermilk Dinner Rolls

INGREDIENTS

2 cups all-purpose flour
1 tsp. kosher salt (use less for table/sea salt)
1 Tbsp. sugar
1 1/8 tsp. instant yeast
1/2 cup boiling water
1/2 cup buttermilk
3 Tbsp. melted butter, divided
pinch of flakey salt (optional)

DIRECTIONS

  1. In a large bowl, whisk together the flour salt, sugar, and instant yeast.
  2. In a small bowl or liquid measuring cup, pour the boiling water over the buttermilk, stir to combine, and let cool for 10 minutes. The buttermilk may look curdled, but this is okay.
  3. Pour the buttermilk mixture and 2 Tbsp. of the melted butter over the flour mixture. Stir until a sticky ball of dough forms. Cover the dough in the bowl with a damp tea towel or plastic wrap and set aside in a warm place for 1.5 to 2 hours, or until doubled in bulk.
  4. Grease an 8-inch circle or square baking dish. Using two forks, deflate the dough by releasing it from the sides of the bowl and pulling it toward the center. Rotate the bowl quarter turns as you deflate, turning the mass into a rough ball.
  5. Liberally flour a work surface. Use the two forks to lift the sticky ball of dough out of the bowl and onto the floured surface. Using a bench scraper or sharp knife, cut the dough into 10-12 pieces. Using well floured hands, shape each piece roughly into a circle. It’s okay if each piece is a little misshapen. Place the dough balls into the prepared pan, spacing them evenly apart.
  6. Begin preheating the oven to 375ºF. Let the dough rise, uncovered, for 20-25 minutes, or until the dough pieces have puffed to almost fill the pan.
  7. Transfer the pan to the oven and bake for 20-25 minutes, or until golden brown. Remove them from the oven and immediately brush the surfaces with the remaining 1 Tbsp melted butter. Sprinkle a pinch of flakey salt over top. Let the rolls cool in the pan for 5 minutes, then turn it out onto cooling racks and invert onto a plate. Let the bread rest for 5 minutes before serving.

NOTE: I highly suggest using real buttermilk for this recipe instead of a milk and vinegar substitute. If you’re concerned about having leftover buttermilk, follow these instructions for freezing your buttermilk for later use.

Makes approx. 10-12 rolls (and can be easily doubled to make more).

Recipe from Budget Bytes

Scalloped Potatoes

April 27, 2020

My kids are so used to sweet potatoes around here that I have a hard time getting them to eat white ones. They’ll eat french fries, of course, and tater tots. But even mashed potatoes aren’t their favorite. So I’ve been experimenting with different ways to prepare potatoes and found a winner. (Well, Dustin and I think these are amazing, and so does the one year old at least!) This is a classic cheesy scalloped potato dish, with a creamy white cheddar sauce. It went wonderfully with our herb marinated pork tenderloin and roasted carrots for Easter dinner. Next up are the no-knead buttermilk rolls I also served alongside.

Scalloped Potatoes

INGREDIENTS

3 Tbsp. butter
1 cup yellow onion, chopped
3 Tbsp. all-purpose flour
1 Tbsp. garlic, minced
salt and freshly ground black pepper, to taste
2 3/4 cups milk (whole or reduced fat)
1 1/4 cups sharp white cheddar cheese, shredded
2 3/4 lbs. red potatoes (I’ve also used russet potatoes)
1 Tbsp. fresh parsley or chives, chopped (optional)

DIRECTIONS

  1. Preheat oven to 350 degrees. Spray a 9×13 baking dish with non-stick cooking spray.
  2. Melt butter in a medium saucepan over medium heat. Add onion and saute 3 minutes. Add flour and garlic and saute 1 minute. While whisking pour in milk. Bring to a light boil over medium-high heat, stirring frequently, until thickened. Remove from the heat and stir in cheese. Season with salt and pepper to taste (you’ll need about 1 tsp. kosher salt). Set pan aside until ready to assemble.
  3. Peel potatoes and slice into 1/6-inch slices using a mandolin (I do it by hand with a sharp knife). Spread half of the potatoes into an even layer in prepared baking dish (be sure each slice is separated). Pour half the sauce evenly over potatoes. Spread over remaining half of potatoes and finish by covering with remaining half of sauce.
  4. Bake in preheated oven until potatoes are tender when pierced with a toothpick or fork, about 55 – 70 minutes. Garnish with parsley or chives if desired and serve warm.

Makes a 9×13 pan.

Adapted from Cooking Classy

Roasted Whole Carrots

April 25, 2020

Every so often I notice the bags of pretty colorful carrots at the grocery store and, finally, for Easter this year I bought some! These were mini carrots found at Trader Joes and I roasted them whole, drizzled with olive oil and sprinkled with kosher salt and freshly ground pepper. Carrots are one of the best roasted vegetables (though I like just about every vegetable roasted- it improves them all!) because they get extra sweet and taste more carrot-y. Before serving I added some fresh dill (parsley or chives will also work). Yes, vegetables can look and taste great!

Also on our Easter dinner menu: this herb marinated pork tenderloin (the fresh herbs and lemon make it soo flavorful!), classic cheesy scalloped potatoes, and no knead buttermilk dinner rolls- those two recipes coming next!

Roasted Whole Carrots

INGREDIENTS

1 bunch whole carrots (about 1 lb.), peeled and stems removed (I used baby rainbow carrots)
olive oil (enough to coat carrots, about 1 Tbsp.)
kosher salt and freshly ground pepper, to taste

for serving:
fresh dill, chives or parsley, chopped

DIRECTIONS

  1. Preheat oven to 400 F. Line a large baking pan with aluminum foil and coat with cooking spray.
  2. Place carrots on the prepared pan and drizzle with olive oil, sprinkle with kosher salt and freshly ground black pepper, and toss to coat. Spread carrots out so they are not touching each other.
  3. Bake in preheated oven for 20-30 minutes until the carrots are tender and caramelized. Remove from the oven and sprinkle with fresh dill, chives, or parsley and serve.

Adapted from Rachel Cooks

Almond Sweet Rolls

April 24, 2020

Cinnamon rolls might be my absolute favorite food (contending with really good pizza or focaccia)… can you tell I LOVE bread?! And when it comes to dessert, I’ve always loved anything with almond. Almond + dark chocolate = amazing. Marzipan (almond paste) = heavenly. Almond paired with cherries or any berries = divine! Because of this obsession, I decided I wanted to make a version of my mom’s famous (to us, anyway) cinnamon roll recipe that features almond. This recipe I found uses sliced almonds ground (with some sugar, butter, orange zest, cinnamon, vanilla, etc.) into a paste to make the filling. And an orange glaze gets drizzled on top. And it was insanely good! I did feel like the orange flavor was a bit stronger than the almond, so next time around I plan to use a classic glaze, omitting the orange juice and replacing the vanilla with almond extract. I’ve provided both glaze options in the recipe below!

Like I mentioned, I used my mom’s dough recipe. In addition to classic cinnamon rolls (and orange rolls & lemon rolls which I’ve already shared), it makes killer dinner rolls. You can follow the links to those recipes if you want more details on the dough process.

Almond Sweet Rolls

INGREDIENTS

for the dough:
3-4 cups all-purpose flour
1 Tbsp. instant yeast
1 tsp. salt
1/4 cup sugar
1/4 cup butter, melted
1 egg, whisked
1 cup + 2 Tbsp. warm milk

for the filling:
1/2 cup sliced almonds
1/4 cup sugar
1 egg
1/4 cup unsalted butter
zest of one orange
1/4 tsp. cinnamon
1 tsp. pure vanilla extract (you could use a combo of almond and vanilla extracts if you want extra almond flavor- I would try 1/2 tsp. vanilla + 1/4 tsp. almond)

for the orange glaze:
juice of one orange
1 1/2- 2 cups powdered sugar
pinch of salt

OR for the almond glaze:
2 Tbsp. butter, melted
2 cups powdered sugar
1/2 tsp. almond extract
2 Tbsp. milk (+ more to thin the glaze if necessary)
pinch salt

for topping:
handful sliced almonds

DIRECTIONS

1. In a large bowl, combine 1 1/2 cups flour, yeast, salt, and sugar. Whisk to combine. Pour in wet ingredients (butter, eggs, and milk). Stir until it is a thick paste. Add the remaining flour, 1/2 cup at a time, until it comes together into a ball.

2. Lightly flour a flat surface, and knead the dough, adding more flour to prevent sticking, 8-10 minutes, until smooth. Spray the inside of a bowl with cooking spray, place the dough inside, cover, and let rise in a warm place until doubled, about 1 hour.

3. While the dough is rising, prepare the almond cream. In a food processor combine the almonds, sugar, egg, butter, cinnamon, orange zest, and vanilla, and pulse until well combined and it has a smooth, pasty, buttery texture. Place in the refrigerator until ready to use.

4. Roll out the dough on a clean, well-floured surface into a large rectangle about 1/4 inch thick. Spread the almond cream evenly over the surface of the dough. Roll up the dough, keeping it pretty tight, and cut into rolls. Almond cream might seep out the sides and makes things a bit messy – that’s okay. Let rise in a loosely covered, well-greased 9 x 13 pan for another hour, or until doubled in size. You could also let them rise overnight in the refrigerator at this step and then bake them in the morning.

5. Sprinkle sliced almonds on top of the rolls & bake in a preheated oven at 350 degrees for about 15-20 minutes, or until slightly golden brown and cooked through.

6. To make the glaze, in a small bowl, whisk together the powdered sugar, fresh orange juice, and pinch of salt (or butter, powdered sugar, almond extract, milk and salt)-adjusting the powdered sugar and milk as necessary to achieve a pourable glaze- and then drizzle all over the rolls.

Makes a 9×13 pan, about 12 rolls.

Adapted from The Food Wright