Cornmeal Dinner Rolls

April 2, 2020

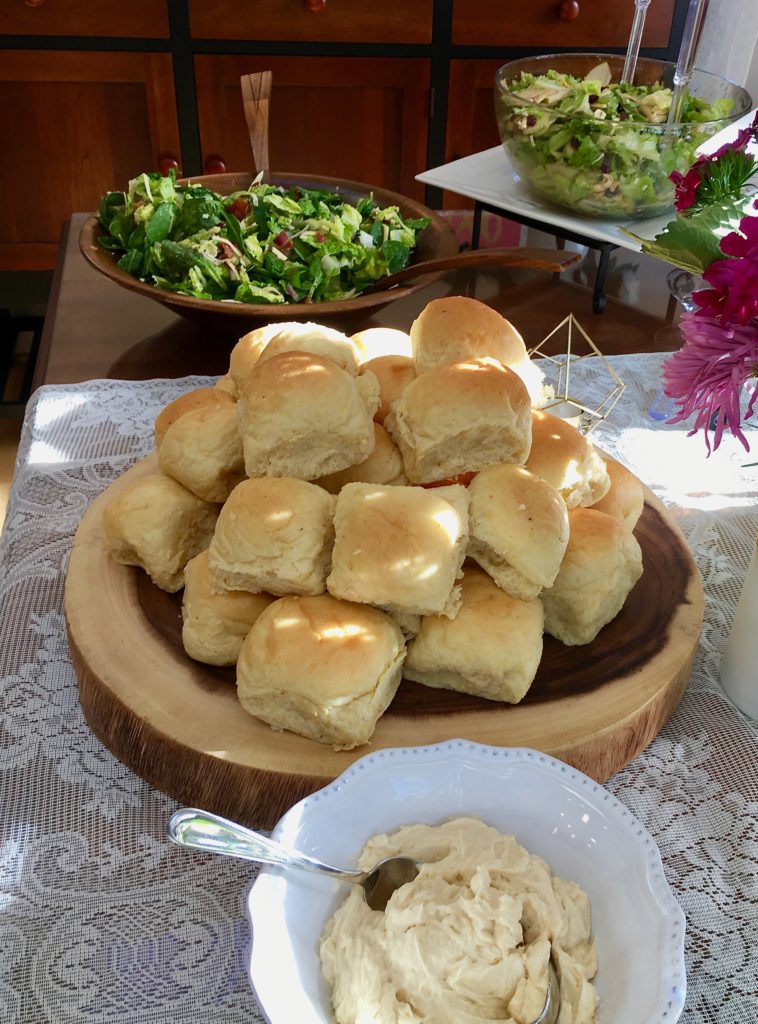
Baking is my first love. I learned to bake alongside my mom as I grew up and love making breads and desserts more than anything! My mom made some amazing rolls and they’ve always been my top comfort food. I still use her recipe to this day for classic dinner rolls and cinnamon rolls that are better than I’ve had in any bakery. I found today’s recipe on Mel’s site– you’ll see me share a lot of her recipes in the future. I was intrigued by the addition of cornmeal to the dough and had to try it out. Now I can’t stop making these because they’re just sooo good! This picture was taken when I took them to a friend’s baby shower and let’s just say I got a lot of recipe requests.

Cornmeal Dinner Rolls

INGREDIENTS

2 cups milk (1%, 2% or whole)
2/3 cup yellow corn meal
1 1/2 Tbsp. instant yeast (or active dry yeast*)
1/2 cup (1 stick) butter
1/3 cup granulated sugar
1 tsp. salt
3 large eggs
5 1/2 – 6 cups all-purpose flour (or you can use half white and half whole wheat flour)

DIRECTIONS

  1. In a medium saucepan set over medium heat, warm the milk to just below a simmer; tiny bubbles will appear around the edges (this is called scalding milk). Add the cornmeal (SLOWLY) and cook and stir constantly until the mixture is thickened and bubbling. It should be the consistency of porridge before taking off the heat.
  2. Pour the cornmeal mixture into the bowl of a stand mixer fitted with the dough hook or a large bowl (if mixing by hand) and let cool until lukewarm. Add the yeast, butter and sugar (if you dissolved active dry yeast with a bit of water and sugar until it foamed, add it now). Mix.
  3. Add the salt and eggs. Mix well. Add the flour gradually until a soft dough forms. Knead for 2-3 minutes (slightly longer if you use half whole wheat flour).
  4. Transfer the dough to a greased bowl and cover with lightly greased plastic wrap; let rise until doubled.
  5. Portion the dough into 24 equal pieces (about 2.75 to 3 ounces each) and roll into a taut ball on the counter. Place each roll on a large, rimmed baking sheet lined with parchment paper, spacing about an inch apart to allow for rising (on a 11X17-inch rimmed baking sheet, I fit 24 rolls on the sheet – four across, six down). Cover lightly with greased plastic wrap. Let the rolls rise until doubled (mine took about 1 1/2 hours).
  6. Bake at 375 degrees for 14-17 minutes (I baked for 12-15 min), until lightly browned and baked through. Remove from the oven and brush with butter while still warm.

*If you need/want to use active dry yeast instead of instant yeast, change the amount of yeast to 2 tbsp. active dry and dissolve the yeast in 1/2 cup warm water and 1 tbsp. sugar. Let the yeast mixture activate and foam (approximately 5 minutes) before adding it to the cornmeal mixture with the butter and 1/3 cup sugar

Makes 2 dozen rolls.

Recipe from Mel’s Kitchen Cafe

Turkey Bacon Panini (or Burger) with Sun-dried Tomato Aioli

March 31, 2020

Today I not only have a recipe to share, but my site has a new look! I was forced to update because of some outdated features of the old design but I’m excited about the new modern/minimalist look. Thank you to Natalie and Blogzilla for the template and installation help- I highly recommend them!

This sandwich/burger and aioli recipe has become a favorite around here. I’ve made it many times now both ways. The secret is the sun-dried tomato aioli, which is just a fancy name for mayo. But not ordinary mayo- no, this one is jazzed up with oil-packed sun-dried tomatoes, garlic, and lemon juice. I used to live a couple miles from Whole Foods and would often pick up lunch there when we were grocery shopping or out for the day. I almost always went for the sandwich bar where you could custom create a massive sandwich (enough for me + toddler) for 8$. They had the best sun-dried tomato mayonnaise and when I moved away (sadly my nearest Whole Foods is a 35 + minute drive now) I had to figure out how to make my own! This recipe is spot on.

For a panini, I like to use crusty white bread, arugula, bacon if I have some, and either provolone or Havarti. When I make turkey burgers, I skip the bacon and add some sliced tomato and red onion. It’s all up to you! (BTW this makes A LOT of aioli, so if you’re not cooking for a crowd you can halve the recipe or save some for later… you’ll want to!)

Turkey Bacon Panini (or Burger) with Sun-dried Tomato Aioli

INGREDIENTS

Panini (or Burger):

crusty bread, sliced (or hamburger buns)
arugula (or baby spinach)
bacon, cooked until crisp (optional, but delicious)
smoked or oven-roasted turkey, thinly sliced (or ground turkey for a burger)
cheese, sliced (smoked provolone or Havarti are my favorites on this)

Sun-dried Tomato Aioli:

1/2 cup mayonnaise
2 Tbsp. minced oil-packed sun-dried tomatoes
2 tsp. fresh lemon juice
1 small clove garlic, minced
1/4 tsp. granulated sugar (optional, but recommended)
freshly ground black pepper

DIRECTIONS

Sun-dried Tomato Aioli:

  1. To make the aioli, mix the mayo, sun-dried tomatoes, lemon juice, garlic, sugar, and pepper in a small bowl. (If you prefer your aioli to have a smoother texture you can pulse them in the food processor.)

Panini:

  1. Spread aioli on one or both slices of the bread. Layer arugula, bacon, turkey, and cheese. Top with the second slice of bread.
  2. Preheat a panini press or pan on the stove to medium heat. Coat the pan with cooking spray or butter to help the sandwich crisp and brown. Grill sandwich, flipping halfway through if necessary, until both sides are toasted and the cheese has melted. Cut and serve.

*If you don’t have a panini press, you can use a plate, spatula, or second pan to press the sandwich down on the pan on the stove to get the “pressed” panini result.

Burgers:

  1. In a medium bowl, combine the ground turkey with a bit of the aioli (1-2 Tbsp. per pound of turkey) and season with salt and pepper. Form into patties and grill until cooked through.
  2. Place burgers on a bun and top with cheese, aioli, bacon (optional), and aioli.

Panini adapted from Mel’s Kitchen Cafe and burger/aioli from Fine Cooking.

Yellow Birthday Cake

March 27, 2020

Damen joined our family two Septembers ago (and turned 1 1/2 this week I’m just realizing)! As usual, I was sick/nauseas for most of my pregnancy and I feel like I’m finally emerging from the sleepless baby phase again. Having babies hasn’t made it easy to keep up with this space, but they’re definitely worth it! He’s the sweetest little guy- he can’t get enough cuddles and his older sisters just adore him.

For Damen’s first birthday I made this classic yellow birthday cake and it was a keeper. The yellow cake layers are fluffy and soft, yet moist (no dry cake allowed around here). I added my favorite chocolate buttercream and kept it simple with a few sprinkles. He was crying in the second pic because I wouldn’t let him have the whole cake! Once he had his own slice he recovered quickly.

If you want detailed instructions on the cake baking process, follow the link to Mel’s original post. She spent a lot of time perfecting her yellow cake and is a trusted source for great recipes! The only deviation I made from her directions was to bake my bake batter in 3 pans and because of this I had to reduce the cooking time.

Yellow Birthday Cake

INGREDIENTS

1 cup butter, softened to room temperature
1 3/4 cups granulated sugar
2 tsp. vanilla
3 large eggs, room temperature
2 large egg yolks, room temperature
2 1/4 cups cake flour, lightly measured
1 1/2 tsp. baking powder
1/4 tsp. baking soda
1/2 tsp. salt
1/2 cup milk (1% or above), room temperature
1/2 cup sour cream, room temperature

DIRECTIONS

  1. To prep, whisk together the milk and sour cream together in a liquid measure and let come to room temperature.
  2. Preheat the oven to 350 degrees F and make sure an oven rack is placed in the middle of the oven.
  3. In a large bowl of an electric stand mixer or with a handheld electric mixer, whip the butter on medium speed for 1-2 minutes. Add the granulated sugar and beat for 4-5 minutes on medium speed. Mix in the vanilla.
  4. One at a time, add the eggs and egg yolks, mixing just until combined in between additions. Scrape down the sides of the bowl as needed.
  5. Combine the cake flour, baking powder, baking soda and salt. Sift them together through a fine mesh strainer.
  6. Add 1/3 of the dry ingredients to the batter and mix just until combined, scraping down the sides of the bowl as needed. Add 1/2 of the milk/sour cream mixture and mix. Add another 1/3 of the dry ingredients, mixing just until combined. Add the last 1/2 of the milk/sour cream mixture and beat until just combined. Add the final 1/3 of the dry ingredients and mix just until combined, scraping down the sides of the bowl if necessary. Give the batter one good, final stir with the rubber spatula.
  7. Grease the cake pans and line the bottoms with a parchment round. Grease the parchment and sides of the pan again very well. I use regular cooking spray but you can also use butter or cooking spray with flour. If your cake pans tend to cause sticking, consider also flouring the pans.
  8. Divide the batter evenly between the two pans. (I used 3 round cake pans) Drop each pan from about 3-inches onto the counter to minimize air bubbles while baking.
  9. Bake for 25-28 minutes (I baked for about 18 minutes) until lightly golden around the edges and a toothpick inserted in the center comes out with moist crumbs. Resist the urge to open and close the oven to check on the cake – this can cause the center of the cake to fall and never recover. And as with all cakes, don’t over-bake or the cake will be dry.
  10. Let the cakes rest in the pans for 5-10 minutes before gently turning them onto a cooling rack to cool completely.

Yellow Cake from Mel’s Kitchen Cafe.

Chocolate Buttercream

INGREDIENTS

1 cup unsalted butter, softened to room temperature
3 and 1/2 cups confectioners’ sugar
1/2 cup unsweetened natural or dutch-process cocoa powder
3 Tbsp. heavy cream or milk
1/4 tsp. salt
2 tsp. pure vanilla extract

DIRECTIONS

  1. With a handheld or stand mixer fitted with a paddle or whisk attachment, beat the butter on medium speed until creamy – about 2 minutes. Add confectioners’ sugar, cocoa powder, heavy cream, salt, and vanilla extract. Beat on low speed for 30 seconds, then increase to high speed and beat for 1 full minute. Add 1/4 cup more confectioners’ sugar or cocoa powder if frosting is too thin or another Tablespoon of cream if frosting is too thick.

*From what I remember this was enough frosting to cover the entire cake, but if you like tons of frosting or find it’s not enough, you can 1 1/2 times or double this recipe.

Chocolate Buttercream from Sally’s Baking Addiction.

BBQ Chicken Nachos

March 23, 2020

Yes, it’s really me here with a new recipe for you! It took a pandemic/quarantine and my husband’s office being forced to close for the next two months to allow me enough time to get black to blogging, but I’m excited to be here! I have almost a hundred recipes waiting to be shared. Most of them are simple/quick meals that have become favorites for feeding three hungry kids without sacrificing my love for good food.

I’ll try to share soon about our family and how we’ve grown and moved and all the changes over the last couple years as I post more recipes! Today I bring you BBQ Chicken Nachos, inspired by our favorite BBQ Chicken Pizza and just as delicious. These nachos are quick to throw together (especially if you use a rotisserie chicken), a complete meal on a pan, easy to feed a crowd AND clean up and equally fit for a party or weeknight dinner. (Notice I don’t include amounts because I never measure anything, adapt this recipe to your taste and needs…)

BBQ Chicken Nachos

INGREDIENTS

tortilla chips
chicken, cooked and shredded or diced (I use about half of a rotisserie chicken)
bbq sauce
Colby/Monterey/Pepper Jack and Smoked Gouda, grated
canned black or pinto beans, drained and rinsed
corn

other toppings:
bell pepper
green onion/chives
cilantro, chopped
salsa
sour cream
avocado or guacamole
pickled jalapeno

DIRECTIONS

1. Preheat oven to 400 F. Line a large baking sheet with aluminum foil and coat with cooking spray. Toss chicken in bbq sauce to coat. Spread a layer of tortilla chips on the pan, top with a generous amount of shredded cheese, bbq chicken, beans, and roasted corn (and any other toppings you want baked in the oven). Sprinkle a bit more cheese on top.

2. Bake in preheated oven for 10-15 minutes until the cheese has fully melted and the chips are beginning to brown.

3. Remove from the oven and top with additional toppings: red pepper, onion/chive, cilantro, salsa, sour cream, guacamole, jalapeno, etc. and serve immediately.

NOTES:

tortilla chips- our favorites are Trader Joe’s organic blue corn tortilla chips, and Late July’s thin and crispy restaurant style tortilla chips

bbq sauce- our favorites are Bone Suckin’ and Whole Foods’ 365 brand Texas True

Smoked Gouda- I highly recommend using some smoked Gouda in this recipe, it gives it the perfect smoky bbq flavor!

corn- fresh, frozen, or canned, my favorite is Trader Joe’s frozen roasted corn kernels

Salted Caramel Ice Cream

February 12, 2020

I wish I could claim this recipe was quick and easy. But unless you’re a professional candy-maker (not me), it’s a bit tricky. First, you have to make the caramel. I’m not talking about melting little candy squares- I mean the old-fashioned way with sugar and cream and heat. This part was the most stressful for me. Then you have to make the custard, which requires tempering (not scrambling) the eggs and thickening the mixture without boiling it. This I had done before, but it makes me nervous every time. Several times during the process I thought for sure my caramel was ruined (is it supposed to clump and harden like that?!). But I kept going, with the faint hope that I wasn’t going to have to pour such precious ingredients down the drain.

And then worst of all, you have to wait. After all of this work, you can’t enjoy the results of your effort until the next day. The custard must chill overnight (or the better part of a day) before churning. But you know what? Despite a few glitches, it somehow worked. And it was worth all the trouble and the patience. I ended up with intensely rich, smooth, creamy caramel ice cream. With a touch of salt to offset the sweet. This is the type of recipe that makes you truly proud (and relieved) when you’re done. My own frozen masterpiece.

Salted Caramel Ice Cream

INGREDIENTS

1 1/4 cups sugar, divided
2 1/4 cups heavy cream, divided
1/2 tsp. flaky sea salt such as Maldon (I used kosher salt)
1/2 tsp. pure vanilla extract
1 cup whole milk
3 large eggs

DIRECTIONS

1. Heat 1 cup sugar in a dry 10-inch heavy skillet over medium heat, stirring with a fork to heat sugar evenly, until it starts to melt, then stop stirring and cook, swirling skillet occasionally so sugar melts evenly, until it is dark amber.

2. Add 1 1/4 cups cream (mixture will spatter) and cook, stirring, until all of caramel has dissolved. Transfer to a bowl and stir in sea salt and vanilla. Cool to room temperature.
3. Meanwhile, bring milk, remaining cup cream, and remaining 1/4 cup sugar just to a boil in a small heavy saucepan, stirring occasionally.
4. Lightly whisk eggs in a medium bowl, then add half of hot milk mixture in a slow stream, whisking constantly. Pour back into saucepan and cook over medium heat, stirring constantly with a wooden spoon, until custard coats back of spoon and registers 170°F on an instant-read thermometer (do not let boil). Pour custard through a fine-mesh sieve into a large bowl, then stir in cooled caramel.
5. Chill custard, stirring occasionally, until very cold, 3 to 6 hours. Freeze custard in ice cream maker (it will still be quite soft), then transfer to an airtight container and put in freezer to firm up.

Makes about 1 quart.

(Recipe from Gourmet)