Soft & Chewy Oatmeal Raisin Cookies

February 23, 2015

IMG_6965

So much snow. Unlike Chicago, at least Colorado warms up in between all the white. We’ll have spring-like weather for a few days and then a blizzard, and then it’s sunny again and you almost forget it’s winter. Until this weekend. When we’re stuck inside I spend a lot of time in the kitchen. And make lots of messes (which Dustin kindly helps clean, but not without complaints). During this snowy weekend we had waffles and burritos and buckwheat crepes with bacon/spinach/mushrooms/cheese. And fish with roasted potatoes (recipes up next). And these cookies.

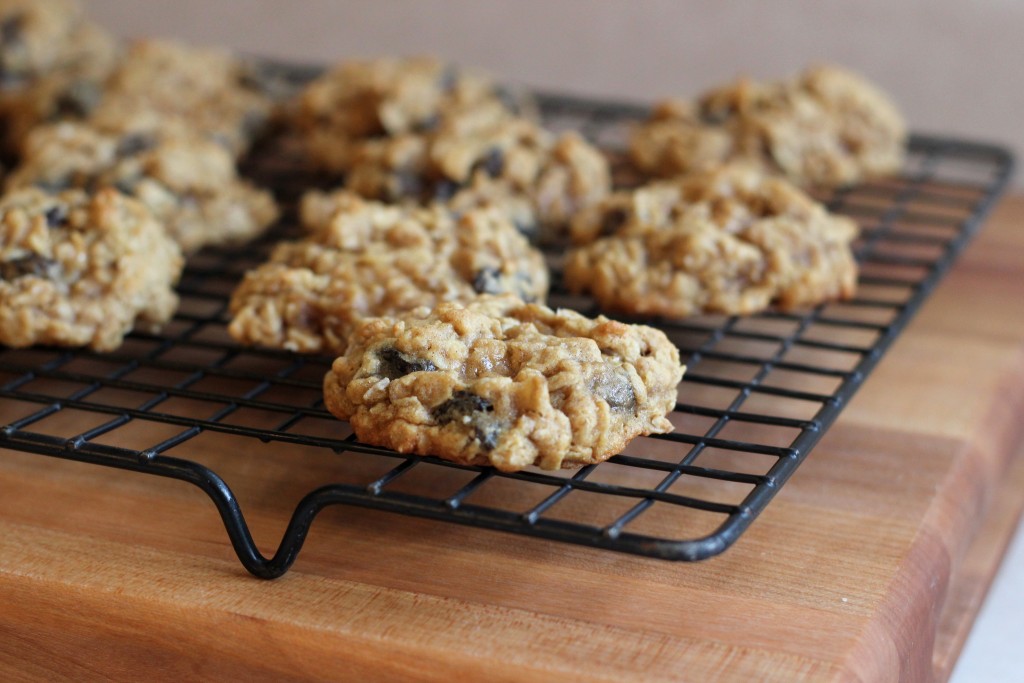
This recipe became an instant favorite when I first made it a few months ago. Oatmeal raisin is just about my favorite cookie, but it has to be soft and chewy and have just the right amount of molasses flavor. And these are exactly that! They need a little time in the refrigerator before baking (to prevent spreading). My only other advice: don’t over-bake them. Take them out as soon as the edges turn golden and they’ll set as they cool.

Soft & Chewy Oatmeal Raisin Cookies

INGREDIENTS

1 cup unsalted butter, softened to room temperature
1 cup light or dark brown sugar
1/4 cup granulated sugar
2 large eggs
2 tsp. pure vanilla extract
1 Tbsp. molasses
1 1/2 cups all-purpose flour
1 tsp. baking soda
1 1/2 tsp. ground cinnamon
1/2 tsp. salt
3 cups old-fashioned rolled oats
1 cup raisins
1/2 cup chopped toasted walnuts (optional- I omitted)

DIRECTIONS

1. Using a hand mixer or a stand mixer fitted with paddle attachment, cream the softened butter and both sugars together on medium speed until smooth. Add the eggs and mix on high until combined, about 1 minute. Scrape down the sides and bottom of the bowl as needed. Add the vanilla and molasses and mix on high until combined. Set aside.

2. In a separate bowl, toss the flour, baking soda, cinnamon, and salt together. Add to the wet ingredients and mix on low until combined. Beat in the oats, raisins, and walnuts (if using) on low speed. Dough will be thick, yet very sticky. Chill the dough for 30-60 minutes in the refrigerator (do the full hour if you’re afraid of the cookies spreading too much). If chilling for longer (up to 2 days), allow to sit at room temperature for at least 30 minutes before rolling and baking.

3. Preheat oven to 350 F. Line two large baking sheets with parchment paper or silicone baking mats.

4. Roll balls of dough (about 1.5 tablespoons of dough per cookie) and place 2 inches apart on the baking sheets. Bake for 8-10 minutes until very lightly browned on the sides. The centers will look very soft and undone. Remove from the oven and let cool on baking sheet for 5 minutes before transferring to a wire rack to cool completely. The cookies will continue to “set” on the baking sheet during this time.

5. Cover cookies and store at room temperature for up to 1 week. Baked cookies and rolled cookie dough freeze well, up to 3 months. Bake frozen cookie dough balls for an extra minute– do not thaw.

Makes about 3 dozen cookies.

(Adapted from Sally’s Baking Addiction)

Hawaiian Fried Rice

February 18, 2015

IMG_6942

Fried rice is one of my favorite dinners. Once you complete all of the prep it cooks so quickly and you can include lots of protein and veggies, making for a relatively healthy meal (especially compared to take-out, though I love that too!). I have recipes for Shrimp Fried Rice (can sub chicken) and Pineapple Mango Fried Rice. This fried rice has a Hawaiian twist. It probably isn’t authentic Hawaiian because I didn’t use spam. If you’re brave, be my guest. I’ll stick with deli sliced ham or Canadian bacon. Fresh pineapple is a must though to achieve that perfect balance of sweet and salty (and spicy with some added sriracha)!

Hawaiian Fried Rice

INGREDIENTS

~2 Tbsp. canola, coconut or peanut oil
1 medium shallot, minced
1/2 large red bell pepper, stemmed, seeded and chopped
3 cloves garlic, minced
1 tsp. grated fresh ginger
1 carrot, peeled and grated
3 large eggs, whisked
4 cups cooked white or brown rice, cold (prepared ahead/leftover refrigerated rice)
1 1/4 cups ham or Canadian bacon, diced
~ 2 Tbsp. low-sodium soy sauce
1 1/2 tsp. toasted sesame oil
2/3 cup frozen peas
1 1/2 cups fresh pineapple, chopped
3 green onions, chopped
fresh cilantro, chopped, to taste
sriracha or crushed red pepper, to taste

DIRECTIONS

1. Prep all ingredients ahead of time. This is key because once you start cooking, it moves fast!

2. Heat 1/2 Tbsp. oil in a large wok or nonstick skillet over medium-high heat. Add the shallot, pepper, garlic, ginger, and carrot and saute for several minutes, until golden and slightly softened. Remove from the pan to a plate and set aside. Return the pan to the heat and lightly coat with cooking spray. Pour the whisked eggs into the pan and cook, stirring occasionally, until almost cooked through. (They’ll cook FAST.) Remove the eggs from the pan and set aside on the same plate. Once cooled, break them up into tiny pieces with a knife or fork.

3. Return the pan to the heat and add the remaining 1 1/2 Tbsp. oil. Add the rice and spread into a single layer. Cook, only stirring every other minute or so, for 5-8 minutes until the rice is golden and warmed throughout. Add the ham and cook for several more minutes.

4. Stir in the vegetables/eggs that you set aside, 1 Tbsp. soy sauce, the sesame oil, peas, and pineapple. Cook, stirring frequently, for several minutes until warmed throughout. Add the green onions, cilantro, sirracha or red pepper, and adjust seasonings to taste (adding another Tbsp. of soy sauce if necessary). Serve immediately.

Serves 4.

(Adapated from Mel’s Kitchen Cafe)

Chewy Fudgy Brownies

February 16, 2015

IMG_6920

When I want to make Dustin happy, I make brownies. Or chocolate chip cookies. Cake is passable as long as it has buttercream frosting. Anything else and I risk complaints. He’ll eat pretty much everything, but he’s sure to let me know he’d rather be having a plain old brownie (with no nuts and no frosting, please). So for Valentine’s Day we had brownies and tried this new recipe. My friend Jenna actually ended up making the brownies while I was working on the rest of dinner. (Thank you, Jenna!) They were perfect: simple and quick to prep, and like the name implies, chewy and fudgy. Just right.

Chewy Fudgy Brownies

INGREDIENTS

1/2 cup butter
8 oz. coarsely chopped quality semi-sweet chocolate (I used Ghiradelli semi-sweet chocolate chips)
3/4 cup granulated sugar
1/4 cup light brown sugar
3 large eggs
1 tsp. pure vanilla extract
1/2 cup + 2 Tbsp. all-purpose flour
2 Tablespoons (11g) unsweetened cocoa powder
1/4 tsp. salt
1 cup semi-sweet chocolate chips (optional- I omitted)

DIRECTIONS

1. Melt the butter and chopped chocolate in a medium saucepan on medium heat, stirring constantly, about 5 minutes. Or melt in a medium microwave safe bowl in 20 second increments, stirring after each, in the microwave. Remove from the heat, pour into a large mixing bowl, and allow to slightly cool for 10 minutes.

2. Preheat oven to 350 F. Line the bottom and sides of a 9×9 inch square baking pan with aluminum foil (or parchment paper), leaving an overhang on all sides. Coat with cooking spray and set aside.

3. Whisk the granulated and brown sugars into the cooled chocolate/butter mixture. Add the eggs, one at a time, whisking until smooth after each addition. Whisk in the vanilla. Gently fold in the flour, cocoa powder, and salt. Once combined, fold in the chocolate chips.

4. Pour batter into the prepared baking pan and bake for 30-35 minutes or until the brownies begin to pull away from the edges of the pan. A toothpick inserted in the center should come out with only a few moist crumbs when the brownies are done. All ovens are different, so keep an eye on them after 25 minutes and use the toothpick test to see when yours are finished.

5. Allow the brownies to cool completely in the pan set on a wire rack. Once cooled, lift the foil out of the pan using the overhang on the sides and cut into squares. For neat squares, I use a very sharp knife and wipe it clean with a paper towel after each cut. Brownies can be stored in an airtight container at room temperature for several days or frozen for up to several months.

Makes a 9×9 pan brownies.

(Adapted from Sally’s Baking Addiction)

Orange Blackberry Muffins

February 12, 2015

IMG_6886

I first made these muffins six years ago (almost to the date!) when I first started this blog. Back then I tried to healthify them by using whole wheat and cutting down the fat. And they turned out great. But these are really really wonderful as a dessert muffin- with all of that white flour and butter. They rise high are pillowy soft and fluffy. They’re stuffed with orange zest and juicy tart blackberries, which is balanced with honey and sweet citrus juice.

IMG_6897

I’ve been baking at high altitude for six months (we moved to Colorado Springs) and almost feel comfortable with it now. This is my go-to guide for adjusting baked goods. I’ll try to include any adjustments* I use when I post recipes from now on. If you ever have any questions about baking at altitude don’t hesitate to ask!

Orange Blackberry Muffins

INGREDIENTS

2 cups all-purpose flour (or 1 3/4 cup white whole wheat flour)
2 1/2 tsp. baking powder
1/4 tsp. baking soda
1/4 tsp. salt
1/3 cup sugar + extra for sprinkling on top (optional)
1/3 cup butter, melted
1 navel orange, zested and juiced
3/4 cup buttermilk
2 large eggs
3 Tbsp. honey
1 cup fresh blackberries (or frozen, thawed and drained)

DIRECTIONS

1. Preheat the oven to 375 F. Lightly grease or line a 12 hole muffin tin.

2. Pour the orange juice into a large glass measuring cup or a bowl and pour in enough buttermilk to make 1 cup. Whisk in the eggs, honey and melted butter.

3. In a large bowl, rub sugar and orange zest together with fingertips until the sugar is moist and you can smell the orange. Whisk in the flour, baking powder, baking soda and salt. Pour the liquid ingredients over the dry ingredients and gently but quickly stir to blend. Stir in the blackberries. Divide the batter evenly among the muffin cups. Sprinkle each muffin with a bit of sugar (optional- I like how it forms a crispy crust).

4. Bake in the preheated oven for about 15-20 minutes, until a toothpick inserted into the center of a muffin comes out clean. Transfer the pan to a rack and cool for 5 minutes before carefully removing each muffin.

*at high altitude: + 2 Tbsp. flour, halve baking powder and baking soda, – 1 Tbsp. sugar, + 2 Tbsp. buttermilk, increase oven temp to 400 F, decrease baking time by several minutes

Makes 12 muffins.

(Adapted from Genesis of a Cook)

Citrus Ancho Grilled Chicken or Pork

February 11, 2015

IMG_6874

This marinade is amazing. I’ve made it twice now- both times with chicken breast (although pork tenderloin would be fantastic) and served it as tacos. The citrus (orange and lime) + brown sugar + ancho chile powder works magic on a lean, boring cut of meat. This could also be prepared as kabobs, threaded with onions and peppers or pineapple and mango and served over a bed of rice or quinoa.

Ancho chili powder can be found at Whole Foods or in the Latin section of many grocery stores. It’s my favorite of all chili powders and I use it constantly. So stock up- you won’t be sorry. A few other recipes using ancho chili powder: Chicken Skewers with Ancho Sauce, Maple Ancho Grilled Salmon, and Slow-Cooker Carnitas.

Citrus Ancho Grilled Chicken or Pork

INGREDIENTS

1- 1 1/2 lbs. boneless chicken breast or pork tenderloin, cut into strips or cubed
1/4 cup fresh orange juice
2 Tbs. fresh lime juice
2 Tbs. canola oil
2 tsp. brown sugar
2 tsp. pure ancho chile powder
2 cloves garlic, minced
pinch crushed red pepper flakes
1/2 tsp. kosher salt
freshly ground black pepper

for serving as tacos:
corn or flour tortillas
cheese (Monterey or Pepper or Colby Jack)
lettuce
salsa (tomatillo highly recommended)
sour cream
diced avocado
chopped cilantro
diced white onion

DIRECTIONS

1. In a medium bowl, whisk the orange juice, lime juice, oil, sugar, ancho powder, garlic, pepper flakes, salt, and pepper.

2. Add the chicken or pork, toss to coat, cover, and refrigerate for at least 1 hour or up to 4 hours.

3. Preheat outdoor grill or indoor grill pan to medium-high heat. Lightly oil and grill the meat (if the meat is cubed, you’ll want to thread it onto skewers before grilling) until the juices run clear (time will depend on the size and type of meat). Let rest several minutes before slicing (if needed) and serving.

4. To serve as tacos, melt cheese on tortillas over medium heat on the stove or griddle. Fill with meat and toppings and serve.

Serves 4-6.

(Adapted from Fine Cooking)