Goat Cheese, Pistachio, and Apricot Stuffed Chicken Breast

February 18, 2014

stuffed chicken breast

I’m not a cookbook hoarder. (Or hoarder of anything, really. Quite the opposite, I tend to toss everything and occasionally regret it.) But I do have a few cookbooks I couldn’t resist purchasing and display them proudly. Currently my small stack includes Rustic Fruit Desserts, The Smitten Kitchen Cookbook (because who doesn’t love her recipes?), Jerusalem (which I’ve yet to actually cook from, but it sure is beautiful), and another that I bought with high hopes and has only been a disappointment and I plan to discard shorty. And then this one, Aida Mollenkamp’s Keys to the Kitchen.

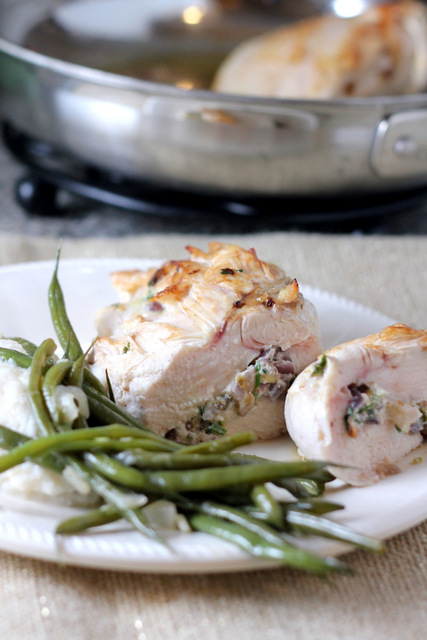
This goat cheese, pistachio, and apricot stuffed chicken breast is the first recipe I’ve tried, but if it’s any indication of the others, this cookbook is a keeper. I’ve made this twice since Christmas which sets all sorts of records for repetition of a dinner recipe in my kitchen. I’m not a huge fan of chicken breast as it’s often dry and dull. But not this one. Stuffed with goat cheese, sweet apricots, crunchy pistachios, onion, and nutmeg, it’s remains tender and juicy. I thought the results far exceeded the minimal amount of prep (which could be done in advance). And it’s impressive enough to serve someone special or for company.

Goat Cheese, Pistachio, and Apricot Stuffed Chicken Breast

INGREDIENTS

2 Tbsp. olive oil, divided
1/2 red onion, finely diced
2 Tbsp. fresh Italian parsley, minced
3 large (about 1 1/2 lbs.) boneless skinless chicken breasts
2 oz. fresh goat cheese (I used Trader Joe’s goat cheese spread which has the consistency of cream cheese)
3 Tbsp. shelled roasted pistachios, roughly chopped
2 Tbsp. dried apricots, finely chopped
1/4 tsp. ground nutmeg
kosher salt and freshly ground black pepper, to taste

DIRECTIONS

1. Preheat oven to 375 F. Heat 1 Tbsp. oil in a large oven-proof pan over medium heat. Add the onion and cook until soft. Stir in the parsley and season with salt and pepper and cook until just wilted. Remove the mixture from the pan to a bowl to cool. Wipe out the pan and set aside.

2. Meanwhile, make pockets in the chicken breasts by slicing horizontally about 3/4 of the way through the meat. (This is done by moving the knife back and forth in the fanning motion to enlarge the pocket. Don’t cut all the way through.) Season the chicken breasts all over with salt and freshly ground black pepper.

3. Stir the goat cheese, pistachios, apricots, and nutmeg into the cooled onion mixture. Taste and adjust seasonings if necessary. Divide the mixture between the chicken pockets and use toothpicks or butcher’s twine to secure the chicken pockets closed.

4. Return the pan to medium-high heat and add the remaining 1 Tbsp. oil. When the oil shimmers, place the chicken breasts in the pan and cook, undisturbed, until golden brown, about 6 minutes. Turn the breasts over transfer the pan to the oven and bake until the filling is hot all the way through and the chicken is cooked through, about 10-15 minutes (or a meat thermometer reads 165 F).

Makes 3 stuffed chicken breasts.

(Adapted from Aida Mollenkamp’s Keys to the Kitchen)

Roasted Sweet Potato and Black Bean Enchiladas

February 11, 2014

IMG_3534

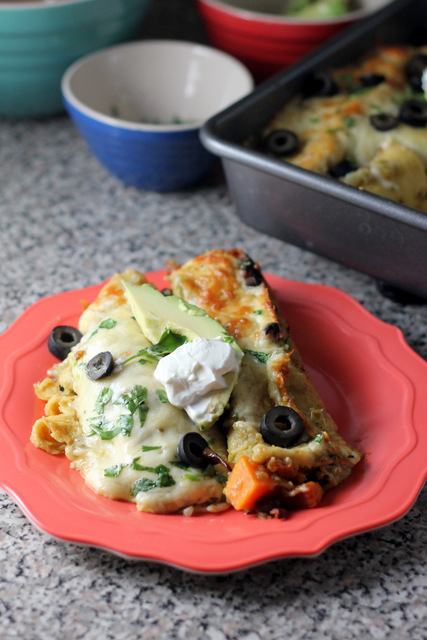
This was an experiment that went exceptionally well. I’d seen a few sweet potato black bean enchilada recipes out there but wasn’t thrilled with any of them in particular. So I decided to create my own. And I got lucky because 1) I had promised dinner to a friend who recently had a baby and while I never recommend trying something new on such occasions, it worked out (phew!) because, 2) these were amazing. We loved them, they loved them. In full disclosure: it’s not often I’m so brave-or this lucky.

IMG_3511

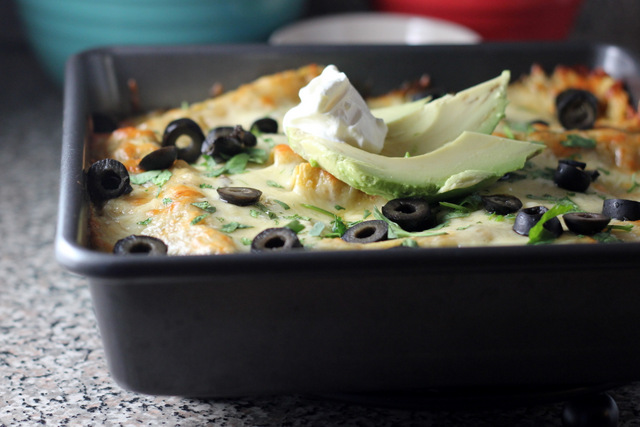
So how do you make sweet potato and black bean enchiladas that will WOW just about everyone? (Yes, they’re vegetarian and they’re still awesome.) You roast the sweet potatoes with garlic and onion and a handful of spices. You combine that with some black beans and cheese to create the filling. And the rolled up enchiladas are topped with salsa verde and more cheese (your favorite melty Mexican variety) before baking. Serve them hot out of the oven with black olives, cilantro, avocado, lime, and sour cream. It’s been two weeks and I’m still dreaming about this meal. Make these immediately.

Roasted Sweet Potato and Black Bean Enchiladas

INGREDIENTS

2 lbs. sweet potatoes, peeled and diced
1 1/2 tsp. cumin
1 tsp. smoked paprika
1/2 tsp. ground coriander
1/2 tsp. Mexican oregano
kosher salt and freshly ground black pepper, to taste
red onion, chopped
2 cloves garlic, minced
1 15-oz. can black beans, drained and rinsed
16 corn tortillas (we like the ones that are a blend of corn and wheat), warmed
12 oz. Monterrey Jack, Colby Jack, or another Mexican melting cheese, grated (I used Chihuahua)
2 12-oz. jars tomatillo salsa (we like the Trader Joe’s brand)

for serving:
black olives, pitted and sliced
sour cream
avocado or guacamole
fresh cilantro, chopped
lime wedges

DIRECTIONS

1. To prepare the sweet potatoes, preheat oven to 400 F. Line a large rimmed baking sheet with aluminum foil and coat with cooking spray. Combine the sweet potato with the olive oil, onion, garlic and spices on the prepared pan and toss to coat. Spread in a single layer and roast for 20-30 minutes, turning occasionally, until browned and tender. Set aside to cool.

2. If you will be baking the enchiladas immediately, reduce the oven heat to 350 F. If not, turn the oven off. (The enchiladas can be prepared ahead of time and refrigerated until ready to bake.)

3. To assemble the enchiladas, in a large bowl toss to combine the sweet potato mixture and the black beans. Spoon several tablespoonfuls of the mixture into the center of a warm tortilla (warming them helps prevent tearing). Sprinkle with a bit of grated cheese (about 1 Tbsp.). Roll up and place in a 9×13 baking dish lightly coated with cooking spray. Repeat with the remaining tortillas and filling. Pour the two jars of enchilada sauce over top and sprinkle with the remaining cheese.

4. Bake in preheated 350 F oven for 20-30 minutes until the sauce and is bubbling and the cheese is melted and browning. Serve with black olives, sour cream. avocado, cilantro, and lime wedges.

Serves 8.

(Adapted from A Couple Cooks)

Roasted Broccoli

February 3, 2014

roasted broccoli

I’m about to hop on a plane. (Um, I wish it was that easy. I’m hauling a car seat and stroller and luggage and a lap child, so my getaway will be anything but graceful- or relaxing.) Clara and I are headed for Arizona. For some warmth and sunshine and catch-up time with one of my best friends. I’ve been looking forward to this trip for several years, not knowing if it would actually happen. Now it’s here, it’s happening! A late Christmas gift to myself. But I’ll admit that traveling with a toddler is like a reoccurring nightmare. I know what’s coming and I can only hope for the best. And yet here we go again. Dear friends and 70 degree days will be worth it.

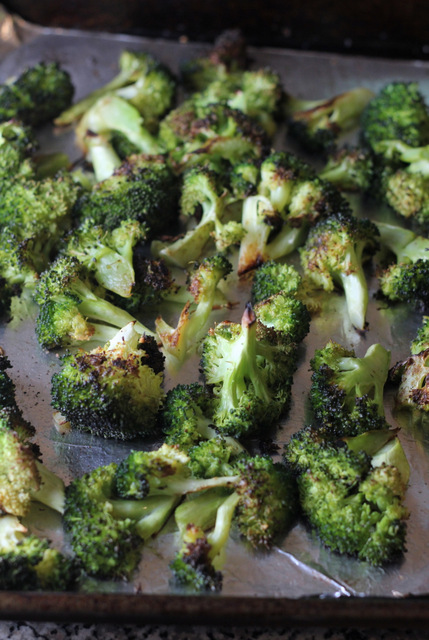
I thought I’d share a quick recipe before I depart. Something I’ve made a handful of times recently because it’s such a simple delicious way to eat your broccoli. This broccoli is tossed with olive oil, salt, and pepper- some garlic if you wish- then roasted until tender yet crisp. Little bits of the broccoli darken and char- the best part. Eat it straight off the pan or dust with crushed red pepper and/or Parmesan for a special touch. (In full disclosure, Clara still prefers her broccoli steamed. But she’s under two and not to be trusted when it comes to such things.)

**Winner of last week’s cast iron skillet giveaway announced at the bottom of this post.**

Roasted Broccoli

INGREDIENTS

1 lb. fresh broccoli, cut into florets
2-3 Tbsp. extra virgin olive oil
kosher salt and freshly ground black pepper

optional:
minced garlic
freshly grated Parmesan or sharp white cheddar
crushed red pepper flakes

DIRECTIONS

1. Preheat oven to 425 F. Line a large rimmed baking sheet with aluminum foil and coat it with cooking spray.

2. Place the broccoli on the baking sheet and drizzle with olive oil and sprinkle with kosher salt and freshly ground black pepper. Toss to coat and spread the broccoli in an even layer. (Optional: Toss garlic with broccoli before roasting.)

3. Bake in preheated oven for 20-25 minutes, turning halfway through, until tender-crisp (the broccoli will brown in spots). Serve immediately. (Optional: Sprinkle with Parmesan or cheddar and/or red pepper flakes.)

(Adapted from Rachel Cooks)

Deep Dish Skillet Pizza {Giveaway}

January 28, 2014

deep dish pizza

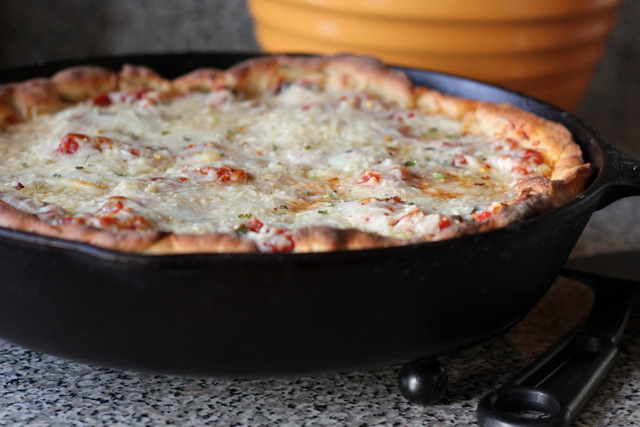
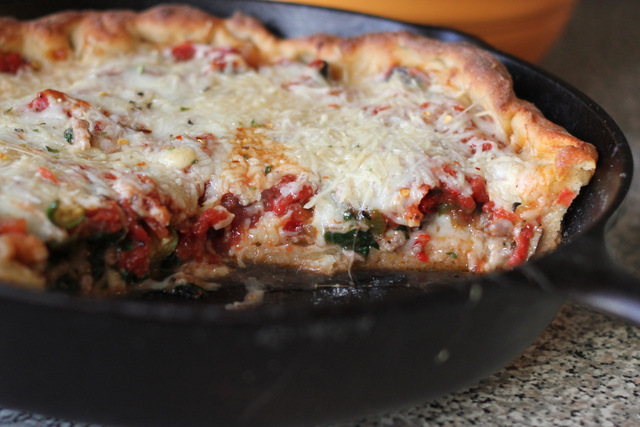
Not too many posts ago I confessed that despite living in Chicago, I haven’t been converted to deep dish pizza. And it’s still true. If I have any say, I’d rather have a thin chewy crust, heavy on the cheese and toppings. That was until I made a deep dish/pan/skillet (whatever you want to call it) pizza my own way. I ditched the dense butter crust (which after a little research I learned isn’t even made with butter, but rather vegetable oil) in favor of my favorite dough. It was this simple: my go-to pizza dough, baked it in a cast-iron skillet (12 inches so it fits), mozzarella layered on the bottom (as is traditional), then the toppings (roasted vegetables, spinach, Italian turkey sausage, and black olives) and the sauce, finished with freshly grated Parmesan. It takes a little longer to cook- but not that long. And it’s good. Not near as heavy or exhausting as a true Chicago pizza. But just a satisfying and delicious.

This recipe is highly adaptable. Stuff your pizza with whatever fillings you desire. Mix up the cheese: you could use smoked mozzarella on the bottom (I’ve made it this way and it was awesome) and/or Asiago or Romano in place of the Parmesan. My only advice is to be careful what you fill it with because you want to prevent too much liquid from accumulating. Squeeze any excess liquid out of the vegetables you’ll be adding. Raw vegetables might present a problem if they release a lot of liquid as they cook. And make sure to reduce the sauce or strain it before using. Letting the pizza sit for a bit before slicing helps it to set and reabsorb some of the liquid.

I should mention the sauce. I think it’s what made this pizza extra special. Don’t be lazy and use a jar. This sauce is worth your time. It’s not a lot of effort and simmers away while the dough is rising. I’ve tried a handful of Chicago pizza eateries and this sauce was pretty darn authentic if comparing. You won’t need all of the sauce for a single pizza so freeze what’s left over for a future sauce emergency.

deep dish pizza

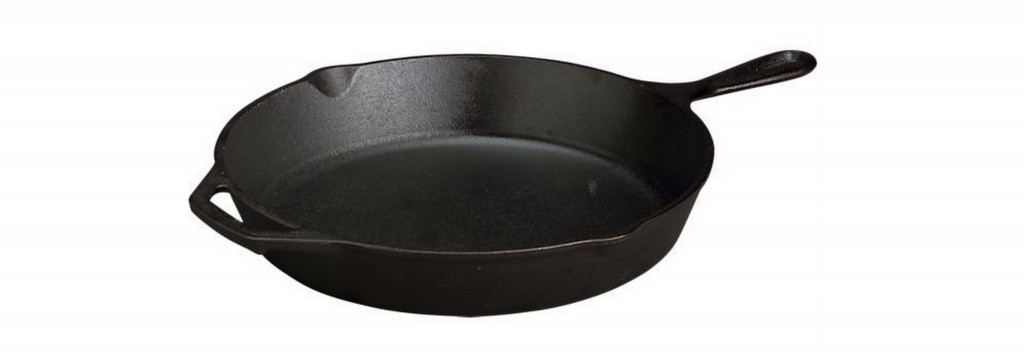
And now for my first ever giveaway! I’m giving one lucky reader this 12-inch Lodge Cast Iron Skillet so they can make their very own deep dish pizza (and pancakes and pot pie and so many other wonderful things) with it. To be eligible, just leave a comment in the comments section. I would love to know what you plan on making if you win…

GIVEAWAY: LODGE 12-INCH CAST IRON SKILLET

2014-01-28.5TO ENTER: Simply leave a comment in the comments section. One entry per person. Giveaway will remain open until 12:00 A.M. CST on Monday February 3, 2014. ONE winner will be selected at random and announced and contacted later Monday morning. Make sure to provide your email address in the comment form so I can contact you (it will not be published). This giveaway is NOT being sponsored by any company. It’s a product that I have purchased myself and use and love. And now I am providing one for you!
** This giveaway has ended. Congratulations to BRITTANY ERICKSON, winner of the cast iron skillet. I’ll be in contact with you via e-mail. Thanks to everyone who entered!**

Deep Dish Skillet Pizza

INGREDIENTS

1 recipe pizza dough
1 Tbsp. extra virgin olive oil, for greasing the pan
cornmeal, for dusting the pan

sauce:*
2 Tbsp. olive oil
1 Tbsp. fresh garlic, minced
2 tsp. fresh basil, chopped (or 3/4 tsp. dried)
1 tsp. fresh oregano, chopped (or 1/2 tsp. dried)
1/4 tsp. fennel seeds
1/2 tsp. salt
1/4 tsp. freshly ground black pepper
pinch crushed red pepper flakes (more to taste)
28 oz. can plum tomatoes, coarsely crushed
1 Tbsp. dry red wine (I replaced it with 1 tsp. red wine vinegar)
1 tsp. sugar

*NOTE: This makes more sauce than you need for 1 pizza. I used about 1/2- 2/3 of the sauce and froze the rest for later.

filling:
roasted vegetables (I roasted red and green bell peppers, onion, and mushrooms- make sure to drain any excess liquid before adding to the pizza)
spinach, cooked and chopped (remember to squeeze out any liquid)
black olives, sliced
8 oz. Italian sausage, cooked and crumbled (I used mild Italian turkey sausage) and/or pepperoni
~8 oz. mozzarella, grated (or smoked mozzarella for even more flavor)
~3/4 cup freshly grated Parmesan (and/or Pecorino Romano, Asiago, etc.)

DIRECTIONS

1. Prepare pizza dough according to recipe directions.

2. To make the sauce, heat the olive oil in a large saucepan over medium heat. Add the garlic and cook, stirring, for 30 seconds. Add the herbs, salt and peppers and cook, stirring, for another 30 seconds. Add the tomatoes, wine (or vinegar), and sugar, and bring to a boil. Lower the heat and simmer, stirring occasionally, for 20-30 minutes, until thickened. Remove from the heat and set aside to cool completely before using. (The sauce can be made ahead of time and refrigerated or frozen until ready to use.)

3. Preheat oven to 450 F. Rub 1 Tbsp. olive oil over the bottom and sides of a 12-inch seasoned cast iron skillet. Dust the bottom and sides with cornmeal.

4. When the dough is ready, use your hands to stretch it into a large circle and place it in the bottom of the prepared cast iron skillet. Continue stretching it evenly and pressing it into the pan until the dough reaches the edges and up the sides of the pan coming to the top. Place the mozzarella cheese on top of the crust. Top with the sausage, vegetables, and olives. Ladle the sauce evenly over top (I use about 2/3 of the sauce) and sprinkle with the Parmesan cheese.

5. Bake pizza in preheated oven for 20-25 minutes, until the crust is puffed and browned, the cheese is melted and golden, and the sauce is bubbling. Remove from the oven and let sit 5 minutes before slicing.

Makes 1 12-inch round deep dish pizza.

(Adapted from Food Network and Minimalist Baker)

Coconut Banana Muffins

January 9, 2014

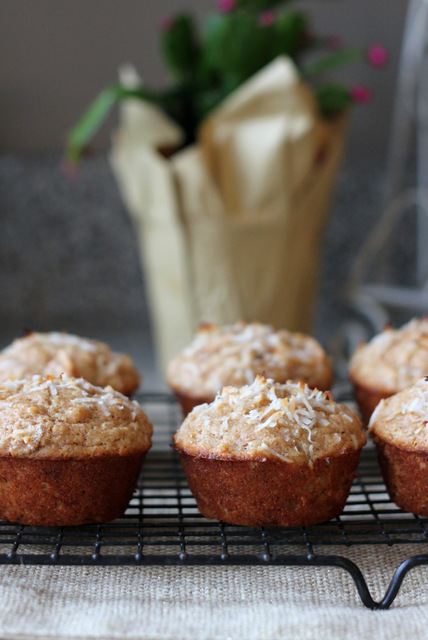
coconut banana muffins

I can’t remember for sure (as it has been 20+ years) but being a toddler must be tough. Learning to move and communicate with a tiny awkward body. Constant tumbles. Constant rejection. Constantly sick and snotty. It must be frustrating figuring out a new world. Finding out that world isn’t fair.

Most of my day revolves around a miniature being who is so full of life and energy and so fed up with it at the same time. One minute I’m being smothered in hugs and kisses and the next I’m ducking swinging arms and legs amidst wails of despair. (It must be diaper changing time again.) She’s so sweet and innocent and meanwhile clever and mischievous and I never know what I’ll get.

coconut banana muffin

I consider myself a pretty nice mama. I patiently walk in to her bedroom in the middle of almost every night, to give her a hug and a kiss, a sip of water, and lay her back down to sleep. I cook her breakfast, lunch, and dinner and try my hardest to not throw a tantrum when she doesn’t eat. I spend hours at the park and on the floor playing blocks and drawing beside her and reorganizing the drawers she’s emptied. I set limits and stick her in time-out when she loses it. (Which she then begs for anytime I’m making her do something she doesn’t want to be doing. -i.e. diaper changing.) I’m her nurse, stylist, chef, maid, teacher, therapist, and punching bag.

And I love it. I lover her. But what I’m really saying is that some most days being a mama is tough and exhausting. But I’m guessing that being under two (or three, etc.) is hard too. And just like my little Clara, who can’t seem to remember that her potty is for poo-poo and not for stashing toys, I need reminding. That she’s not out to get me. That she needs me. And that she’s allowed to have bad days too.

coconut oil banana muffins

Anytime I ask Clara what she wants for a snack (which isn’t often, I usually decide what we eat) she’s guaranteed to say one of three things: “chi-chi’s” (cheerios), “oie” (orange), or muffie (muffin). (And she begs for pizza every night. I don’t blame her.) She’s loves her muffins and I love that I can stuff them full of healthy things: oatmeal, whole grains nuts/seeds, fruit (banana, raisins, whatever is in season) and even veggies such as carrots and zucchini.

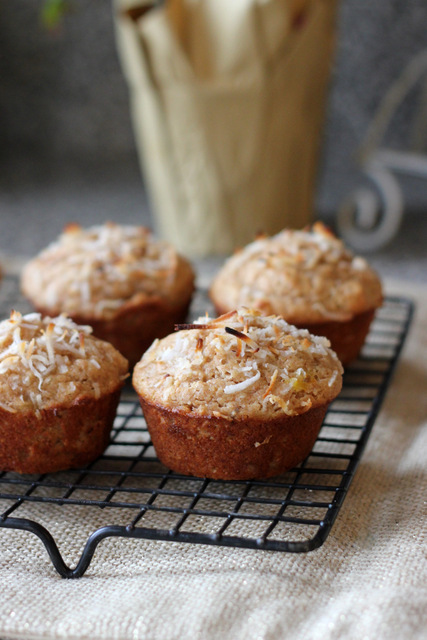
Today we have coconut banana muffins. I always make my muffins low-sugar (so beware, if you want a dessert-type muffin you’ll want to increase the amount of sugar) and usually low-fat by swapping out the oil for yogurt or applesauce. This time I left in the coconut oil because it adds so much flavor and has nutrient benefits. And instead of whole wheat flour, I used spelt. It’s still whole grain but makes for an even lighter, more tender muffin. Stock up on spelt- it makes some amazing bread and baked goods! There’s a bit of tang from the sour cream/yogurt and texture from the coconut. And they’re just sweet enough with banana and brown sugar and cinnamon.

Coconut Banana Muffins

INGREDIENTS

1 3/4 cup whole spelt flour (or white whole wheat flour)
2 tsp. baking powder
1/2 tsp. salt
1/2 tsp. cinnamon
1/4 tsp. nutmeg
1/4 cup brown sugar
1/4 cup coconut oil, melted
1/2 cup sour cream or plain yogurt
2 large eggs
1 tsp. pure vanilla extract
1 cup mashed ripe banana (about 2 large bananas)
1/4-1/2 cup unsweetened shredded coconut + extra for topping (If you use sweetened coconut you could reduce the sugar further)

DIRECTIONS

1. Preheat oven to 375 F. Line with muffin liners or lightly grease a 12 cup muffin pan.

2. In a large bowl, whisk to combine the flour, baking powder, salt, cinnamon, and nutmeg. In a separate bowl, whisk to combine the brown sugar, coconut oil, sour cream or yogurt, eggs, vanilla, and mashed banana. Add the wet ingredients to the dry and mix until just combined. Stir in the coconut. Spoon the batter into the prepared muffin pan.

3. Bake in preheated oven for about 15 minutes, until a toothpick inserted into the center of a muffin comes out clean. Cool in the pan for several minutes before removing muffins from the pan onto a wire rack to cool completely.

(NOTE: These muffins freeze well. Reheat at room temperature or in the microwave.)

Makes 12 muffins.

(Adapted from The Green Forks)