Light Brioche Hamburger Buns

August 23, 2009

If you hadn’t noticed, this is my third burger bun. They just keep getting better. Number 1 was just a bit too hearty (100% whole wheat, very rustic). Number 2 was just as tasty, but less bun-like, more sandwich-worthy. But this one, number 3, is PERFECT. I swear you will never want another bread-aisle bun again. They don’t compare.
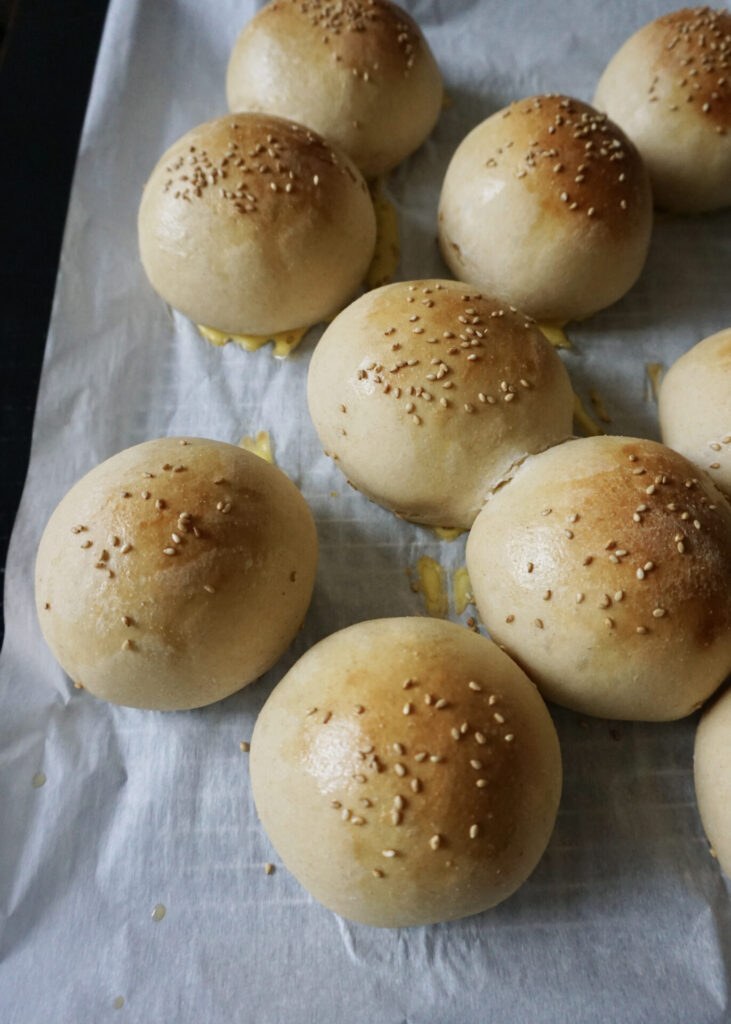
I managed to make this recipe with half whole wheat flour, and it’s hardly noticeable. Except I know, and that matters. Dustin and I almost died (of pleasure) when we took our first bite. (Well, I pretended it was my first bite. I’d already eaten a whole bun sans burger right when they came out of the oven. Shh… our secret.) Bakery quality, right in your own kitchen. Bread/buns is the most satisfying thing to make right. Baking bread always means I come out of the kitchen dusted in flour with a huge grin on my face. If only I had a cute white cap.

Light Brioche Hamburger Buns

INGREDIENTS
1 cup warm water
3 Tbsp. warm milk
2 tsp. active dry yeast
2 1/2 Tbsp. sugar or honey
1 large egg, lightly beaten
1 1/2 cups white whole wheat flour
1 1/2 cups bread flour, plus extra for kneading
1 1/2 tsp. salt
2 1/2 Tbsp. unsalted butter, softened
sesame seeds (optional)
1 large egg + 1 Tbsp. water, for egg wash

DIRECTIONS
1. In a glass measuring cup combine warm water and milk, sugar, and yeast. Let stand until foamy, about 5 minutes.

2. In a large bowl, whisk flours and salt. Add softened butter and mix together with your fingers to make crumbs. Stir in the yeast mixture and beaten egg until a dough forms. Turn out onto a well-floured surface and knead until smooth and elastic (8-10 minutes), adding more flour as necessary to prevent sticking. You want the dough to still be slightly sticky/tacky so that the buns are not tough.

3. Lightly grease the original bowl and return the ball of dough to the bowl. Cover with plastic wrap and let rise in a warm place until doubled (about 1 1/2 hours).

4. Line a baking sheet with parchment paper. Divide the dough into 8-10 equal parts, and roll each into a ball. Arrange on the baking sheet several inches apart. Lightly spray a piece of plastic wrap with nonstick cooking spray and loosely cover the rolls. Let rise in a warm place until doubled (another 1 1/2 hours).

5. Preheat oven to 400 F. Make sure the rack is in the center. Set a large shallow pan of water on the oven floor (I forgot to do this step and mine turned out fine). Lightly beat the remaining egg with 1 Tbsp. water. Brush the tops of the risen buns with the egg wash. Sprinkle with sesame seeds. Bake, rotating the sheet halfway through, until the tops are golden brown, about 8-10 minutes. Remove from the pan to cool on a wire rack.

Makes 8-10 buns.

(Adapted from Smitten Kitchen)

Guacamole

August 22, 2009

I’ve committed myself to educating you (and myself in the process) more on the topic of food, and so today I bring you a history lesson (via Wikipedia) on my favorite dip. Guacamole is of Aztec origin (present day Mexico) and was traditionally made with a molcajete (mortal and pestle- which is still the most authentic way to do it). Spanish conquistadors fell in love with it as well and carried the recipe back to Spain. Traditional ingredients include everything I have listed below.

You can make your guacamole unique by adapting it to your own taste. Sometimes I like to leave it full of avocado chunks, and other times I mash it to a pulp. I always include tomatoes… I am fond of the substance and bright red color they add. But never ever leave out the limes (or lemons). Their enzymes prevent the avocado from turning brown before you get it to the table (and will keep it looking green for up to a couple days if not exposed to air).

INGREDIENTS
3 large ripe Hass avocados, pitted and halved
1 large lemon, juiced (or 2 limes)
1/2 onion, diced
1 clove garlic, minced
1/2 jalapeno pepper, finely diced (more or less depending on the level of heat you want)
handful fresh cilantro leaves, roughly chopped
2 Roma tomatoes, seeded and diced
1/2 tsp. kosher salt
1/2 tsp. ground cumin (optional- I don’t always include it)
1/4- 1/2 tsp. cayenne pepper (once again, to taste depending on how much heat you want)

DIRECTIONS
1. Scoop the avocados out of their skin, place them in a small bowl, and mash them with a fork (or potato masher) to desired consistency. Add the remaining ingredients and stir to combine.

2. Place plastic wrap directly over top of the guacamole so that it doesn’t brown and refrigerate for 1 hour before serving.

Serves 6-8.

(Adapted from Food Network)

Stawberry Cupcakes

August 15, 2009


8/15/09: Ah, what can I say, strawberry cupcakes? We have an ambivalent relationship. Should I tell them how much I long for you, how when you are not around I desire your moist center and fluffy frosting. And then once I have you I cannot stop myself from consuming all of you, at once. I am uninhibited in your presence. So much so that our encounters always leave me feeling regret. Regret that I couldn’t stop after just one taste. And sick, overwhelmed by your sweetness and the fact that I licked up every last crumb and you are gone. I will miss you. Until I once again succumb to temptation and invite you back into my life. It’s inevitable. And I’d say, worth it!

2/23/09: The vibrant pink color and subtle strawberry flavor of these cupcakes both come form using real, fresh strawberries! I was so excited that I found this recipe and couldn’t wait to try it out! They not only turned out stunning, but just as anticipated, they tasted divine! I totally agree with Dustin’s comment that they “actually tasted even better than they looked!” And in my opinion, when it comes to cake, that’s rare. I’m betting you could make them using frozen berries in the off-season. If you have a bunch of fresh strawberries and you are making the sauce, why not make extra and freeze it? It could be thawed out for cupcakes on the spot!

INGREDIENTS
For the Cupcakes:
1 1/3 cups flour
1/2 tsp. baking powder
1/2 tsp. baking soda
1/8 tsp. salt
1/2 cup strawberry sauce
1/4 cup milk
1/2 cup butter, room temperature
1 cup sugar
2 eggs, room temperature
For the Strawberry Sauce:
2 cups fresh strawberries, stem removed
sugar, to taste
For the Strawberry Cream Cheese Frosting:
8 oz. cream cheese
1/4 cup butter
3 1/2- 4 cups powdered sugar
1/4 cup strawberry sauce

DIRECTIONS

1. For the Strawberry Sauce, macerate strawberries with about 1-2 Tbsp. sugar for 15 minutes. Put strawberries in a small saucepan and heat under medium heat with lid on. Cook strawberries for approximately 15 minutes till strawberries cook down and become soft and saucy. Adjust sweetness with sugar until you get the desired sweetness. Using a hand blender (or a food processor), puree until you get the desired smoothness or chunkiness. Cool before using in recipe.
2. For the cupcakes, preheat oven to 350 F. Grab a large bowl and beat the butter and the sugar together until light and fluffy. Add eggs one at a time. Whisk together flour, baking powder, baking soda and salt in a bowl. Measure out milk and strawberry sauce together.
3. Add about a fourth of the flour to the butter mixture and beat to combine. Add about one third the milk mixture and beat until combined. Repeat, alternating flour and milk and ending with the flour mixture. Scoop into cupcake papers about 3/4 full. Bake for 18-20 minutes.
4. For Strawberry Cream Cheese Frosting, bring cheese and butter to room temperature. Sift powdered sugar into a bowl. Beat butter and cheese at medium speed until creamy. Add half of the sugar, beat until combined. Add strawberry sauce until you achieve the right color and flavor but making sure not to add too much or the frosting will be too soft. Gradually add any remaining sugar until you get to the consistency and sweetness you like.
5. Remove the cupcakes from the oven when they are done (a toothpick inserted into the center comes out clean.) Cool them on a wire rack completely before frosting.
Makes 12 cupcakes.
(Adapted from A Sweet Fantasy)

Gorilla Poops, A.K.A. No Bake Cookies

August 14, 2009

Whoever dreamed up such an appetizing name for these “dessert droppings”, I’ll never know. That’s what my mom called them and so that’s what they are. Delicious as far as dung goes. We always made them with coconut, but I recently realized that the rest of the world was using peanut butter. So this go round I made them both ways, coconut for the sake of tradition, and peanut butter for Dustin (like I’ve mentioned 800 times, he detests coconut, and it’s tragic).

They really are a snap to make. No preheating the oven, setting timers, shuffling cookie sheets. Just drop them by the blob on some wax paper and you’re done. The hard part is waiting to eat them until they’ve cooled. I’ve singed my tongue countless times due to lack of patience. And it’s ironic because afterward you can’t taste much of anything! (Luckily, the fridge/freezer will speed up the cooling process.)

INGREDIENTS
2 cups sugar
5 Tbsp. unsweetened cocoa powder
1/2 cup milk
1/2 cup butter
1 tsp. vanilla extract
pinch of salt
1/2 cup coconut OR peanut butter
3 cups old-fashioned oats

DIRECTIONS
1. In a saucepan bring sugar, cocoa, milk, and butter to a rapid boil for 1 minute. Remove from the heat and add vanilla, salt, coconut or peanut butter, and oats. Mix well.

2. Drop by spoonfuls onto wax paper and let cool.

Makes 2-3 dozen, depending on size.

(Recipe from my mom.)

Blueberry Crumb Bars

July 31, 2009


I found this recipe on Smitten Kitchen, who adapted it from All Recipes, and I did a little tinkering of my own. I tried it two ways: with classic white sugar and white flour and a “healthified” version with natural cane sugar and whole wheat. (The latter still contains a full stick of butter so it still doesn’t exactly fall within the health food realm.) I split the pan right down the middle, half whole wheat and the other half not.

It was an experiment of sorts. As you can see, the whole wheat crust was a deeper golden brown, hinting at its whole grain goodness. The test was to see how different they tasted. I made the mistake of telling my guests the difference, and predictably, they avoided the whole wheat bars. I munched on both (with a scoop or two of vanilla ice cream on the side, yum!) and didn’t think either stood out as better than the other. But sometimes I worry that I’m slightly jaded, being accustomed to the taste of whole wheat. My husband though, who is brutally honest in his culinary opinions, happily gobbled up the leftovers with no discrimination. According to him- brown or white- the taste was the same. So there you have it… either way you make ’em, you’ll have blueberry bliss!

INGREDIENTS
1 cup white sugar (or evaporated cane sugar)
1 tsp. baking powder
3 cups all-purpose flour (or whole wheat pastry flour)
1 cup cold butter (2 sticks)
1 egg
1/4 tsp. salt
Zest and juice of 1 lemon
4 cups fresh blueberries
1/2 cup white sugar (or evaporated cane sugar)
4 tsp. cornstarch

DIRECTIONS
1. Preheat oven to 375 F. Grease a 9×13 inch baking dish.

2. In a large bowl, stir together sugar, baking powder, and flour. Mix in salt and lemon zest. Using a pastry blender, cut in the butter and egg. Dough will be crumbly. Pat half of the dough into the bottom of the prepared pan.

3. In a separate bowl stir together sugar, cornstarch, and lemon juice. Gently mix in the blueberries. Sprinkle the blueberry mixture evenly over the crust. Top with the remaining dough crumbles.

4. Bake in preheated oven for 30-45 minutes, until the top is slightly browned. Cool before cutting into squares.

Makes 1 9×13 pan.

(Adapted from Smitten Kitchen)