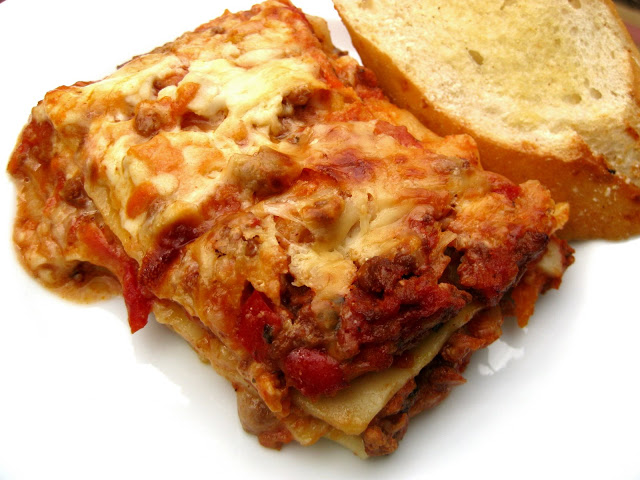
Nick & Jenna’s Lasagna Italiano

July 23, 2009

It’s been a while. We took a little trip to Charleston over the last few days and I thought I’d be able to keep up on the blog. I thought our (Priceline special) hotel would have wi-fi. And it did. But you had to pay an extra 10 bucks a day to use it. I guess you’re just not worth it to me. I figured the blog could wait. I was probably much more anxious to continue posting than any of you were for my return.

Internetless (It’s a helpless feeling!), our small budget went towards delectable, fresh, fantastic seafood. I didn’t eat anything that spent its life on land during the trip. Why bother? Virginia produces plenty of pork and poultry, but Charleston is teeming with glorious sea life! For me, the highlight of the trip was the food. We also got a taste of real Southern cuisine. We nibbled fried green tomatoes, devoured Cajun shrimp po’boys, and slurped creamy crab fettuccine. We visited the french quarter and tried our first croque monsieur. The seared ahi was awesome and I fell head over heels for the best mahi fish tacos ever. The food was unforgettable. Expect to see many more seafood recipes in the near future. You can’t visit a place like Charleston without feeling inspired!

I know I’m contradicting myself, raving about Southern shrimp and fish on a day that I present to you this extraordinary Italian recipe. Shift your focus to the flavors and aromas of Italy and just imagine…the most magnificent lasagna in the world! This is it! I might have had a little fling with those fish tacos, but this dish right here will be my lifetime companion. I’m still amazed that something this Italian, this good came out of my kitchen (Stouffers, goodbye.). Thank you, Nick and Jenna, for sharing this recipe with me and letting me share it with the world. I first had it in their home and am loving being able to recreate it in mine.

In the method of a true chef, the instructions I was given were far from exact. I have detailed what I have done, twice now, to achieve what I feel is the desired result. There are several keys to achieving greatness with this lasagna: high-quality fresh artisanal cheeses (worth every penny), no-boil lasagna noodles (they require less work and are much thinner which means more layers), and slow-simmering the sauce. Just accept that that it will take the better part of a day for the sauce to reach its peak. Your patience will be rewarded upon your first bite.

INGREDIENTS
Per il Ragu:
1 Tbsp. extra virgin olive oil
1 yellow onion, diced
1-2 red/yellow bell peppers, diced
2 cloves garlic, diced
2 carrots, shredded (optional)
2 stalks celery, diced (optional)
1 lb. lean ground beef
36 oz. plain tomato sauce
dried or fresh basil, to taste (I use about 1 Tbsp. dried)
crushed red pepper flakes, to taste (I use 1/2 tsp.)
salt and pepper, to taste

La Besciamela:
1/4 cup (1/2 stick) butter
4 Tbsp. flour
milk, enough to make a creamy sauce (I use 2-3 cups of 2% milk)
salt, to taste
nutmeg, to taste (I use 1/4 tsp.)

1-2 packages NO BOIL lasagna noodles (1 package of Barilla is usually enough)
FRESHLY GRATED Parmiagiano, Pecorino Romano, Mozzarella, and Asiago cheeses

DIRECTIONS
1. To make the Ragu sauce, heat olive oil in a large pan over medium high heat. Saute onion, peppers, garlic, carrot, and celery until soft. Add beef and cook until browned. Drain grease. Add tomato sauce and season with basil, red pepper, salt and pepper. Let simmer on the stove (the longer the better) or transfer to a crock pot set on low and let cook for about six hours.

2. When you are ready to assemble the lasagna, melt butter in a large pan over medium heat. Stir in flour until a thick paste forms. Whisking constantly, add milk to form a creamy sauce. Season with nutmeg and salt. Keep warm while assembling the lasagna.

3. Cover the bottom of a 9×13 pan first with a layer of ragu sauce. Next place a non-overlapping layer of pasta. Now another layer of ragu, then a sparse layer of besciamela, then cheese. Repeat as many times as you can fit into the pan. Top with a generous layer of cheese.

4. Bake in a 375 F preheated oven for 40 minutes lightly covered with foil. Remove foil and finish cooking for another 10-15 minutes. Let sit 10 minutes before serving. Buon appetito!

Fills a 9×13 pan.

(Recipe courtesy of Nick and Jenna Hatch)

Southwest Egg Rolls with Avocado Dipping Sauce

July 14, 2009

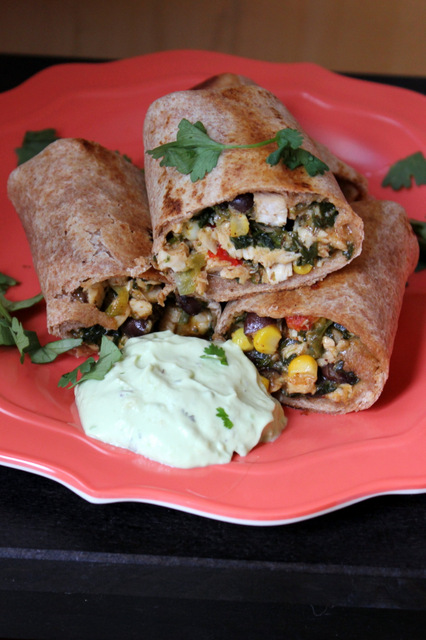
southwest egg rolls

Yum, yum, yum! I, excuse me, we (my entire family) love these Mexican “egg rolls”. Family tradition dictates that for our Christmas Eve dinner we serve an array of appetizers and treats. This past 24th of December I debuted this recipe and it was a smashing success! My younger sister Katelyn has been ferociously baking batches of them ever since. You must serve them alongside either avocado dipping sauce (not pictured) or chipotle spiked sour cream (both fabulous).

2/16/09: I suppose these Southwest Egg Rolls are technically an appetizer, but since no human being has ever been known to eat only one, we have turned them into a complete meal! Filled with an assortment of sauteed Southwestern ingredients, held together by oozing Jack cheese, and oven-baked-till-crisp in a butter-brushed tortilla shell, they will tantalize your taste buds and leave your stomach shouting for more. We make huge batches of them and store them in the fridge or freezer. This ensures that there will be leftovers galore-perfect to sneak when that can’t-quite-get-enough feeling overcomes us again. For a seriously greasy snack, try deep frying them.

Southwest Egg Rolls with Avocado Dipping Sauce

INGREDIENTS

Southwest Egg Rolls:
2 Tbsp. extra virgin olive oil
4 skinless, boneless chicken breast halves, cooked and diced
2/3 cup green onion, sliced
2/3 cup red bell pepper, minced
1 cup frozen corn kernels, thawed
1 can black beans, rinsed and drained
2/3 cup frozen chopped spinach, thawed and drained
1/4 cup diced jalapeno peppers, seeded and rinsed (1 medium sized)
3 Tbsp. minced fresh parsley (or 1 1/2 tsp dried)
2 tsp. ground cumin
2 tsp. chili powder
2 tsp. garlic powder (or 5 cloves fresh minced garlic)
1/4 cup fresh cilantro, chopped (or 1 Tbsp. dried)
1 tsp. salt
1/4-1/2 tsp. ground cayenne pepper (more or less to taste)
3 cups shredded Monterrey Jack or Cheddar cheese
20-30 (6-8 inch) whole wheat flour tortillas (depends on the size of your tortillas and how full you stuff them)

Avocado Dipping Sauce:
1 fresh avocado, smashed
1/4 cup mayonnaise
1/4 cup sour cream
1 Tbsp. buttermilk
1 1/2 tsp. white vinegar
1/8 tsp. salt
1/8 tsp. dried parsley
1/8 tsp. onion powder
1/8 tsp. garlic powder
1 dash dried dill weed
1 dash pepper

DIRECTIONS

1. Heat olive oil over medium heat. Add green onions and bell pepper and saute 5 minutes until tender.

2. Add diced cooked chicken, corn, spinach, black beans, jalapeno, parsley, cumin, chili powder, garlic powder, cilantro, salt, and cayenne pepper. Cook and stir 5 minutes until well blended and tender. Remove from heat and stir in cheese so it melts.

3. Place tortillas between two moist paper towels and microwave 30 seconds-1 minute until hot and pliable.

4. Spoon even amounts of mixture onto each tortilla. Fold in ends of tortilla, then roll tightly around mixture. Arrange in a medium dish, cover, and store in the freezer or refrigerator. Chilling them for several hours before baking helps hold them together, but is not absolutely necessary. They keep well frozen, and can be placed directly in the oven.

5. Butter a baking sheet and place rolls evenly on the pan. Brush them with melted butter.

6. Bake rolls at 375 F for 20-25 minutes, until golden brown and the edges begin to crisp, rotating them every 10 minutes.

7. Remove them from the oven and allow them to cool for several minutes before slicing in half. Serve with Avocado Dipping Sauce and garnish with chopped onion and tomato.

8. To prepare sauce combine all ingredients in a small bowl and whip until creamy. Store in an airtight container in the refrigerator until ready to serve.

Makes 20-30 rolls.

(Adapted from Recipe Zaar)

Chicken Tortilla Soup

July 8, 2009

For my parents’ birthdays this weekend I prepared a Mexican Feast. For the main course I debuted my original Chicken Tortilla Soup! I have had many versions of this dish and I finally decided to create my own that Incorporated all of my favorite aspects of each. My family loved it and I was elated that it turned out so well on my first try! I provided an array of toppings… such as sharp cheese, tangy sour cream, and bright cilantro, that further enhanced the flavor and flair of this soup! While it is absolutely delicious as is, if you like it spicy you could add some diced jalapeno or cayenne pepper. Boiling a whole chicken might take some time, but it provides for the juiciest meat and top notch stock. If you are in a hurry you could substitute diced cooked chicken breast and canned chicken broth, but the results won’t be as phenomenal (and watch out for the sodium content in your broth). Adobo seasoning is my “secret ingredient”! While the ingredients might vary by brand, mine contains salt, garlic, onion, black pepper, oregano, bay, and turmeric. It is available at most grocery stores (although my specific version comes from Whole Foods). Next time I might use fresh diced/pureed tomatoes in place of the canned, but otherwise I’m sticking to this recipe for good!

INGREDIENTS
1 3 lb. chicken, giblets removed
water, enough to cover chicken for boiling and create at least 6 cups of stock
2 cans black beans, drained and rinsed
1 can whole kernel corn, drained
28 oz. can crushed tomatoes (I used fire-roasted)
4 oz. can diced green chiles
2 Tbsp. extra virgin olive oil
1 large onion, diced
4 cloves garlic, minced
1 tsp. Adobo seasoning (I purchase this brand)
1 tsp. ground cumin
1 tsp. chili powder
1/2 tsp. paprika

salt and freshly ground black pepper, to taste

pinch cayenne pepper, to taste
To garnish:
sharp Cheddar or Monterrey Jack cheese
fresh cilantro, chopped
sour cream
green onions, sliced
avocado, sliced
tortilla chips
DIRECTIONS
1. Place chicken in a large pot. Cover with water (at least 8 cups) and bring to a boil. Boil for 40 minutes, or until the chicken is no longer pink and the juices run clear.
2. Take the pot off of the stove. Remove chicken from the pot and set aside to cool. Strain the stock and allow it to cool to room temperature. Once the chicken has cooled, remove the meat from the bones. Store the stock and chicken meat in the refrigerator until you are ready to use them (can be several hours or overnight). Before using the stock, skim the fat off the surface. Shred or dice the chicken before use.
3. Heat olive oil in a large pot over medium heat. Add onion and cook until translucent. Add garlic and cook for about a minute. Stir in the Adobo, cumin, chili powder, and paprika and cook for another minute. Add 6 cups of chicken stock, the black beans, corn, tomatoes (I dumped in one can of beans whole and pureed the second in a blender for a creamier consistency.), green chilies, and chicken.
4. Bring to a boil and then reduce heat to medium-low and simmer for at least 15 minutes. Season to taste with salt and freshly ground black pepper and cayenne.
5. Serve hot and garnish with a selection of Cheddar or Monterrey Jack, fresh cilantro, sour cream, green onions, avocado, and tortilla chips.

Serves 8.

Oreo Sandwich Cookies

July 5, 2009


It has taken me five days to get around to finishing this post. These last two weeks of school (before a glorious summer break) have been the busiest yet. Why is it that teachers like to throw everything at you at once? I have a final tomorrow morning that I should be studying for right now. That or practicing giving a physical examination that I have to record to DVD next week. But instead I’ve got my laptop propped on the end of an examination table in our clinical lab, next to the otoscope and blood pressure cuff, avoiding productivity for just a few more minutes.

Food is my creative escape from this sterile world of hospital gowns and surgical gloves. I want to be a nurse. I signed up for this. But some days I want to be a the girl who doesn’t think about food as a measure of input and output. I’ll never again be able to eat a cinnamon bun without thinking about its spiking affect on my blood glucose. This heightened level of awareness is keeping me healthy, but it can be irritating.

Since adopting a natural foods diet, there are several treats we miss. I miss my daily Fiber1 Bar (they are way too tasty to actually be good for you). Dustin longs for his favorite packaged cookies: Keebler Fudge Sticks, Nutter Butters, and Oreos. When I came across this recipe I was super excited! Homemade Oreos! I was not expecting to be wowed, but Dustin and I both agreed (and he is the expert) that these are far superior the to Nabisco brand! The outer cookie is soft and chewy (and stays so stored at room temperature for a few days) and perfect with the fluffy frosting filling. Pour a glass of milk, pile up a plate of cookies, dip, and devour.

INGREDIENTS
For the chocolate cookies:
1 1/4 cups all-purpose flour
1/2 cup unsweetened cocoa
1 tsp. baking soda
1/4 tsp. baking powder
1/4 tsp. salt
1 cup sugar
1/2 cup plus 2 tablespoons (1 1/4 sticks) unsalted butter, room temperature
1 large egg

For the filling:
1/4 cup (1/2 stick) unsalted butter, room temperature
1/4 cup non-hydrogenated shortening (suggested: Spectrum organic shortening made with palm oil)
2 cups confectioners’ sugar, sifted
2 tsp. vanilla extract

NOTE: While I try not to use shortening, it is essential in this case to maintain the consistency of the filling. If you were to use butter or oil it wouldn’t keep its shape at room temperature (and would alter the taste.)

DIRECTIONS
1. Preheat oven to 375 F.

2. In a food processor or electric mixer (this could be done by hand as well), thoroughly mix the flour, cocoa, baking soda, baking powder, salt, and sugar. With the motor running on low add the butter and then the egg. Continue mixing until the dough comes together in a big ball.

3. Spoon rounded teaspoonfuls onto parchment lined baking sheets (giving them room to spread). Slightly flatten them with the tips of your fingers. Bake in the preheated oven for 9 minutes. Remove from the oven to cool on a wire rack.

4. To make the filling, cream butter and shortening at low speed, gradually beating in the sugar and vanilla. Turn mixer to high and beat several minutes until light and fluffy.

5. To assemble the cookies, spoon frosting into a piping bag (or a Ziploc with the corner cut off works just as well). Pipe dots of filling onto the center of half of the cookies. Place a second cookie (that is the same size) on top and press down gently so the filling spreads to the sides. Continue assembling all of the cookies and enjoy!

Makes about 2 dozen sandwich cookies.

(Adapted from Smitten Kitchen)

Pizza Margherita

July 2, 2009

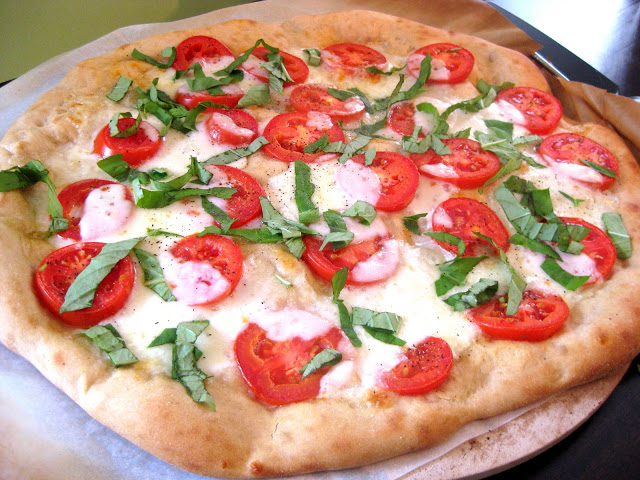
Once upon a time in a land far far away, the Kingdom of Italy was ruled by a king and his Queen Margherita. During Margherita’s reign a gifted artisan baker crafted a pizza “whose red tomatoes, green basil, and white cheese represent the Italian flag”. The queen so loved the pizza that it was named Margherita in her honor (which actually means “daisy” in Italian). This traditional pizza is served to this day in Italy, and throughout the world. (This story brought to you by Wikipedia.)

I thank Queen Margherita for her good taste, without which I would not be enjoying such a fantastic pizza today. Like is the focus of most Italian food, pizza Margherita is all about using the freshest ingredients. You need four simple, fresco ingredients: tomatoes (Romas preferred), basil leaves, extra virgin olive oil, and mozzarella. Don’t even think about using the bagged or pre-shredded or low moisture/low-fat cheese. You need a ball of fresh, moist, luxurious mozzarella. It’s the only way.

A slice of this breathtaking pizza will take you back to Naples…back to the birthplace of a culinary masterpiece that has found its way into your kitchen.

INGREDIENTS
1 recipe pizza dough
Roma tomatoes, sliced (enough to cover surface of pizza)
handful fresh basil leaves, chopped
8 oz. fresh mozzarella, sliced
1 Tbsp. extra virgin olive oil
salt and freshly ground pepper
balsamic vinegar + extra virgin olive oil, for dipping

DIRECTIONS
1. Prepare pizza dough according to directions.

2. Preheat oven and pizza stone to 450 F.

3. Brush crust with olive oil. Layer tomatoes and mozzarella over crust. Season with salt and pepper.

4. Bake in preheated oven for 10-12 minutes until crust is golden brown and cheese is bubbling. Remove from the oven and sprinkle with basil.

5. (Optional) Serve with a mixture of balsamic vinegar and olive oil for dipping.

Makes 1 pizza.